Open, view and navigate
Open your drawings, get the view you need and move around a set quickly: zoom, page layouts, split views, search, and display aids for long reviews.
- You'll learn
- How to open files, zoom, move between pages, split the view and search.
- Fit to the window
- Fit Page Ctrl+9 · Fit Width Ctrl+0
- Find text
- Search panel Alt+1, or Edit ▸ Advanced Search… Ctrl+Shift+F
Open files
To open a drawing
- Choose File ▸ Open Ctrl+O.
- Select one or more files and click Open.
Each file opens in its own tab.
Other ways in: File ▸ Open Recent lists your 20 most recent files, the File Access panel keeps recent and pinned files, and you can drag files from your desktop onto the window. Opening a file that's already open just brings its tab forward.
What opens
| You open | What happens |
|---|---|
| A PDF | It opens in a tab. A damaged file is repaired as it opens, and Document Properties lists the repairs. |
| An image: .png, .jpg, .jpeg, .tif, .tiff, .gif, .bmp, .jp2, .j2k, .jpx | It becomes a new, unsaved PDF named after the image: photo.jpg opens as photo.pdf. Save asks where to put it. |
| A text file: .txt, .text | The same: a new PDF of the text. |
| A Set (.bex) | It opens in the Sets panel. See Sets and drawing logs. |
| Tool sets (.btx), style sets (.blx, .bhx), Profiles (.tpx) | They're imported into MarkupRight. |
| Office or CAD files | They don't open: "… isn't a PDF, an image or a text file". Print or export them to PDF first. |
A password-protected PDF asks for its password ("Password Required"). If another program is holding the file, File in Use offers Open Read-Only: you can still review it, but only Save As keeps your changes.
Drag and drop
- Drop PDFs, images or text files anywhere on the window to open them. Other kinds of file are refused.
- Drop PDFs on the Thumbnails panel to insert their pages where you drop them (see Thumbnails).
- An image dropped on a markup becomes that markup's photo; dropped anywhere else, it opens as a new PDF. Preferences ▸ Import/Export ▸ Images ▸ Image Drag/Drop Behavior can make it an Image Markup or always Create PDF instead.
Every open file has a tab; a dot (•) after the name means unsaved changes. See Document tabs.
The File Access panel
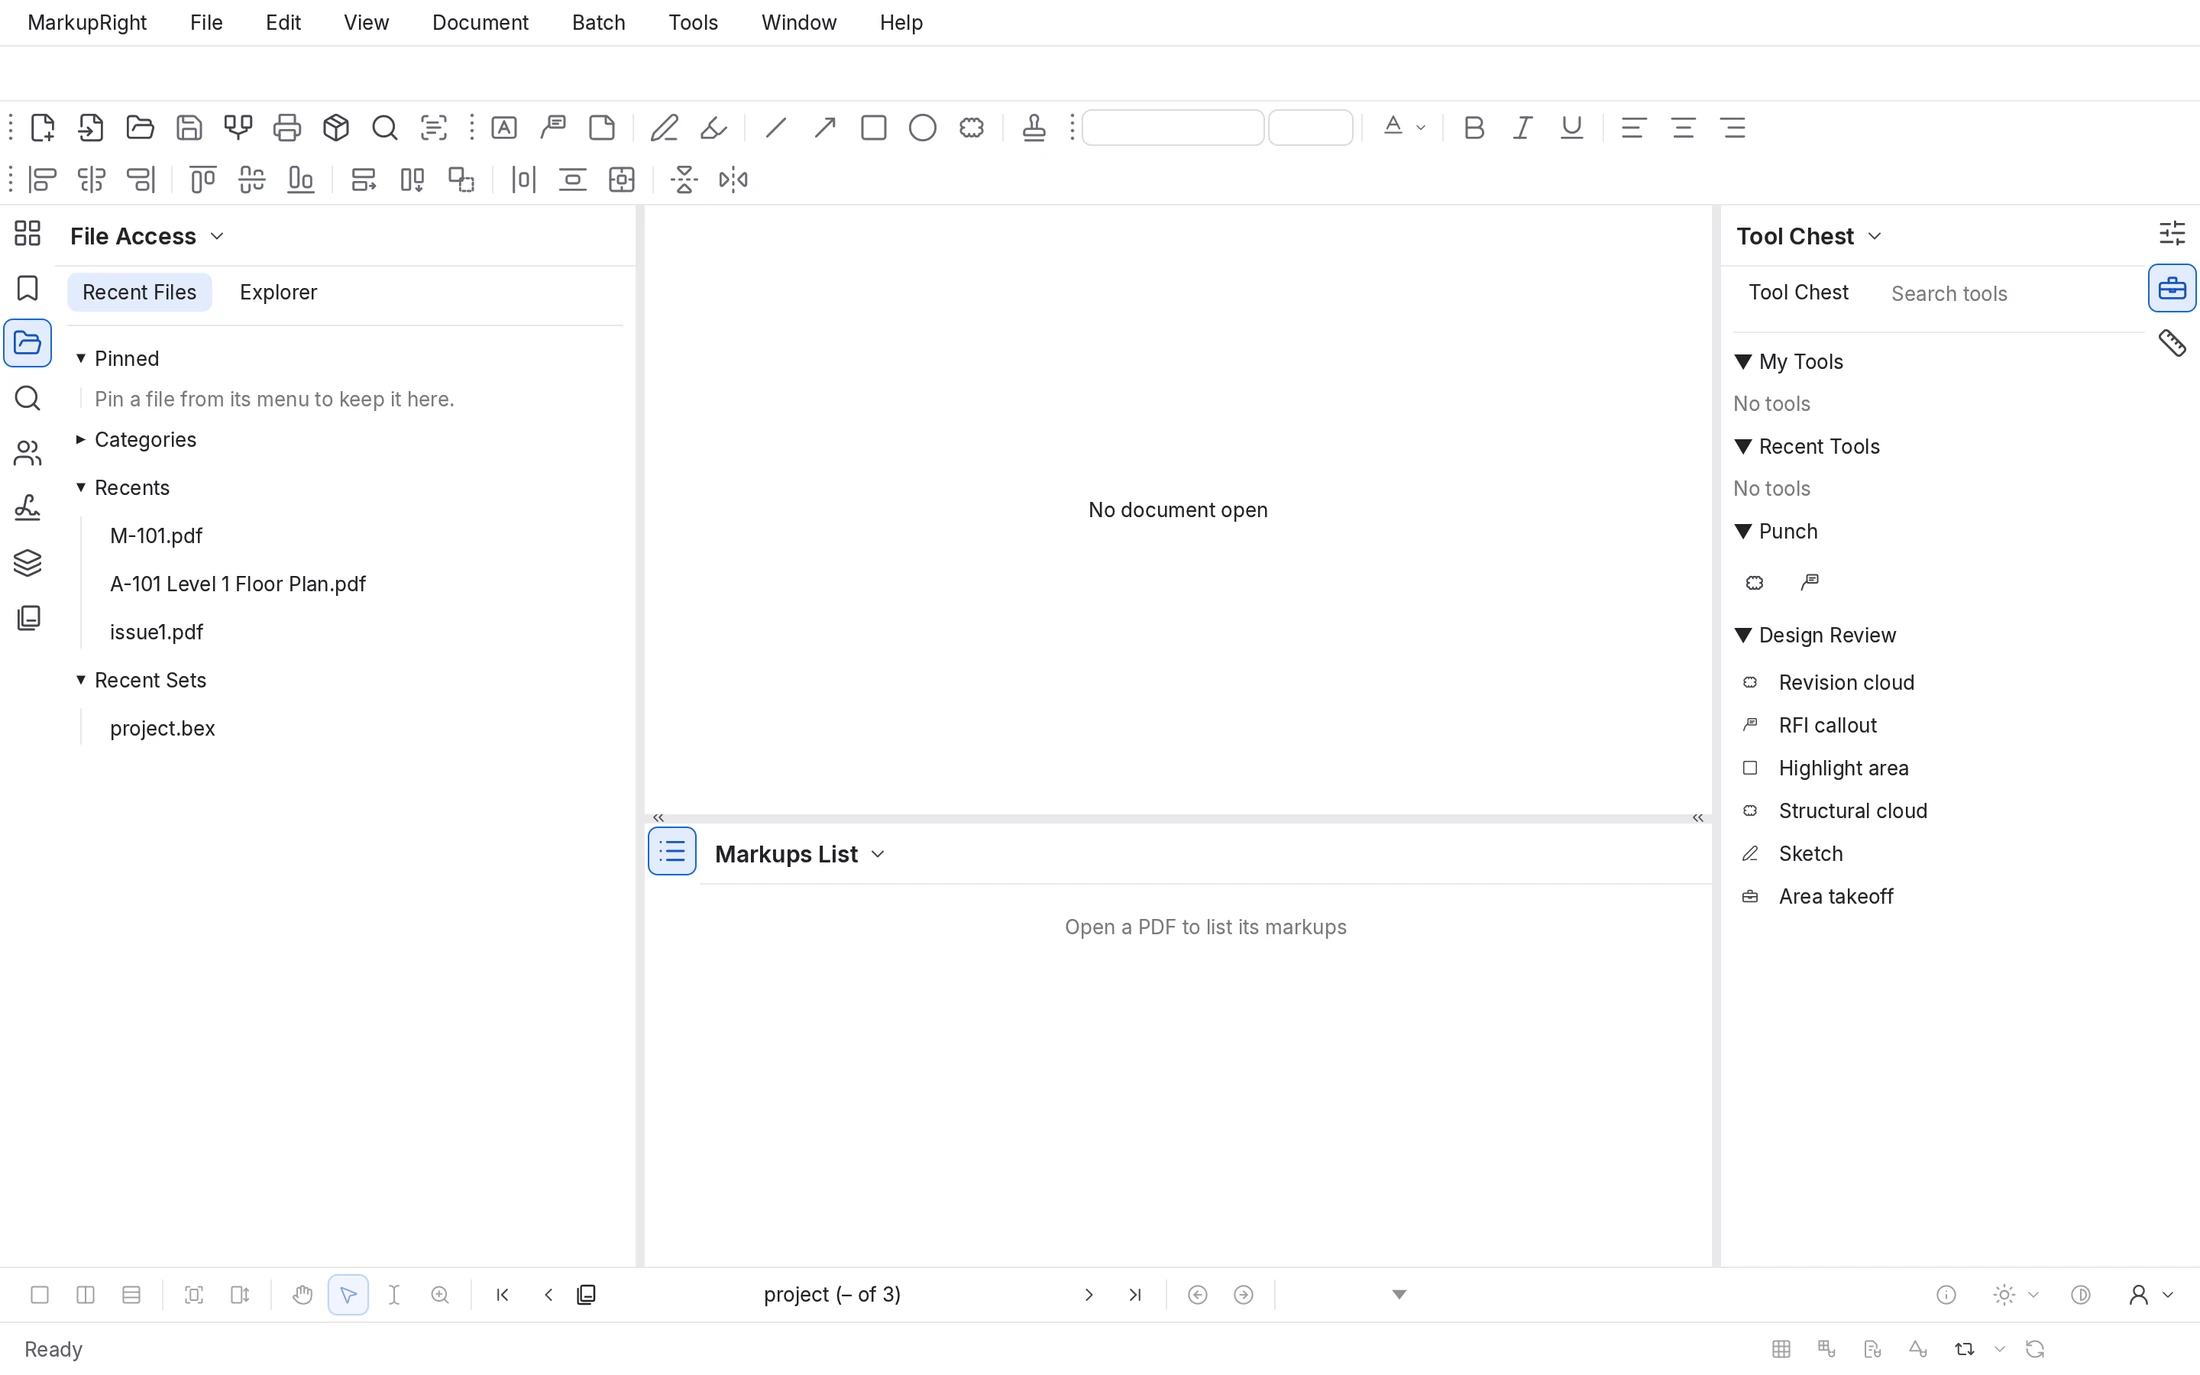
File Access Alt+A keeps your recent and pinned files and lets you browse folders without leaving MarkupRight. It opens on the left at startup while Preferences ▸ General ▸ Options ▸ Show Recent Files on Startup is on.
 1
2
3
4
- Recent Files and Explorer. The panel's two modes.
- Pinned. Files you pinned, always at the top.
- Recents. The files you opened last, newest first. Hover over one to preview its first page.
- Recent Sets. Drawing sets you opened.
Categories, folded under Pinned, groups your recent files by folder. Double-click a file to open it, or right-click it for Open, Open Folder, Pin (or Unpin), Remove and Clear Recents…, which empties the list but keeps pinned files.
Explorer browses your folders, with Back, Forward and Up, New Folder, Pin folder, a PDF / Documents / All filter and a Path field. Places lists your drives and Pinned your pinned folders (File ▸ Pin Folder to File Access… adds one too). Double-click to open; right-click for Open, Open Folder, Rename, Delete and Properties.
It deletes the file from disk: "… will be deleted permanently from disk. This cannot be undone." It doesn't go to the Trash or Recycle Bin. Cancel is the default button, and folders can't be deleted here.
Preferences ▸ Interface ▸ File Access sets how many files Recents keeps (20, up to 100) and for how many days (90).
Zoom and fit
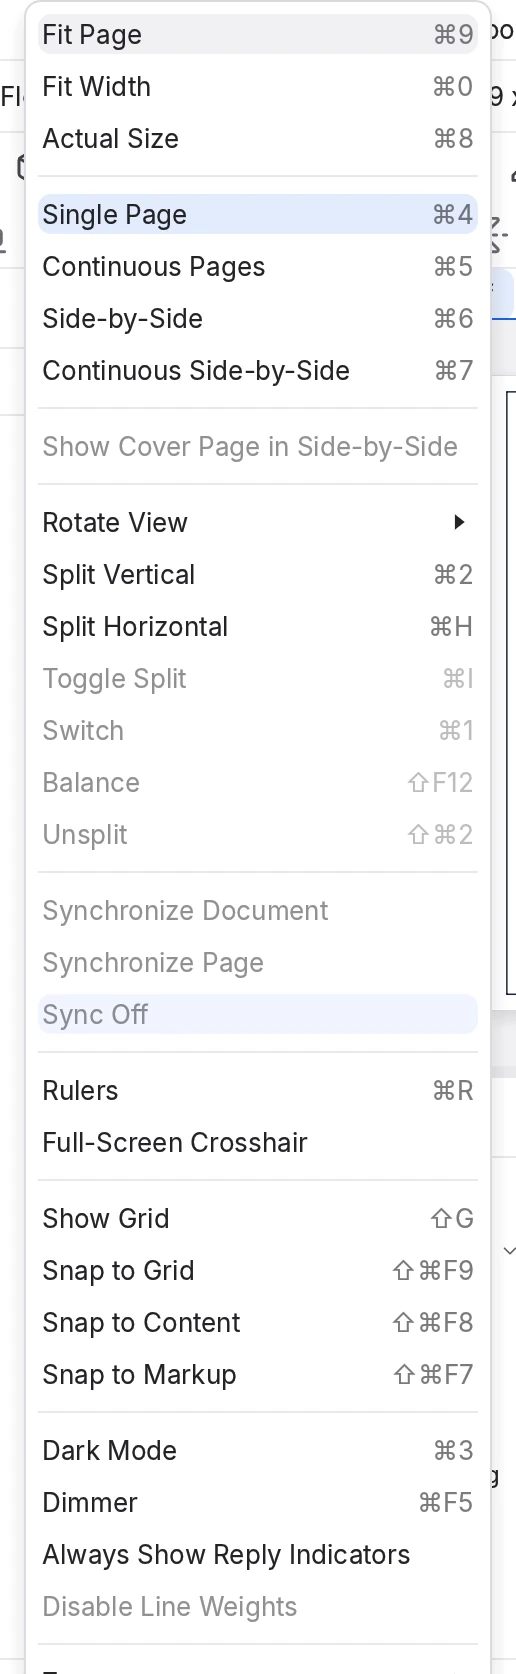
| Command | Shortcut | What you see | |
|---|---|---|---|
| Fit Page | Ctrl+9 | The whole page in the window. | |
| Fit Width | Ctrl+0 | The page's width fills the window. | |
| Actual Size | Ctrl+8 | 100%: the page at its printed size. | |
| Zoom In | Ctrl+Plus | One step closer. | |
| Zoom Out | Ctrl+Minus | One step back. |
The zoom box in the navigation bar offers levels from 8% to 6400%, and View ▸ Zoom lists the same presets. The Zoom tool Z zooms to a rectangle you drag; a click zooms in a step, and a click with Ctrl held zooms out. Toggle Zoom Shift+Z switches to the Zoom tool and back to the tool you were using.
Mouse wheel and trackpad
- The wheel scrolls. On Single Page, when the page fits, each notch (or trackpad swipe) turns one page.
- Turn the wheel with Ctrl held to zoom around the pointer. On a trackpad, pinch.
- Double-click the middle mouse button for Fit Page; hold it and drag to pan.
- In Preferences ▸ General ▸ Navigation, Single Page Mode and Continuous Mode choose whether the wheel scrolls (the default) or zooms.
A trackpad swipe always scrolls sideways. The wheel with Shift held, or a tilting wheel, does so only after you turn on Enable Horizontal Scrollbar and Enable Horizontal Mouse Wheel on the same page.
Page layouts and rotation
| Layout | Shortcut | Shows | |
|---|---|---|---|
| Single Page | Ctrl+4 | One page at a time. | |
| Continuous Pages | Ctrl+5 | Pages one after another in a scroll. | |
| Side-by-Side | Ctrl+6 | Two pages at a time. | |
| Continuous Side-by-Side | Ctrl+7 | Pairs of pages in a scroll. |
Show Cover Page in Side-by-Side puts page 1 on its own, like a book cover. The navigation bar's One Full Page and Scrolling Pages buttons switch between page-by-page and continuous.
New documents pick a layout for you. With Preferences ▸ General ▸ Document ▸ Page Layout at Auto Detect by Page Size, pages longer than 14 inches, such as drawing sheets, open on Single Page at Fit Page; smaller pages, such as specifications, open Continuous at Fit Width.
View ▸ Rotate View turns your view a quarter turn, clockwise Ctrl+Shift+Plus or counterclockwise Ctrl+Shift+Minus. Only the display turns; the PDF isn't changed. To rotate the pages themselves, see Pages and document tools.
Move between pages
The page field in the navigation bar shows where you are, such as "2 of 3", or "M-101 (2 of 3)" when the page has a label. Type a page number or a label, such as M-102, and press Enter. Input it doesn't understand flashes red and is undone. View ▸ Go To ▸ Go to Page… Ctrl+Shift+N puts the cursor in the field, so the navigation bar F4 needs to be showing.
| Keys | What they do |
|---|---|
| ← → | Previous or next page, in every layout. |
| Home End | First or last page. |
| ↑ ↓ | Scroll a line. On Single Page they turn the page at its top or bottom edge. |
| Page Up Page Down | Scroll a screen in continuous layouts; turn the page on Single Page. |
| Ctrl+Page Up Ctrl+Page Down | Always turn the page. |
| ⌘[ ⌘]Ctrl+[ Ctrl+] | Previous View and Next View. |
Previous View and Next View, also buttons in the navigation bar, step back and forward through the places you've looked at, like Back and Forward in a web browser. When a Set is open, the page arrows step through its sheets and the field accepts a sheet name, label or tag (see Sets).
Page keys work when the page has focus. Click the page first if you were typing in a panel.
Thumbnails and Bookmarks
Thumbnails Alt+T shows every page with its label and scale ("Scale Not Set" when it has none). Click a thumbnail to go to that page, and drag the Size slider to make them bigger. Dragging thumbnails moves pages, which changes the document: see Thumbnails.
Bookmarks Alt+B lists the document's bookmarks; click one to jump there. Document ▸ New Bookmark Ctrl+B bookmarks the current view, named after the page. Building bookmarks is covered in Pages and document tools.
Split views
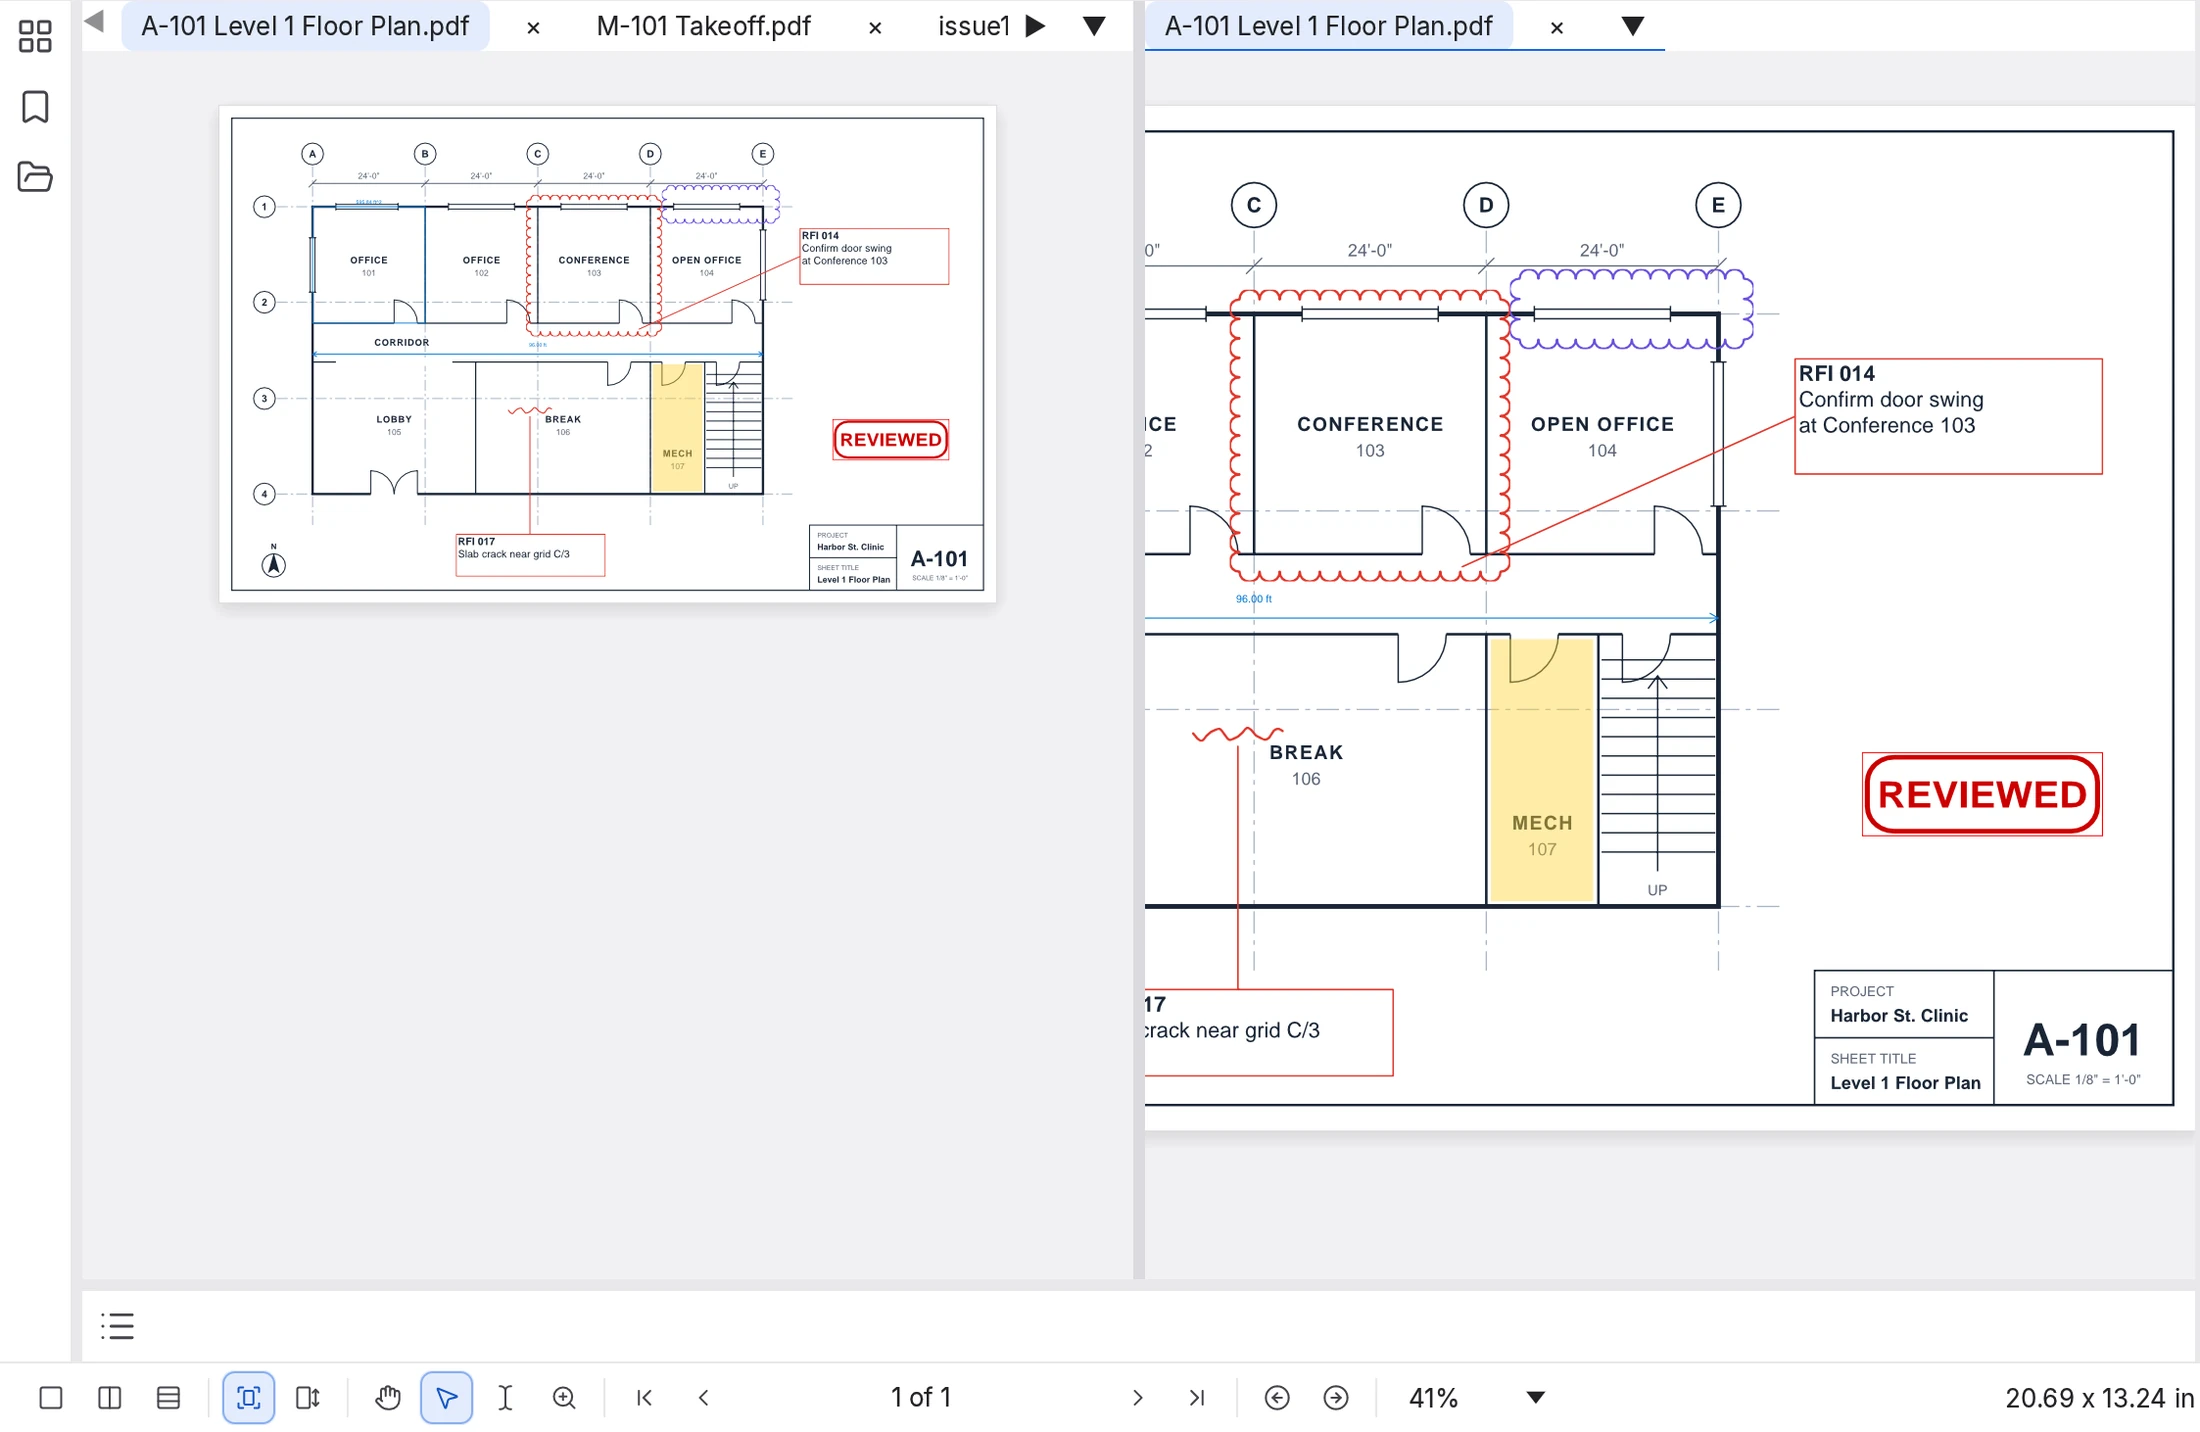
Split the document area to see two places at once: two sheets side by side, or the whole plan beside a close-up. Each split has its own tabs, page and zoom.
 1
2
3
4
5
- Left split. A-101 at Fit Page.
- Right split. A second view of the same sheet, zoomed in on its own.
- Splitter. Drag it to resize the splits.
- Tab strip. Each split has its own. Arrows appear when the tabs don't fit, and ▼ lists every open document.
- Split buttons. Unsplit, Split Vertical and Split Horizontal, at the left of the navigation bar.
| Command | Shortcut | What it does | |
|---|---|---|---|
| Split Vertical | Ctrl+2 | Two splits side by side. The new one shows a second view of the tab you're in. | |
| Split Horizontal | Ctrl+H | Two splits, one above the other. | |
| Toggle Split | Ctrl+I | Switches between side by side and stacked. | |
| Switch | Ctrl+1 | Moves to the next split. | |
| Balance | Shift+F12 | Makes the splits the same size. | |
| Unsplit | Ctrl+Shift+2 | Merges the split's tabs into its neighbor. |
You can also drag a tab to the outer edge of a tab strip to split that side. A window holds up to 16 splits.
To compare two issues side by side
- Open both issues, for example M-101 Issue 1 and Issue 2.
- Press Ctrl+2 to split the view.
- Drag the other issue's tab onto the new split's tab strip.
- Choose View ▸ Synchronize Document.
When you pan, zoom or change page in one split, the other follows.
To mark the differences automatically, use Compare and overlay.
Synchronize the views
Sync makes the other splits follow the one you're working in. Choose it from the View menu, or with the Sync button at the right of the status bar: click to turn it on or off, and use its ▾ to pick the mode.
- Synchronize Document: the other splits follow the page, the position on the page and the zoom.
- Synchronize Page: they keep their own page but follow the position and zoom, so you can line up two different sheets.
- Sync Off: each split moves on its own.
Synchronize Views and Synchronization Mode in Preferences ▸ General ▸ Navigation decide whether sync is on when MarkupRight starts.
Search
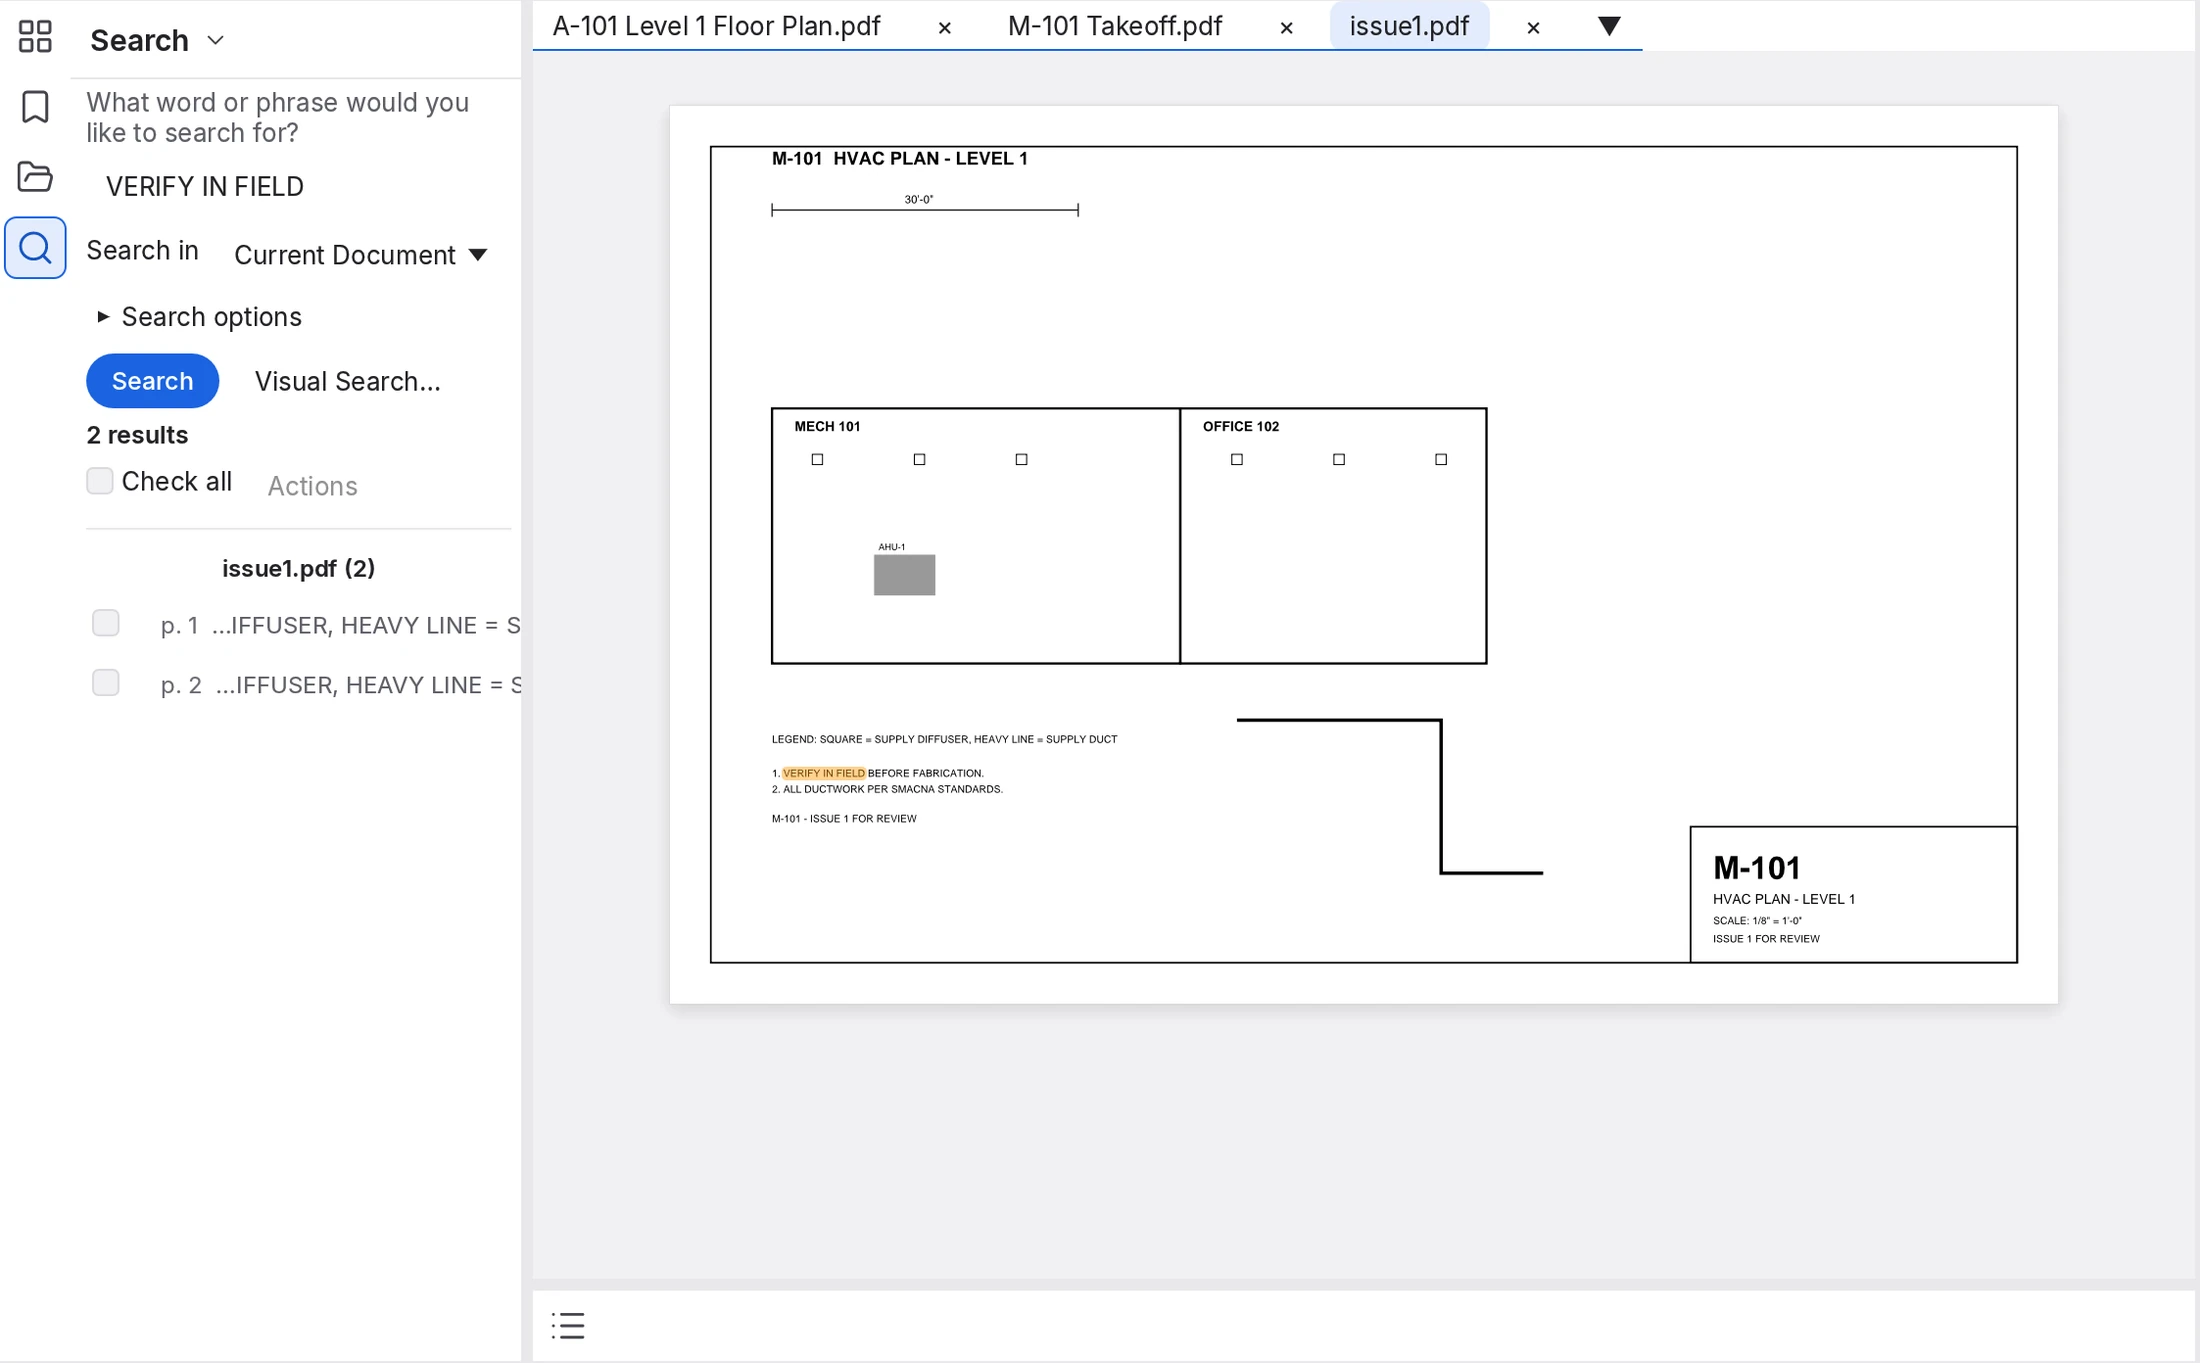
The Search panel finds words in the current page or document, in every open document, in a Set or in a whole folder, and lists every hit. Open it with Alt+1, Edit ▸ Advanced Search… Ctrl+Shift+F, or the Search button on the File toolbar.
 1
2
3
4
5
6
- Search text. A word or phrase. Press Enter to search.
- Search in. Where to look.
- Search options. What to look in, whole words and case.
- Check all and Actions. Do something with the results you tick.
- Results. Grouped by file, with the page of each hit.
- The hit. Click a result and MarkupRight goes to it, outlining the match for a moment.
To find text
- Press Alt+1 to open the Search panel.
- Type the words under "What word or phrase would you like to search for?".
- Choose where to look in Search in.
- Click Search.
"N results" appears with the hits grouped by file. Click one to go to it.
Search in offers Current Document, Current Page, All Open Documents, Current Set (while a Set is open), Recents (your recent files, open or not) and Folder (the PDFs in a folder you Browse… to, with Include Sub-Folders).
Under Search options, Pages and Markups (both on) search the page text and the text of markups; you can add Form Fields, Filenames and File Properties, and turn on Whole words only or Case-sensitive. There are no wildcards. A search stops at 10,000 hits and skips closed files larger than 512 MB.
Search finds nothing on a scan until you run Document ▸ OCR… (see Pages and document tools). Visual Search works on scans as they are.
Act on the results
Tick results, or Check all, then choose from Actions: Hyperlink, Mark for Redaction, Apply Count Measurement, Highlight, Underline, Squiggly, Strikethrough or Replace Checked (type the new text in Replace with and click Replace). Only text found on pages, and Visual Search hits, can be ticked. Tick every "VERIFY IN FIELD" hit and choose Highlight, and they're all marked at once.
To find a symbol with Visual Search
- In the Search panel, click Visual Search….
- Drag a rectangle around one example of the symbol, such as a diffuser or a door tag.
- Adjust Sensitivity if needed. Turn on Rotations to find it turned in 45° steps, Filter by Color to match its color, or Limit by Selection to look only inside the selected markups.
- Click Find, or Draw Again to pick a better example.
The matches are listed like text hits, from wherever Search in points. Tick them and choose Apply Count Measurement to count them (see Measure and take off).
Dark Mode and the Dimmer
Two different settings darken your screen:
- The app Theme (Preferences ▸ General ▸ Options ▸ Theme: System, Light or Dark) changes the MarkupRight window, not your drawings. See Light and dark.
- Dark Mode (View ▸ Dark Mode Ctrl+3, or the sun button in the navigation bar) changes the drawings: pages draw as light lines on black. It applies to every open document and to the ones you open later, until you turn it off.
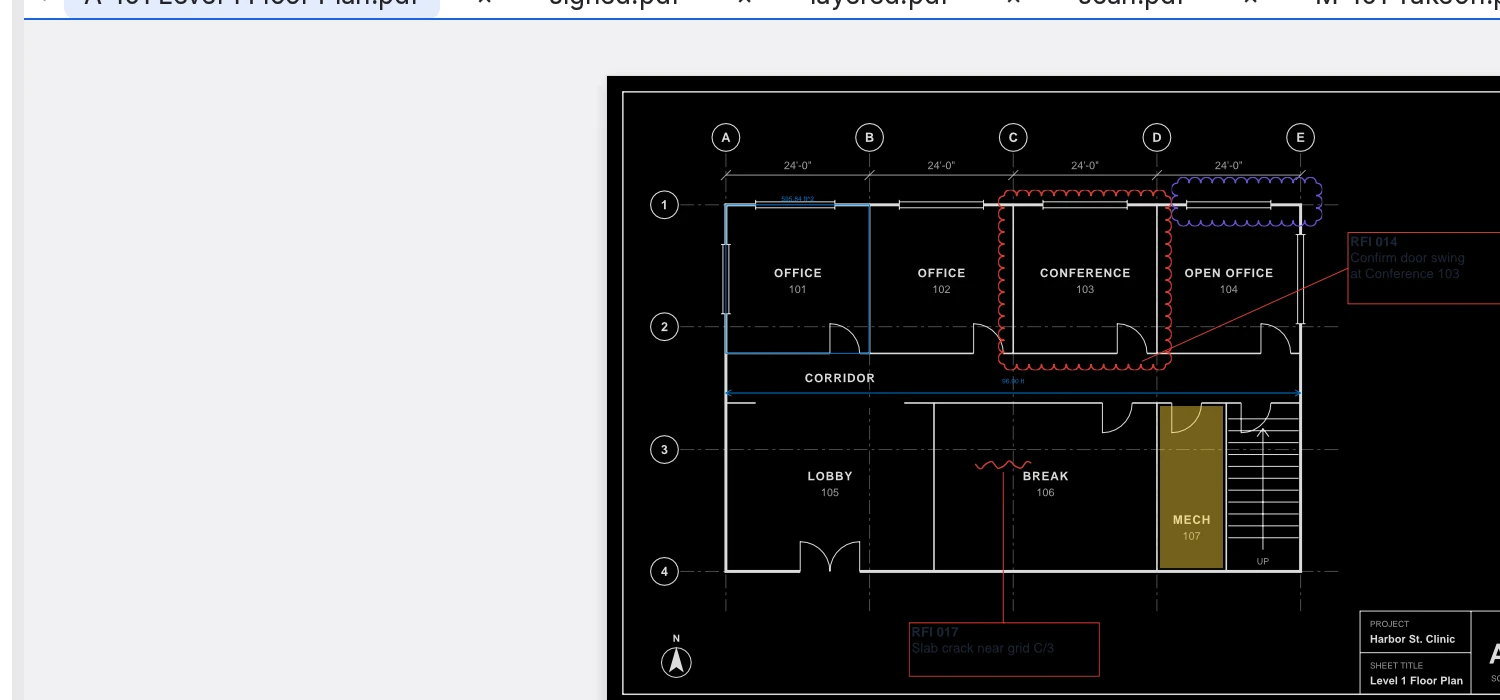
The Dimmer fades the drawing so your markups stand out; markups stay at full strength. View ▸ Dimmer Ctrl+F5 turns it on at the last amount (50% at first) and off again, and the Dimmer button in the navigation bar has a slider from 0 to 100%. The black behind Dark Mode can be changed in Preferences ▸ Advanced ▸ 2D Rendering ▸ Dark Mode Background Color.
Rulers, grid and crosshair
| View command | Shortcut | What it does | |
|---|---|---|---|
| Rulers | Ctrl+R | Rulers along the top and left, in inches from the page's top-left corner. They mark the pointer, the selection and snap points. | |
| Show Grid | Shift+G | A grid of dots, 0.25 inch apart unless you change Preferences ▸ General ▸ Grid & Snap. Snapping is in Mark up drawings. | |
| Full-Screen Crosshair | — | Hairlines across the whole window at the pointer, for lining things up across a sheet. | |
| Hide Markups | — | Hides every markup for a clean look at the drawing, until you turn it off or restart. Hidden markups don't print. |
Full Screen and Presentation
Full Screen (Window ▸ Full Screen F11) gives the drawing the whole screen. The menus, toolbars and status bar hide, panels shrink to their icon strips, and a small Full Screen toolbar floats at the top right with Select, Pan, the basic markup tools, Undo, Redo and Delete; its last button leaves Full Screen. Window ▸ Always On Top Ctrl+F12 keeps the full-screen window above other apps.
Presentation (Window ▸ Presentation Ctrl+Enter) shows one page at a time, fitted to the screen, with nothing else. For the next page, click or press ↓ or Page Down; for the previous page, right-click or press ↑ or Page Up.
Esc ends Presentation. In Full Screen, Esc just switches to the Pan tool: press F11 again, or click the Full Screen toolbar's last button, to get your window back.
Preferences ▸ Window ▸ Presentation has Loop After Last Page, Auto Advance with Auto Advance Every (5 seconds), Background Color, and Mouse Cursor (Hide After Delay, Always Show or Always Hide). On a Mac keyboard you may need to hold Fn for F11; the Window menu always works.
For power users Expert
- A second view of one document. Hold Ctrl as you drop a tab on another strip to copy it instead of moving it. Both views show, and edit, the same document.
- Detached windows. Drag a tab outside the main window, or right-click it and choose Detach. A detached window stays on top, can be split, and its tab menu offers Return to Main Window, Split and Sync with Main Window. Closing it brings its tabs back.
- Open from a script.
markupright A-101.pdf M-101.pdfopens the files in tabs; images and text files open as untitled PDFs. - Layouts and Profiles. If your Profile's view defaults (layout, zoom, rulers and their unit) differ from the built-in ones, the Profile wins over Page Layout. The ruler unit has no control in the app; it comes from the Profile.
- Interface size. MarkupRight follows your system's display scale; there's no control for it in the app. To override it, set
interface.ui_scale(0.5 to 3.0) inpreferences.jsonwhile MarkupRight is closed. - Preference keys.
navigation.wheel_single_page,navigation.wheel_zooms,navigation.sync_views,navigation.sync_mode,document.default_layout,document.max_zoom(caps the zoom box below 6400%),rendering.dark_mode,rendering.dark_background. - Automation. With
markupright mcp --app, an AI agent can drive the open window:view_set(zoom, fit, layout, rotation, page, dimmer),search_run,workspace_split,workspace_open_in_splitandworkspace_set_sync. See Command line and AI agents.