Compare and overlay
See what changed between two issues of a drawing. Compare Documents clouds every change on the new issue; Overlay Pages stacks the issues in contrasting colors so you can see both at once.
- You'll learn
- When to compare and when to overlay, how to tune a comparison, and how to review what it finds.
- Where
- Document ▸ Compare Documents… and Document ▸ Overlay Pages…
- Whole sets
- Batch ▸ Compare Documents… and Batch ▸ Overlay Pages… pair the sheets of two issues for you.
Compare or overlay?
Both tools look at the drawings as pictures, so they work on any PDF, scans included: they don't need text or CAD layers. They answer different questions:
| Tool | What you get | Best for | |
|---|---|---|---|
| Compare Documents | A cloud (or rectangle) around each change, added to the new issue as ordinary markups. | Working through the changes one by one: review, reply, accept or reject, and keep a record of what changed. | |
| Overlay Pages | A new document with each issue on its own layer, in its own color. | Seeing both issues at once: what moved, what's gone and what's new, however small. Works with more than two documents. |
Neither tool changes the issued files. Compare adds markups to the open new issue, which you choose whether to save; Overlay makes a new, unsaved document.
Compare two issues of a sheet
Marcus T. (general contractor) has Issue 2 of mechanical sheet M-101 and wants to see what changed since Issue 1.
To compare two issues of a sheet
- Open both issues,
M-101 Issue 1.pdfandM-101 Issue 2.pdf, and click the Issue 2 tab. - Choose Document ▸ Compare Documents…
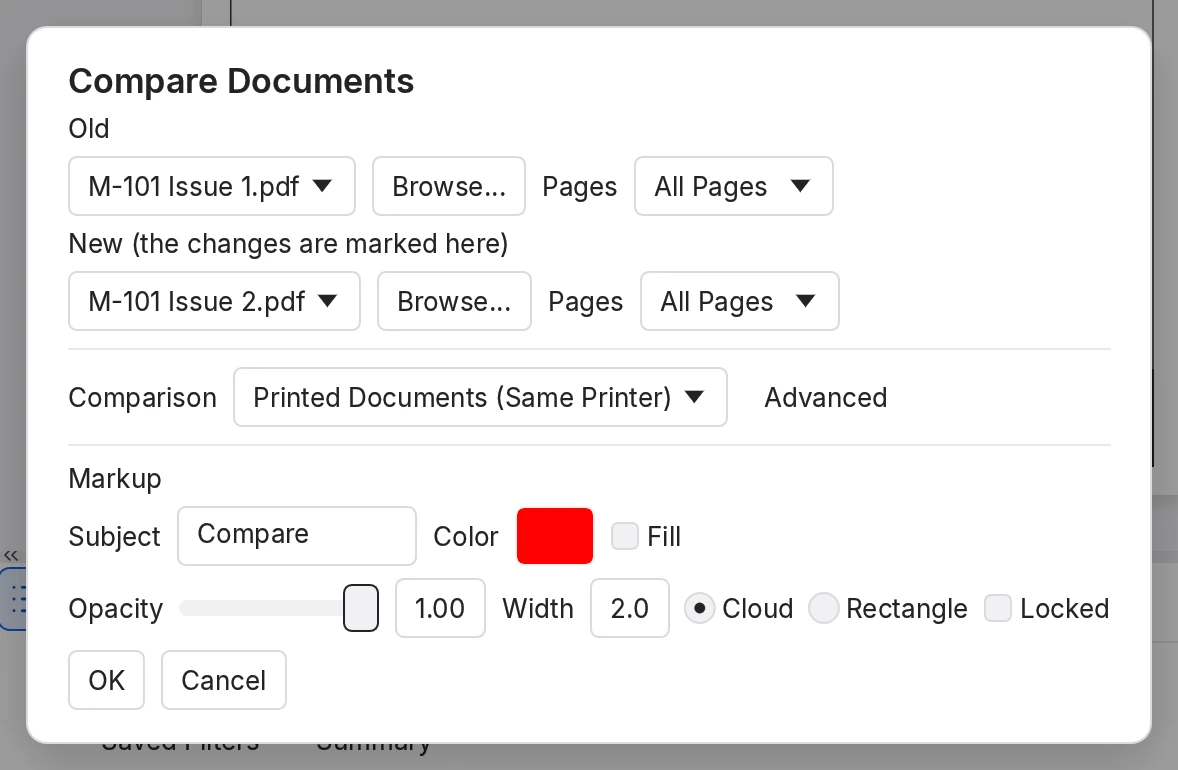
The dialog opens with the active document as New and another open document as Old.
- Under Old, choose
M-101 Issue 1.pdffrom the list, or Browse... for a file that isn't open. Leave both Pages at All Pages. - Keep the Comparison preset Printed Documents (Same Printer), and the red Cloud under Markup.
- Choose OK.
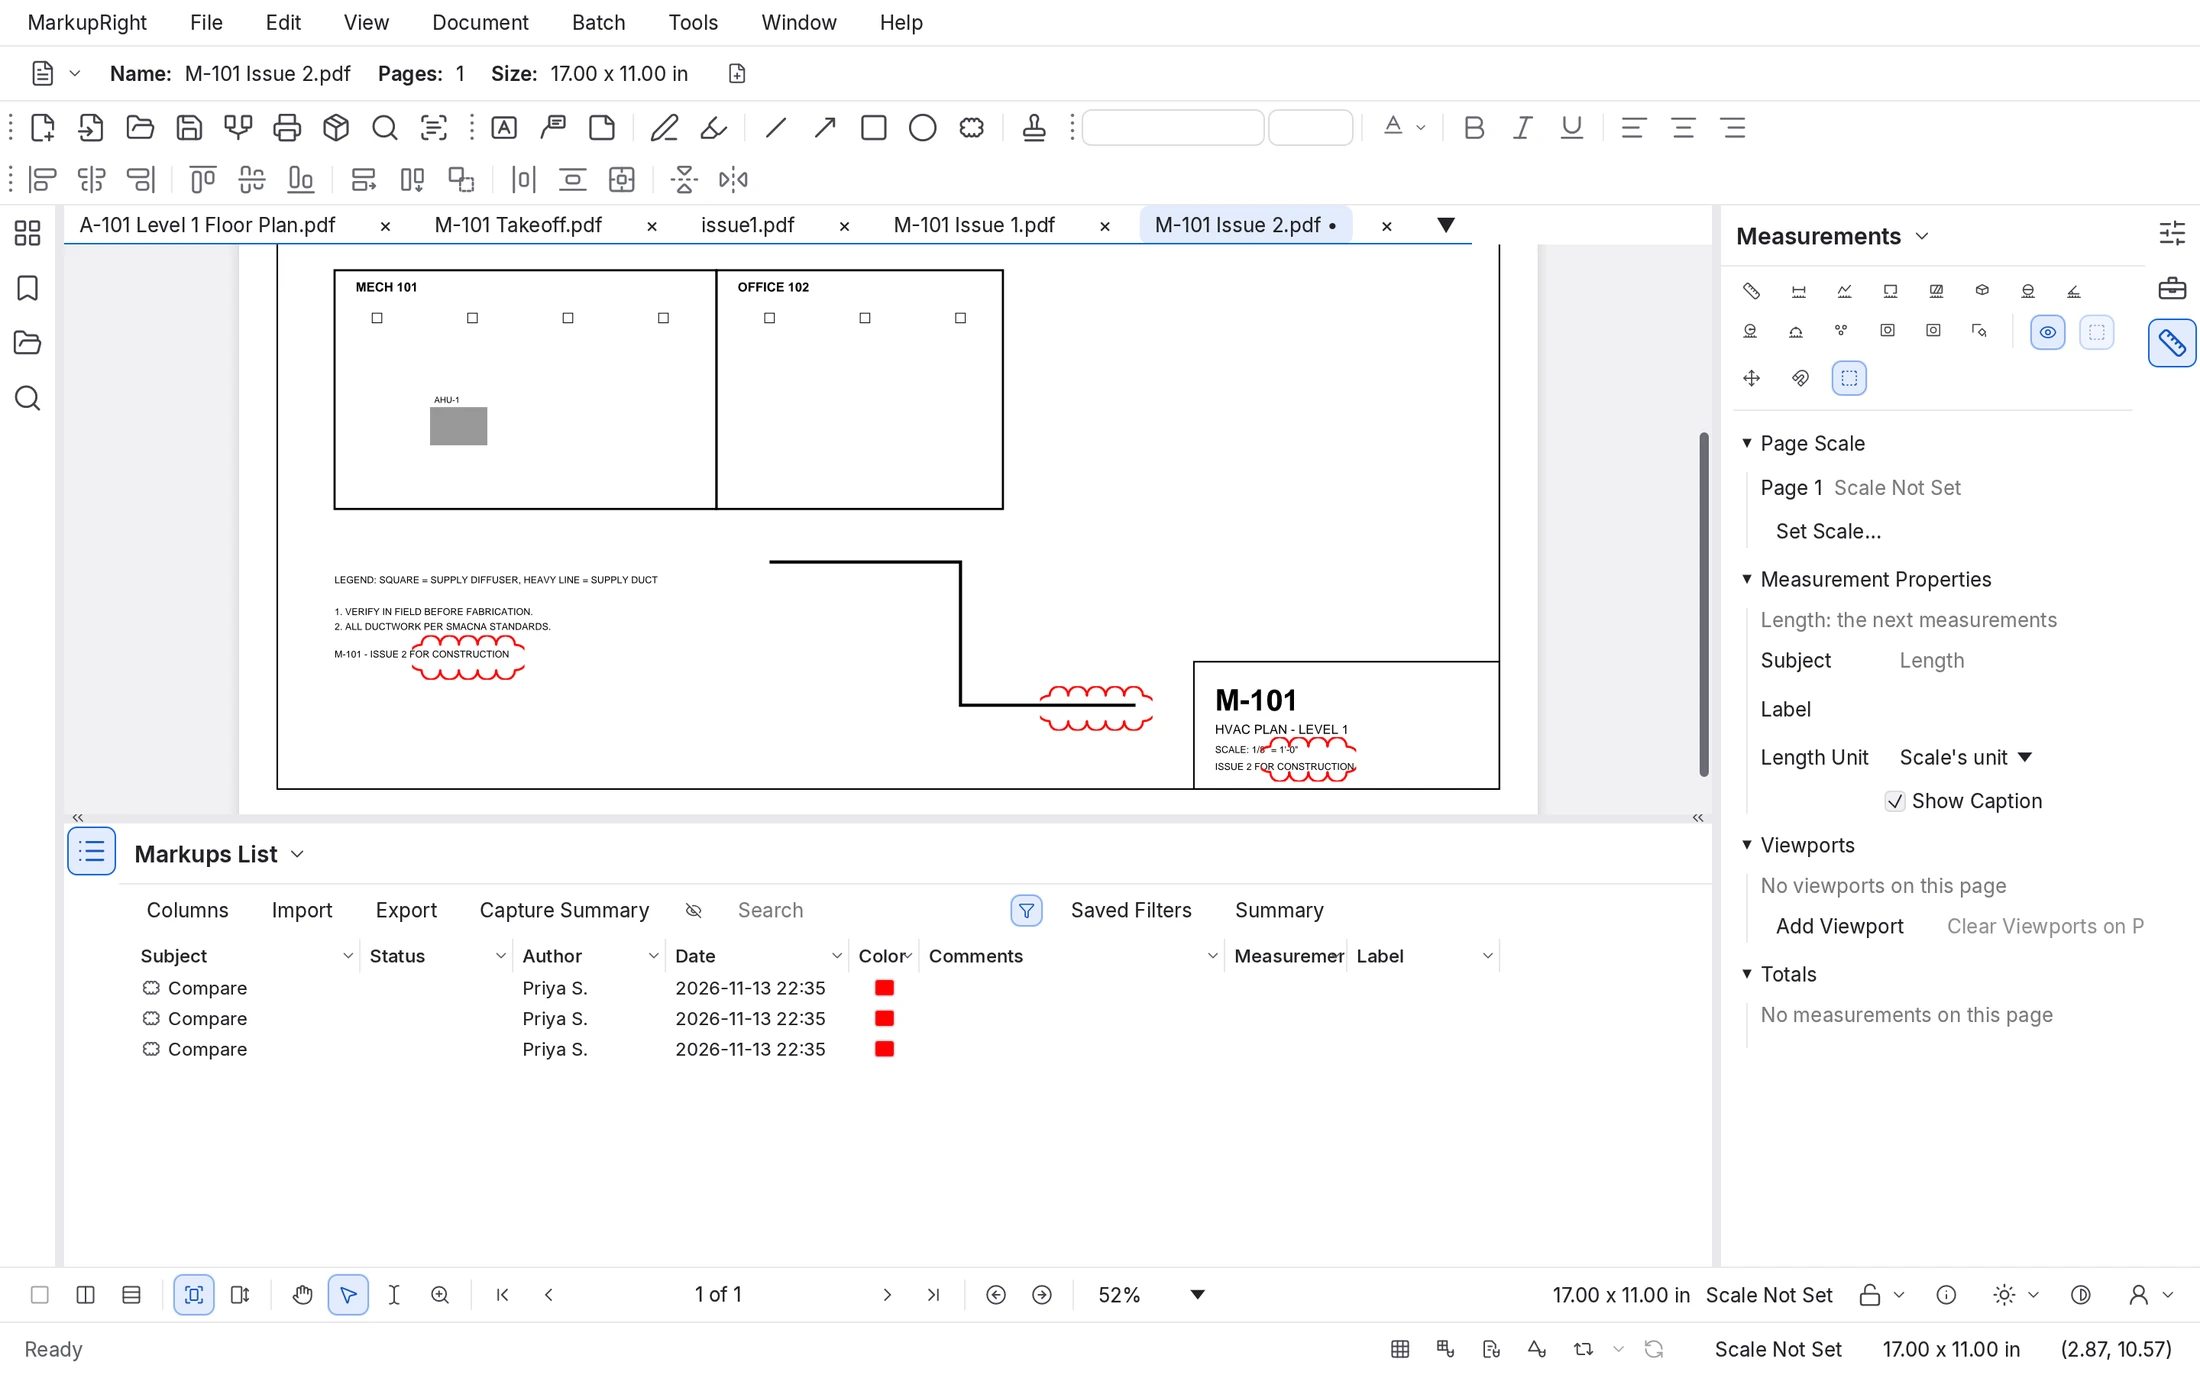
A notice reads "3 changes marked", and Issue 2 shows a red cloud around each change. If the issues match, the notice reads "No differences found".
 1
2
3
4
5
- Old. The earlier issue: an open document, or a file you browse to.
- Pages. Which pages of each side to compare.
- New (the changes are marked here). The later issue. It receives the clouds.
- Comparison and Advanced. A preset for how the drawings were made, and its settings.
- Markup. What a change becomes: Subject, Color, Fill, Opacity, Width, Cloud or Rectangle, and Locked.
Pages are compared in order: the first page chosen on each side, then the second, and so on. To compare one sheet with a sheet in a different position, set each side's Pages to that page, for example Current Page or Custom.
 1
2
3
4
5
6
- Changed note. The issue note changed from FOR REVIEW to FOR CONSTRUCTION.
- Extended duct. The supply duct runs further.
- Title block. The issue text changed here too.
- Not clouded. A fourth diffuser was added in MECH 101, but it was too small a change to count (see the tip below).
- Markups List. One row per cloud, with the subject Compare.
- Unsaved. The dot after the name: the clouds aren't saved yet.
Presets and Advanced settings
A comparison looks at both pages in small squares and counts how many pixels changed in each. The three presets set how forgiving that is. Choose the one that matches how the two issues were made:
| Setting | Printed Documents (Same Printer) | Printed Documents (Different Printer) | Scanned Documents | What it does |
|---|---|---|---|---|
| Grid Size | 32 px | 32 px | 48 px | The size of the squares the page is checked in. |
| Pixel Density | 10% | 15% | 25% | How much of a square must change for it to count. |
| Color Sensitivity | 20 | 30 | 45 | How far a pixel's color must change to count. A higher number ignores fainter differences. |
| Pixel Proximity Allowance | 4 | 6 | 8 | Changed squares this many squares apart join into one cloud. |
Choose Advanced to see and change these, plus:
- DPI: 72 or 144 (all presets use 144). Higher sees finer detail.
- Margin: a band along the page edges that's left out, 18 pt at first.
- Include Markups: off at first, so existing markups aren't reported as changes. Flattened markups are part of the page, so they're always compared.
- Page Align: Auto-alignment lines the new page up with the old by its content, which handles sheets that shifted when they were printed or scanned. Offset moves the new page by a distance you give, in points.
To keep your own settings, type a name in Save As and choose Save; it joins the Comparison list. Delete removes a saved one and Restore Defaults undoes your changes to the one chosen. Next time, the dialog starts with the comparison you last ran.
Read and review the clouds
Compare's clouds are ordinary markups. Each has the subject Compare, your name as author (the User in Preferences ▸ General ▸ Options), the date and the color you chose, and each is a row in the Markups List Alt+M.
- Go to a change by clicking its row: the view zooms to the cloud.
- Record your review with the row's Status (Accepted, Rejected, Completed…), a reply, or a better subject such as "Duct extended".
- Clear the noise by deleting clouds over differences that don't matter, such as a reprinted logo.
- See only the clouds by filtering the Markups List's Subject column to Compare.
- Start again with Ctrl+Z: all the clouds from one comparison are a single Undo step.
A change counts only when it fills enough of a square. In the sample comparison, the supply diffuser added in MECH 101 wasn't clouded. Before you rely on the clouds, look over the sheet yourself, and if you need finer results, open Advanced and try a smaller Grid Size or a lower Pixel Density (expect more clouds from noise). An overlay shows every difference, however small.
The clouds change the new issue in MarkupRight only. To keep the issued file as it came, use Save As to save the compared copy under a new name.
Overlay pages
Document ▸ Overlay Pages… makes a new document with one layer per file. Each layer draws its lines in its own color, with the paper left transparent. Where the issues agree, the lines lie on top of each other and look dark; a line in only one color is only in that issue.
To overlay two issues
- Open
M-101 Issue 2.pdfand choose Document ▸ Overlay Pages…The active document is the first layer, in red.
- Choose Add... and pick
M-101 Issue 1.pdf. (Add Open Files adds every other open document instead.)Issue 1 becomes the second layer, in blue.
- Keep the Alignment at Auto Align and choose OK.
A new document, Overlay, opens. Lines in both issues look dark; red lines are only in Issue 2 and blue lines only in Issue 1.
- Open the Layers panel Alt+L and untick a layer to see the other on its own.
Each row of the dialog is a layer, with its Layer name, File, Pages, Color and Background (keep that layer's white paper). Use Up and Down to change the order: the first row is the base the others are lined up with. Select Region limits a layer to part of its page; it needs the file to be open.
| Alignment | How the layers are lined up |
|---|---|
| Page Align | Page on page, as they are, with any rotation, scale or offset set in Edit Defaults. |
| Auto Align (default) | By the drawings' content. If a page can't be matched closely enough, it falls back to Page Align, and a notice names the page. |
| Manual Align | By three points you pick, the same three in the same order on each layer: choose the row's Points button and click them on its page. Use it for a sheet reissued at another size or scale. |
Edit Defaults… sets the layer colors (red, blue, green, purple, orange and teal at first), Background, Opacity, the Auto Align Limit, and Page Align's Rotation, Scale and Offset. With Advanced Color Shading on, as it is at first, lines the layers share read darker; off, each layer covers the ones before it.
Compare whole sets
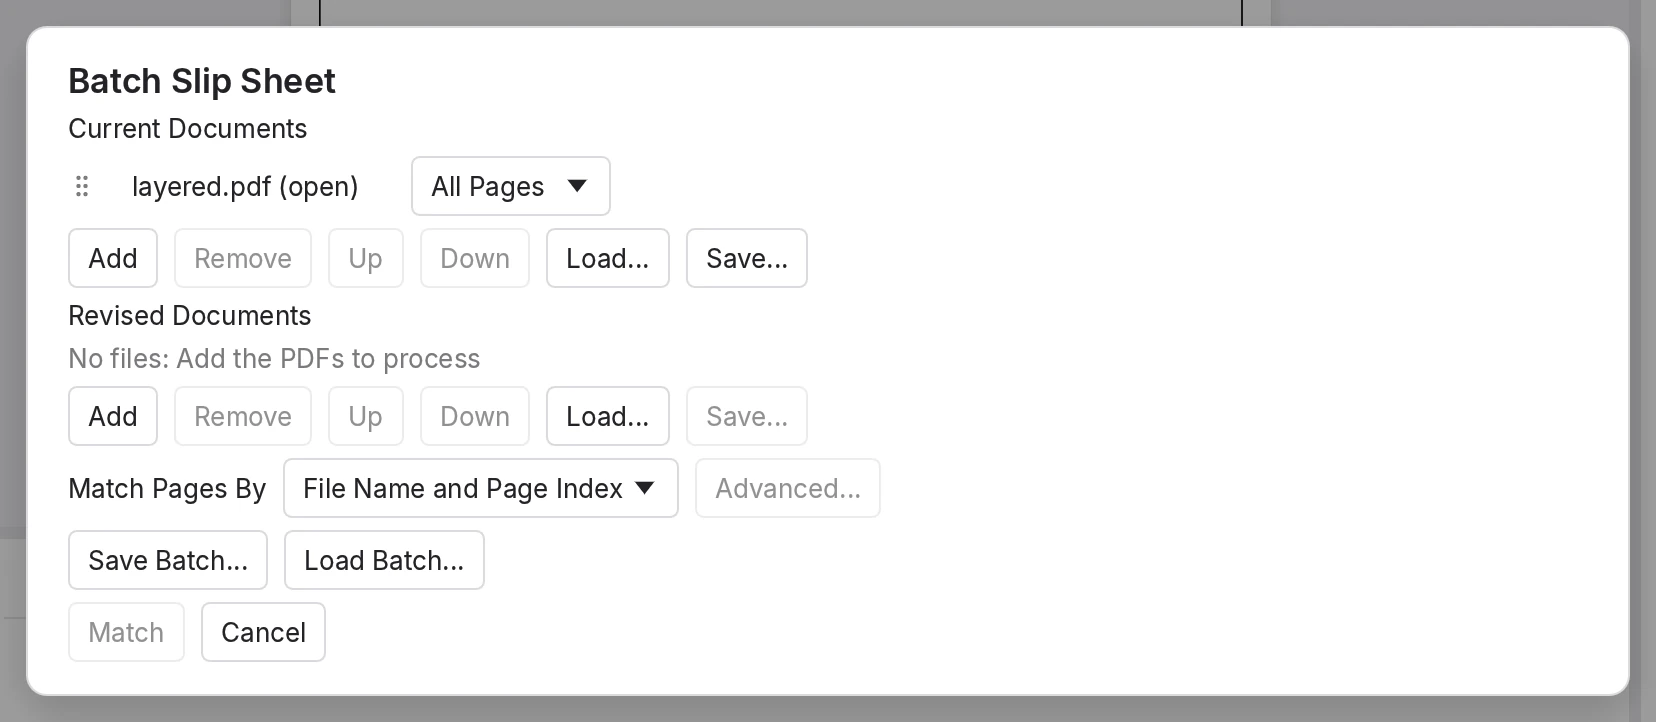
When a new issue of a whole set arrives, Batch ▸ Compare Documents… and Batch ▸ Overlay Pages… pair each current sheet with its revision and process every pair. Both start with the same Files step:
 1
2
3
4
5
- Current Documents. The issue you have, each file with its pages.
- Revised Documents. The new issue.
- Match Pages By. How sheets are paired (below).
- Save Batch... and Load Batch... Keep both lists in one
.bcxfile to reuse. - Match. Pairs the pages and moves on, once both lists have files.
| Match Pages By | Pairs a current page with a revised page that has |
|---|---|
| File Name and Page Index | The same file name and the same page position. |
| File Name and Page Label | The same page label, such as M-101, whatever the files are called. The best choice for labeled sets, even when sheets were added or reordered. |
| Manual Correlation | Nothing: you pair the pages yourself. |
The next step lists the pairs on a Matched Pages tab and the leftovers on Unmatched Pages. A red Conflict means a page has more than one candidate: choose one under Use:, or Leave Out. To pair a leftover, click a current page, then a revised one. Batch Compare offers the same Advanced... settings as above and Cloud or Rectangle; Batch Overlay offers Edit Defaults.... Choose the Output Folder, then OK, which waits until every conflict is settled. The summary counts the results and can Create detailed report as a PDF or CSV file.
Batch Compare writes a copy of each revised file, with its changes as Compare markups, into the output folder, named like the revised file (with _compared added if that name is taken). Batch Overlay writes one file per pair, named after the current file and the page's label, such as Mechanical M-101_overlay.pdf, with the current issue in the first layer color and the revision in the second. The source files never change. For file lists and the other batch jobs, see Batch processing.
Compare revisions in a Set
In a Set, a sheet's revisions stack under it. Select one stacked sheet in the Sets panel and choose File ▸ Sets ▸ Compare Revisions… or File ▸ Sets ▸ Overlay Revisions…, or right-click the sheet and choose Batch Compare… or Batch Overlay…. The batch wizard opens with the previous revision and this one already paired.
For power users Expert
- How Compare decides. Both pages are drawn at the chosen DPI and the new page is aligned onto the old. The page is split into Grid Size squares, and a square counts as changed when at least Pixel Density percent of its pixels differ by more than Color Sensitivity (a percentage of full scale). Changed squares within Pixel Proximity Allowance squares of each other become one region, the Margin band is skipped, and each region becomes a cloud, padded slightly, on the new page.
- Label pairing and single sheets. With File Name and Page Label, a one-page file whose label is only its page number is matched by its file name instead, so loose sheets named
M-101.pdfpair with the page labeled M-101 in a combined set. Labels and names match without regard to case. - Command line.
markupright batch compare --bcx pairs.bcx --out comparedandmarkupright batch overlay --bcx pairs.bcx --out overlaysrun a paired list; in Windows terminals, usemarkupright-cli. A paired.bcxmarks the revised files and names the pairing (index,labelormanual). If any page has more than one candidate, the command stops and asks you to pair it in the app.<markupright-batch version="1" pairing="label"> <file path="Issue 1/Mechanical.pdf" pages="all"/> <file path="Issue 2/Mechanical.pdf" pages="all" list="revised"/> </markupright-batch> - Automation tools.
doc_compare_visual(presetssame_printer,different_printer,scanned),doc_overlay(2 to 8 documents),batch_pair,batch_compareandbatch_overlay. Automation also has a text comparison with no menu entry:doc_comparelists replaced, inserted and deleted text,doc_compare_markmarks those changes as comments, anddoc_compare_reportwrites them up as a PDF. Turn on Preferences ▸ Admin ▸ MCP ▸ Enable the MCP connector first; see Command line and AI agents. - Preference keys.
compare.configs(your saved comparisons),compare.last_config(the one chosen next time) andoverlay.defaults(Edit Defaults).