Markups List and reports
The Markups List shows every markup in a document as a row of data. Sort and filter it, track review statuses, and turn it into a CSV, spreadsheet or PDF report.
- You'll learn
- How to find, filter and review markups as data, and report on them.
- Where
- Window ▸ Panels ▸ Markups List, under the document
- Shortcut
- Alt+M shows or hides the list
Markups as data
A markup is more than a shape. Each one carries data: its Subject, who made it and when, its Comments, a Status, a Label, its page and, for measurements, its readings. The Markups List puts all of that in a table, one row per markup in the active PDF, so a review becomes something you can sort, filter, count and hand on.
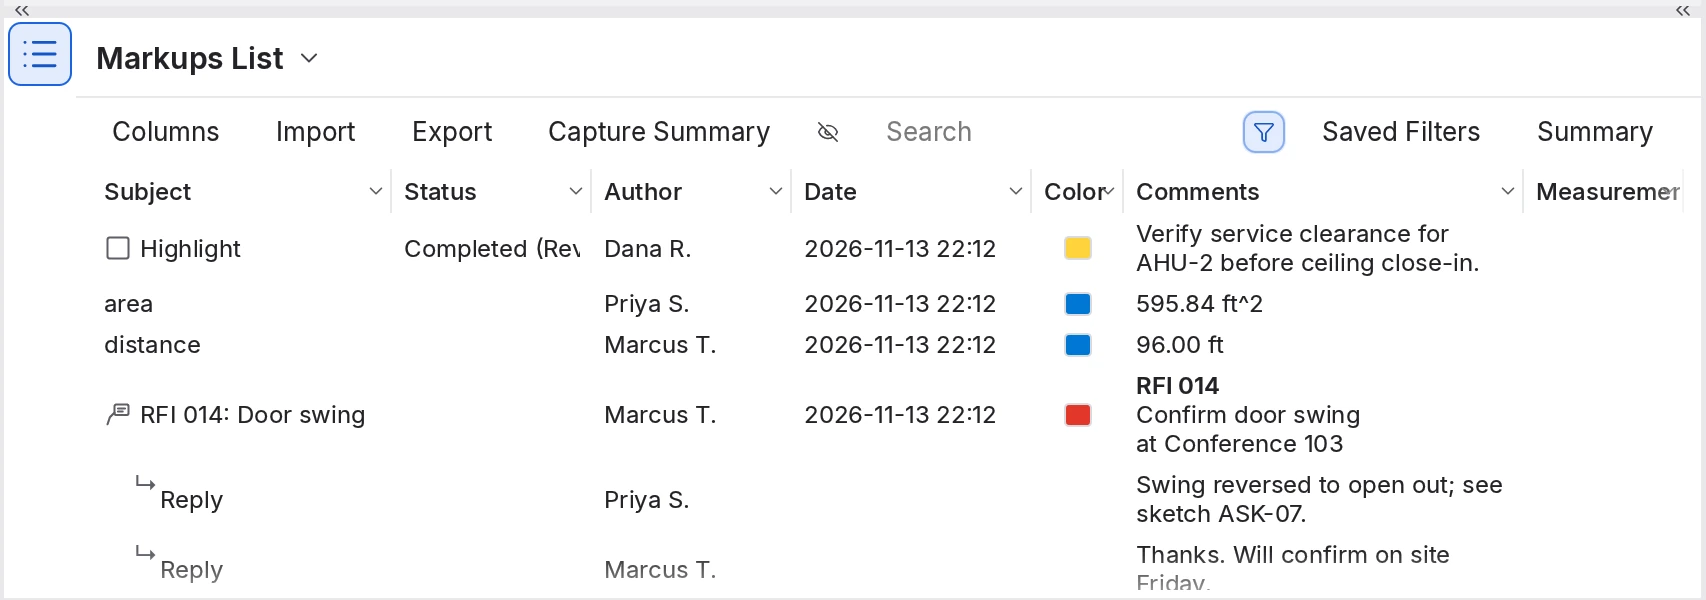
Replies sit under their markup, marked ↳, and a group is one row that expands to show its members. Each Subject starts with the icon of the tool that made the markup.
 1
2
3
4
5
6
7
8
- Columns, Import, Export, Capture Summary. Menus for columns, exchange files and photo reports.
- Hide Markups. Hides every markup so you can read the drawing (the same as View ▸ Hide Markups; it isn't saved).
- Search. Finds text in the rows and their replies.
- Filter List. Turns the column filters on or off.
- Saved Filters, Summary. Reuse filters; make reports.
- Column headers. Click to sort. With Filter List on, ▾ opens a filter.
- Status. Dana R. marked this highlight Completed (Review).
- Replies. Priya S. and Marcus T. answered RFI 014.
Open and use the list
Press Alt+M or choose Window ▸ Panels ▸ Markups List. The list opens in the bottom dock; the shortcut puts it away again.
- Click a row to select the markup and zoom to it. Ctrl-click adds rows, Shift-click selects a range, and ↑ ↓ step through them. Selecting a markup on the page highlights its row.
- Search from the keyboard. With the list focused, Ctrl+F jumps to its Search box.
The toolbar
| Control | What it does | |
|---|---|---|
| Columns | Tick the columns to show; Manage Columns... orders them. | |
| Import | Bring markups in from a PDF, XML or BAX, or FDF file. | |
| Export | Send markups out as BAX or FDF. | |
| Capture Summary | A PDF of the markups that carry photos, and their media files. | |
| Hide Markups | Hide or show every markup on the page. | |
| Search | Find text in any row or reply. | |
| Filter List | Turn the column filters on or off. | |
| Saved Filters | Save, apply and delete named filters. | |
| Summary | Reports as CSV, XLSX, XML, PDF or Print. |
While a filter or search leaves markups out, the toolbar says how many are listed, such as 5 of 12.
Columns
The list starts with 30 columns: Subject, Page Label, Page Index, Lock, Status, Checkmark, Author, Date, Creation Date, Color, X, Y, Comments, Wall Area, Length, Area, Volume, Count, Measurement, Label, Sequence, Capture, Depth, Rise/Drop, Slope, Layer, Legend, Height, Width and Space. Five more are a tick away: X Center, Y Center, Document Width, Document Height and Unit.
- Show or hide a column by ticking it in the Columns menu; at least one stays.
- Reorder by dragging a header, or in Columns ▸ Manage Columns..., whose Display Order tab has a Show tick per column and Up, Down, Show All and Reset.
- Resize by dragging the edge of a header.
Your layout is kept in your Profile, so every document opens with the same columns. Length, Area, Volume, Wall Area, Depth and Rise/Drop hold readings with their units. Count holds a count's number, and Measurement holds each measurement's main value as a plain number, such as 976 or 45, which is easy to sort and to use in a spreadsheet.
Sort and sections
Click a header to sort by that column, and again to reverse the order (▲ ▼). A sorted list falls into sections, one per value, each with its count and subtotals; empty values come last as (blank). Click a section's heading to collapse it. Without a sort, rows are in document order, page by page.
The Document Total row
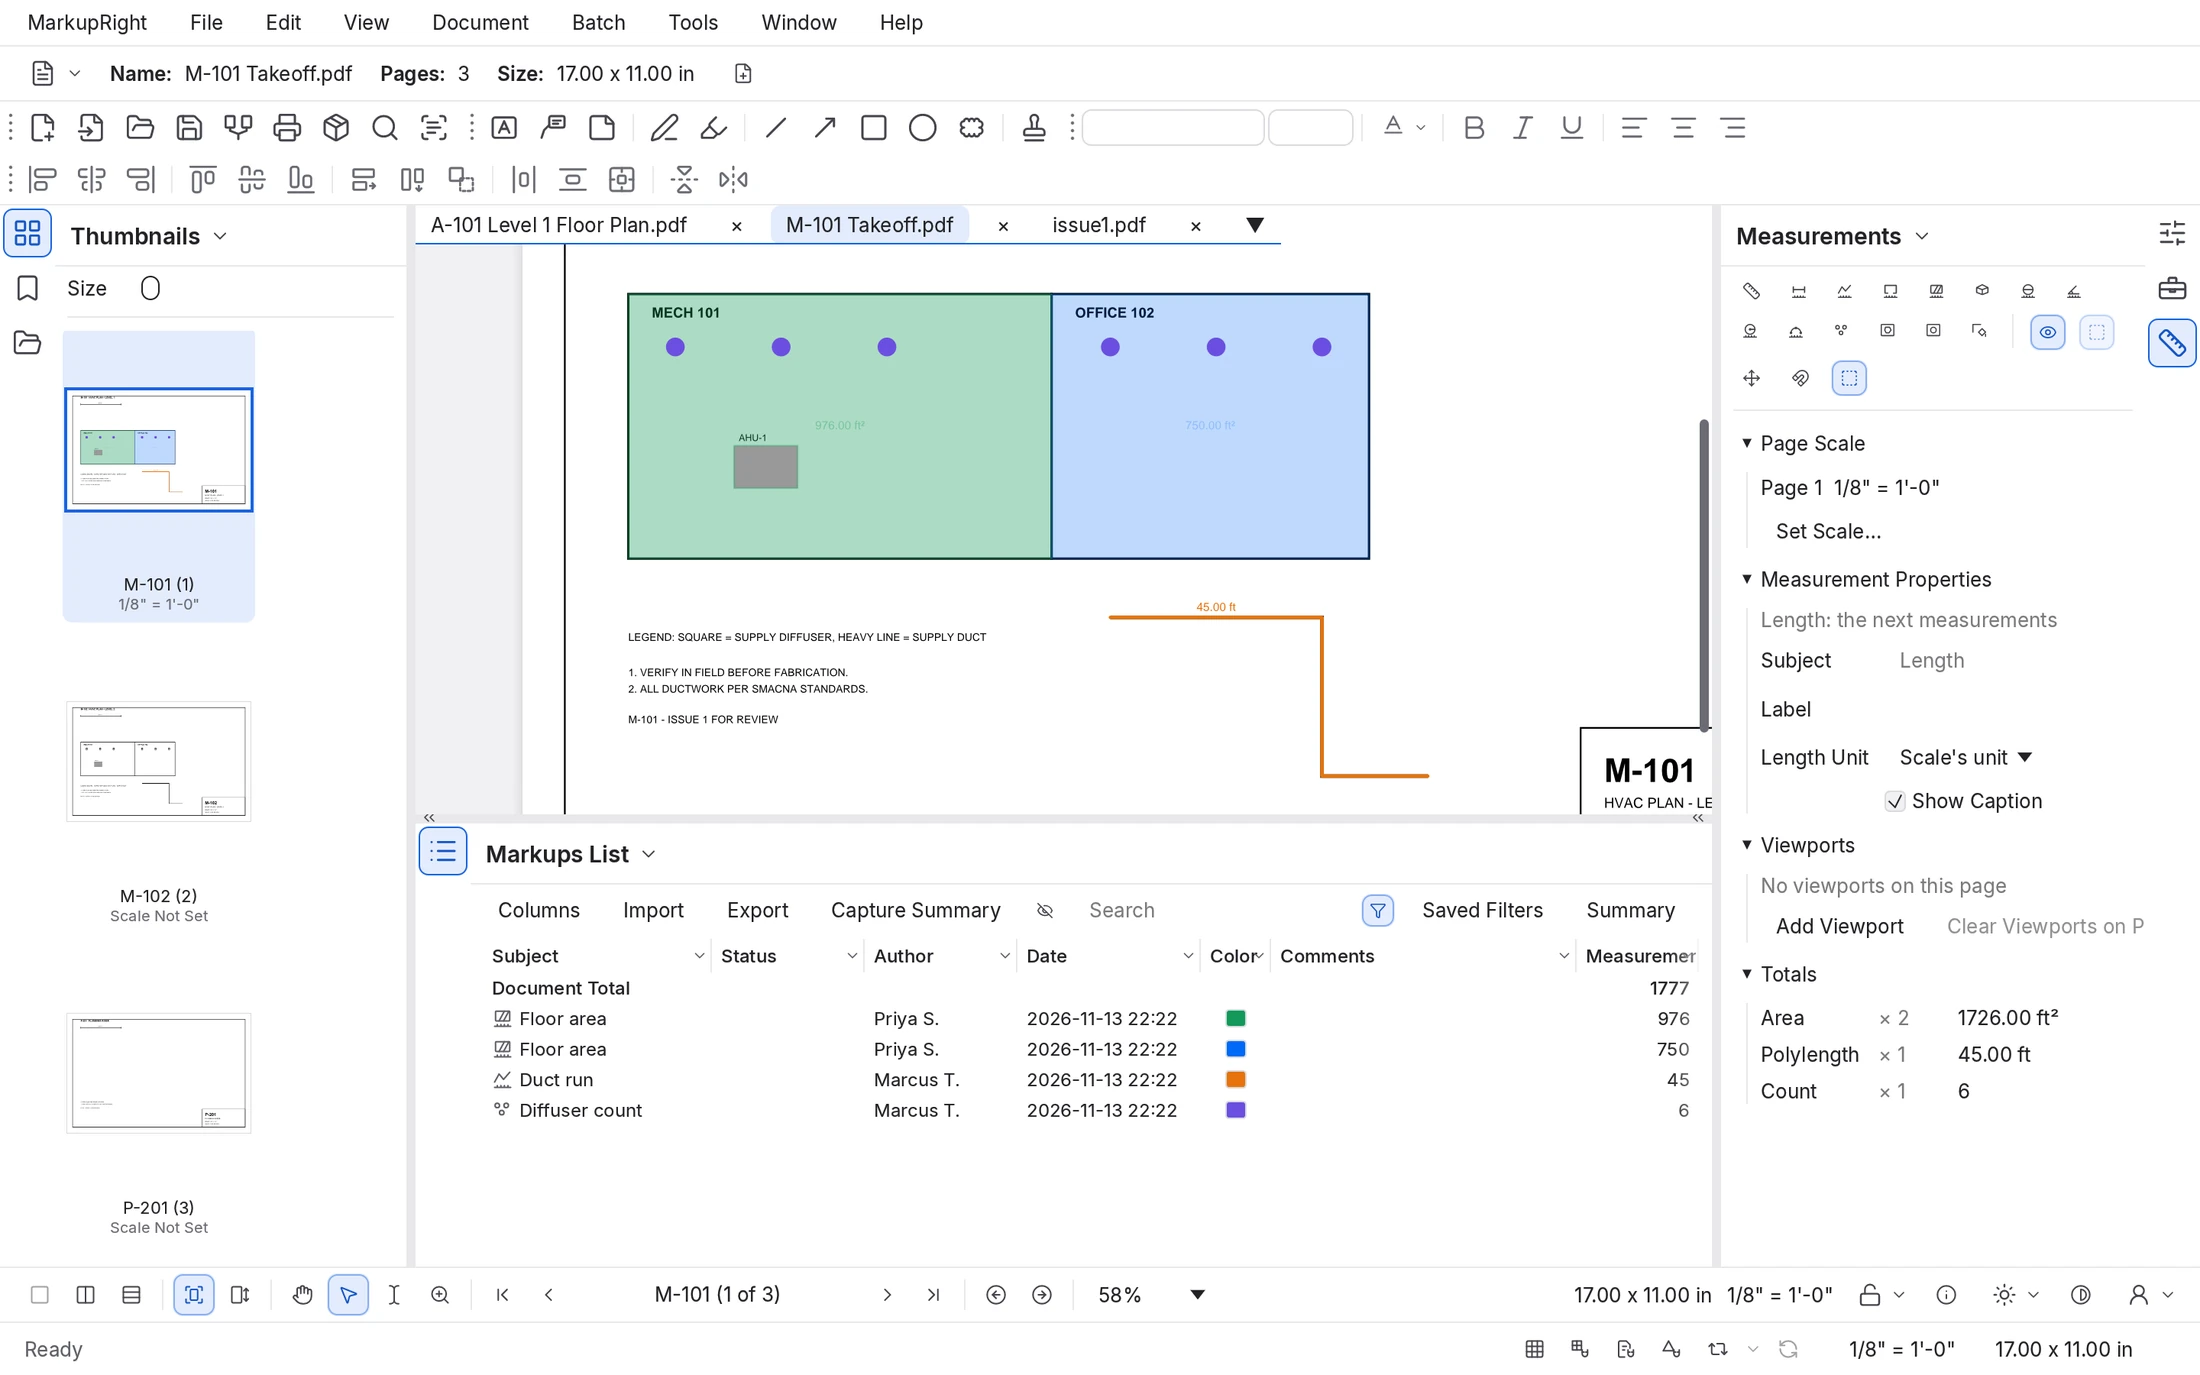
Under the headers, the Document Total row adds up the totaling columns across the whole document: Wall Area, Length, Area, Volume, Count, Measurement and Depth. It appears as soon as one of them is showing.
 1
2
- Document Total. The sum of each totaling column that's showing.
- Measurement column. 976 and 750 square feet, 45 feet and 6 diffusers.
Measurement adds every row's main value, whatever it measures: here square feet, feet and a count make 1777. Read takeoff totals from the Area, Length and Count columns, or sort by Subject so each section gets its own subtotal.
Edit in the list
Double-click a Subject, Author or Comments cell to edit it in place; a locked markup keeps its Subject and Author. Click a Lock or Checkmark cell to switch it, and a Status cell to choose a state.
The row menu
Right-click a row, or several selected rows:
| Command | What it does | |
|---|---|---|
| Copy | Copies the cell under the pointer. | |
| Layer | Moves the markups to a layer, to Base PDF, or to a new layer. | |
| Lock / Unlock | Stops or allows changes. | |
| Legend | Places a Markups Legend of the markups. | |
| Reply... | Answers the markup. | |
| Set Status | Each status model's states, and Manage Status.... | |
| Check / Uncheck, Clear All Checks | Sets or clears checkmarks. | |
| Delete | Deletes the markups (Delete Reply on a reply). A markup with replies asks first. | |
| Properties | Shows the markups in the Properties panel. | |
| Group, Ungroup, Paint | Group or ungroup, or copy a look with the Format Painter; Remove Selected from Group and Remove Group Nesting follow. |
Filter the list
Filters narrow the list to what you need: one reviewer's comments, everything still open, one sheet's measurements. Markups a filter leaves out are dimmed on the page too.
Column filters
Click Filter List, then the ▾ in a header to open that column's filter:
- Values. A checklist of the column's values with their counts, such as "Accepted (Review) (3)" or "(blank) (5)"; Lock and Checkmark list Yes and No. Select All ticks or clears them all.
- Custom. Contains for text, Before and After for dates (YYYY-MM-DD), and Equal to, Greater than and Less than for numbers. Add Condition adds another, joined by AND or OR.
Click Apply. A filtered header turns orange (Color, Lock and Checkmark add a dot), and a row must pass every column's filter. Click Filter List again to suspend the filters without losing them.
Search the list
Type in Search to find text anywhere in a row, in any case: subjects, comments, authors, measurement values, statuses and replies. Starting a search clears the column filters, and searches are never saved.
Saved Filters
In the Saved Filters menu, Save Filter... names the current column filters (reusing a name replaces that filter). Your filters are listed below it; click one to apply it. A ✓ marks the one applied, and * means you've changed it since. Delete... removes the applied filter, and Clear All clears every filter and the search. Saved filters are kept in your Profile, so they work in every document.
Statuses and review
A status records where a markup stands in a review. Two status models come built in, Review and Migration, each with the states Accepted, Rejected, Completed, Cancelled and None. The list shows the state and its model, such as Accepted (Review); a markup that has never had a status shows an empty cell.
 1
2
3
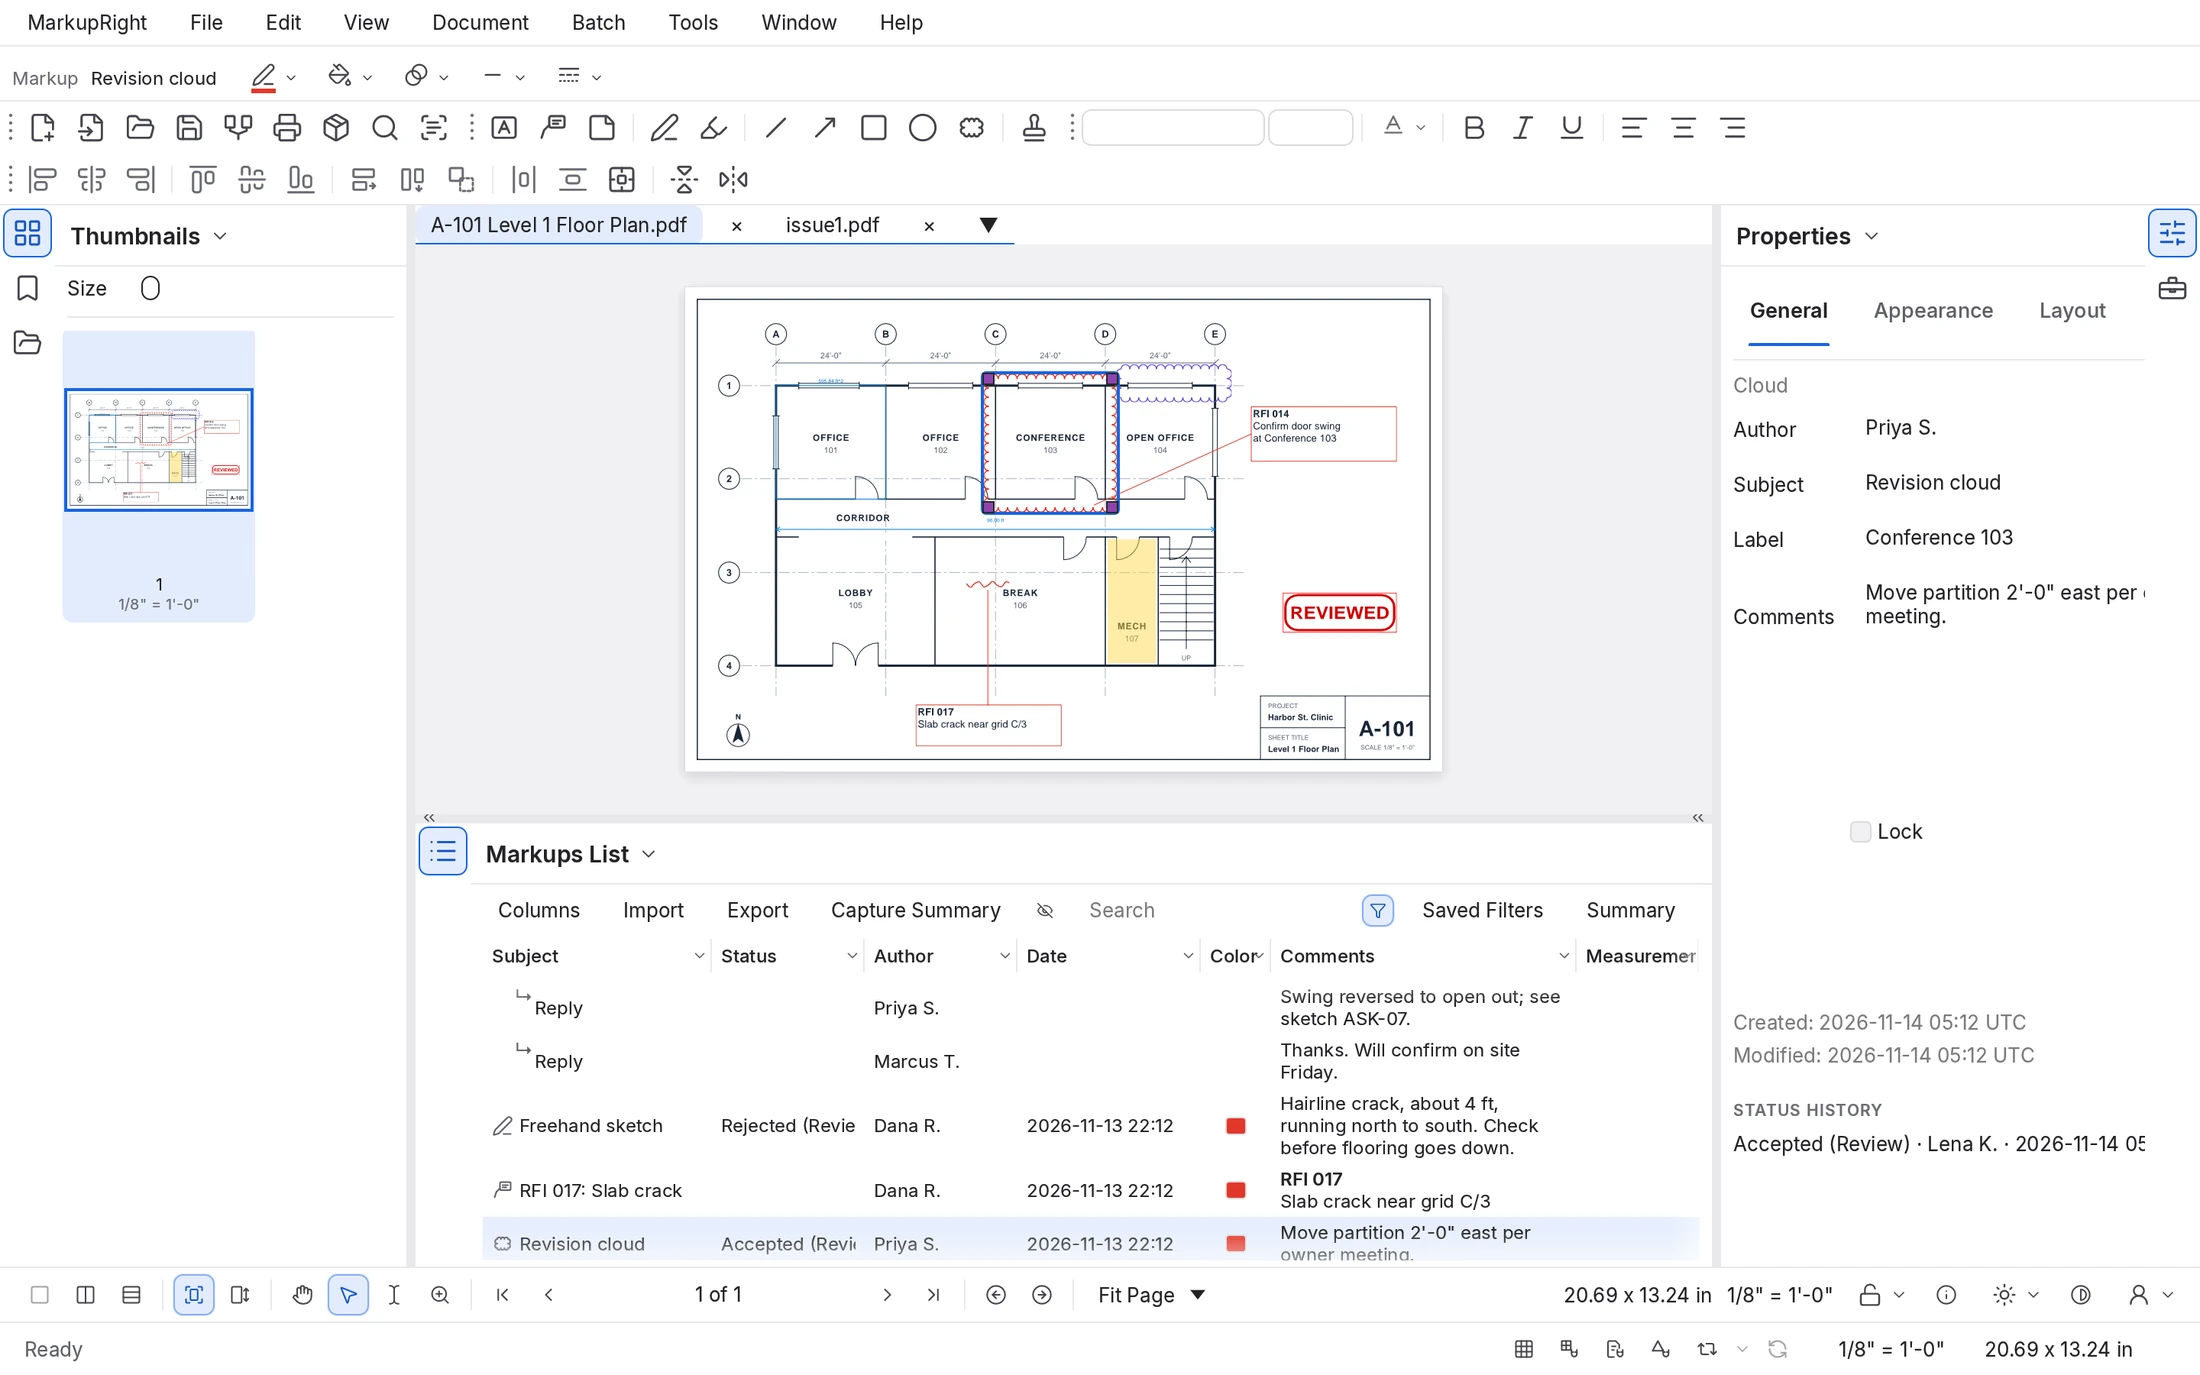
- Status column. Dana R.'s sketch is Rejected (Review); the cloud is Accepted (Review).
- Status History. On the Properties panel's General tab: every status the markup has had, who set it and when.
- The selected markup. Selecting a row selects the markup on the page, and the other way around.
To set a status, click the markup's Status cell; or right-click a row, or the markup on the page, and use Set Status. To set several at once, select their rows and right-click the Status header. The menus list each model with its states, such as Review ▸ Accepted.
Each change adds a line to the markup's Status History with your name (from MarkupRight ▸ Preferences ▸ General ▸ Options ▸ User) and the time; the history only grows. If the state has a color the markup is recolored, and if it has text, a Text Box grouped with the markup shows it.
To accept one reviewer's markups
- Press Alt+M and click Filter List.
- Click ▾ on the Author header, click Select All to clear the ticks, tick Priya S. and click Apply.
Only Priya S.'s markups are listed; the rest are dimmed on the page.
- Click the first row, then Shift-click the last.
- Right-click the Status header and choose Review ▸ Accepted.
Every selected markup reads Accepted (Review), and its Status History records your name.
Your own status models
Choose Manage Status... at the bottom of a row's Set Status menu. A tick beside each model shows it in the menus. Built-in states keep their names and order; only their Text and Color change. For your own workflow, click Add under Models, then add states with a Name, optional Text and a Color (tick Recolor). Your own models can reorder states (Up, Down) and mark one as the Default for new markups. Import... and Export... share models as XML; Save to Profile stores them in your Profile.
Checkmarks and replies
A checkmark is a simple tick for your own tracking, separate from the status, such as items you've verified on site. Click the Checkmark cell, or use Check, Uncheck and Clear All Checks in the row menu.
To answer a markup, right-click its row, choose Reply..., type and click OK. The reply appears under the markup with your name; right-click it for Delete Reply. More on comments is in Edit and style markups.
Import and export markups
Move markups between copies of the same drawings without sending the drawings.
- Import ▸ PDF... copies another PDF's markups onto the same page numbers; XML or BAX... reads a MarkupRight BAX file or an XFDF file; FDF... reads an FDF file. Pictures and file attachments don't come along, because their data isn't in the file.
- Export ▸ BAX... writes every markup with all of MarkupRight's details, the format to send another MarkupRight user. FDF... writes every markup in the standard FDF format.
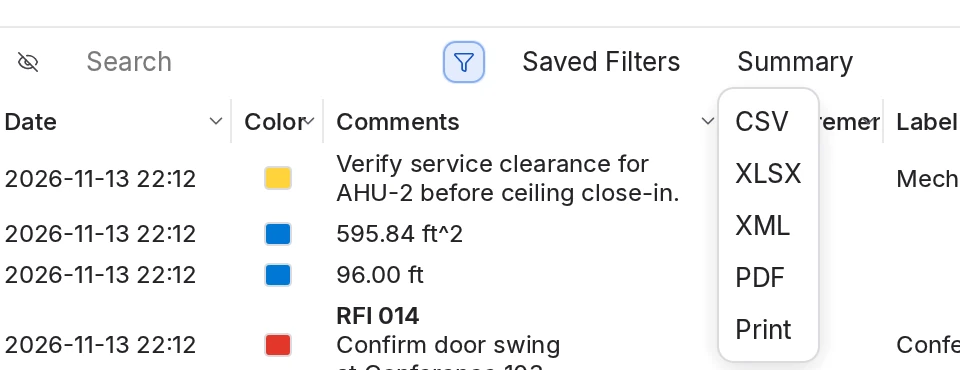
Spreadsheets and reports come from Summary, not Export: Summary ▸ CSV, XLSX, XML, PDF or Print.
Markup Summary reports
A Markup Summary turns the list into a file you can send: a CSV or XLSX spreadsheet, an XML file, or a PDF report with a picture of each markup. Choose the format from the list's Summary menu.
For many files at once, use Batch ▸ Summary… (see Batch processing); you can also right-click a page in Thumbnails and choose Markup Summary. The Markup Summary dialog starts from the list as you left it, with its columns, sort and column filters, and has four tabs:
| Tab | What you set there |
|---|---|
| Files | The open PDF is listed. Add Files..., Add Open Files, Add Folder... (with Include Subfolders), Add Current Set, Remove; Load List... and Save List... keep a file list as a .bcx file. |
| Columns | Tick and order the columns (Up, Down); Show Empty Columns; Load Config. |
| Filter and Sort | The Markups List's filter or All markups (never the list's search), Add Filter, Show All Columns, and Sort by with two Then by. |
| Output | Export as CSV, XLSX, XML, PDF or Print with that format's options, plus Export to (the PDF's folder at first), Title (such as "M-101 Takeoff Summary") with Append Date, Open File After Creation (on) and Overwrite Existing Files (off). |
Output options
| Option | For | What it does |
|---|---|---|
| Include | CSV, XLSX, XML | Markups (the default), Totals, or Both. |
| Headers, ID Columns | CSV, XLSX | Column names in the first row (on); markup ids (off). |
| Units, Format Numbers | CSV, XLSX, XML | Values with their units, formatted as in the list (both on). |
| Replies | All | Replies under their markup (on). |
| Style | PDF, Print | Table (the default), or Flow, with each markup's picture beside its labeled fields. Use Current Column Widths copies the list's widths. |
| Thumbnail | PDF, Print | None, Small, Medium (the default) or Large. Include Page Content draws the drawing under the markup, and takes longer. |
| Template | PDF, Print | Your own PDF page, such as a letterhead; the report fills its rectangle named Report Area. |
| Insert Page Break Per | PDF, Print | A new page per value of a column, such as Page Label. With Space, Create Spaces Cover Sheet adds a cover. |
| Page Size, Include Totals, Full Status History | PDF, Print | Letter (the default), A4 or Tabloid; totals at the end (on); every status change, not only the latest (off). |
| Append and Hyperlink to Current PDF | Adds the report to the end of the PDF, each row linked to its markup. | |
| Include Capture Media Addendum | PDF, Print | Adds the markups' photos at the end. |
| Create Multiple Reports Per | All | One file per value of a column, such as one report per author. |
To send the open items to a CSV
- Press Alt+M and click Filter List.
- Click ▾ on the Status header, click Select All to clear the ticks, then tick (blank), and None (Review) if it's listed. Click Apply.
Only markups nobody has closed are listed, such as "5 of 12".
- Choose Summary ▸ CSV.
Markup Summary opens with this PDF on the Files tab.
- On the Filter and Sort tab, check that The Markups List's filter is chosen. To group rows by sheet, set Sort by to Page Label.
- On the Output tab, set the Title and Export to folder, and leave Headers and Units on.
- Click OK.
The CSV is written and, with Open File After Creation on, opens in your spreadsheet app.
To make a PDF report with thumbnails
- Choose Summary ▸ PDF. To include other open drawings, click Add Open Files on the Files tab.
- On the Columns tab, tick the columns the report needs, such as Subject, Page Label, Status, Author and Comments, and order them with Up and Down.
- On the Output tab, choose Style Table and Thumbnail Medium or Large, keep Include Totals on, and pick a Page Size (Tabloid gives a wide table room). For an audit trail, tick Full Status History.
- Set the Title and Export to folder, then click OK.
The report opens: a table with a picture of each markup, then the totals.
Tick Append and Hyperlink to Current PDF and the report is added to the end of the PDF, each row linked to its markup, so readers can click straight from the report to the comment.
Capture Summary
Markups can carry photos and videos: drop a media file onto a markup to embed it. Capture Summary ▸ Capture Summary... makes a PDF with a heading per markup and its photos placed under it; videos are listed by name. Options: Attach Media as Linked Files (each item links to its file, saved beside the report), Exclude Filtered Markups, Title, Margins (36 pt), Padding (6 pt) and Page Size. Capture Summary ▸ Export Capture Media... copies the media files to a folder.
Markups Legends
A Markups Legend is a table on the page that explains your markups: a Symbol, a Description (the Subject), the Quantity and the Measurement for each kind of markup. It stays live: add, change or delete a markup and the legend follows.
- Make one from selected rows or markups: right-click and choose Legend (Ad-hoc Legend in Find Tools + Commands). It's placed to the right of the selection. For a whole tool set, use the set's gear menu ▸ Legend in the Tool Chest.
- Add to it by right-clicking another markup and choosing Add to Legend.
- Right-click the legend for Copy as Snapshot, Apply to All Pages (each copy counts its own page) and Edit Columns…, which can add any Markups List column after the legend's own.
For power users Expert
- List options. MarkupRight ▸ Preferences ▸ Interface ▸ Markups List: Zoom Fit Markups when selected (
interface., on); Show Measurement Value for Dominant Markup Only (markups_list. zoom_fit_on_select markup.group_dominant_values, off), which shows a group's dominant markup's values instead of its members' sum; Use Rich Text for Comments and Wrap Comment Text (on); Exclude Filtered Markups on Export (interface., off), which makes BAX export and Export Capture Media skip what the filter hides (FDF always takes everything); and Filtered Annotation Dim (markups_list. exclude_filtered_on_export markup.filtered_dim, 70%). - What your Profile keeps. The column layout, saved filters and status models. Status models also export as XML (
<markupright-status-models version="1">) for the rest of the team. - Reusable reports. Type a Config Name at the bottom of Markup Summary and click Save Config; configs go in the
summariesfolder of the settings folder and come back with Load Config. Open File After Creation and Overwrite Existing Files remember your last run (summary.open_after,summary.overwrite). - Commands by name. Find Tools + Commands Ctrl+K runs the list's commands, such as Filter the Markups List, Clear All Filters, Search the Markups List and Summary as CSV….
- Automation. Through the MCP connector, AI agents can use
list_rows,list_totals,list_filter_sets,list_import,list_export,status_models,status_set,status_history,check_set,check_clear,summary_run,summary_config_save,summary_config_load,capture_summary,legend_create,legend_refreshandlegend_apply_all_pages. See Command line and AI agents. - Summaries from a script. The command below runs a summary over a file list.
job.jsonis a job assummary_runtakes it, andfiles.bcxa list saved with Save List.... Each file gets a line of output; the exit code is 0 when every file was done, 1 when one failed and 2 for a usage error. In a Windows terminal, usemarkupright-cli.
markupright batch summary --summary job.json --bcx files.bcx