Edit and style markups
A markup stays editable until you decide otherwise. Select it to move, reshape or restyle it, keep the discussion in comments and replies, and flatten it into the page when the review is done.
- You'll learn
- Selecting, reshaping and restyling markups, replies and statuses, and flattening safely.
- Where
- The Properties panel Alt+P, and the right-click menu of any markup.
- Keys to know
- Select V · Undo Ctrl+Z · Format Painter Ctrl+Shift+C
Select markups
To work on markups already on the page, use the Select tool V (Edit ▸ Select). The markup tools hand you back to Select after each markup, so you're usually there already.
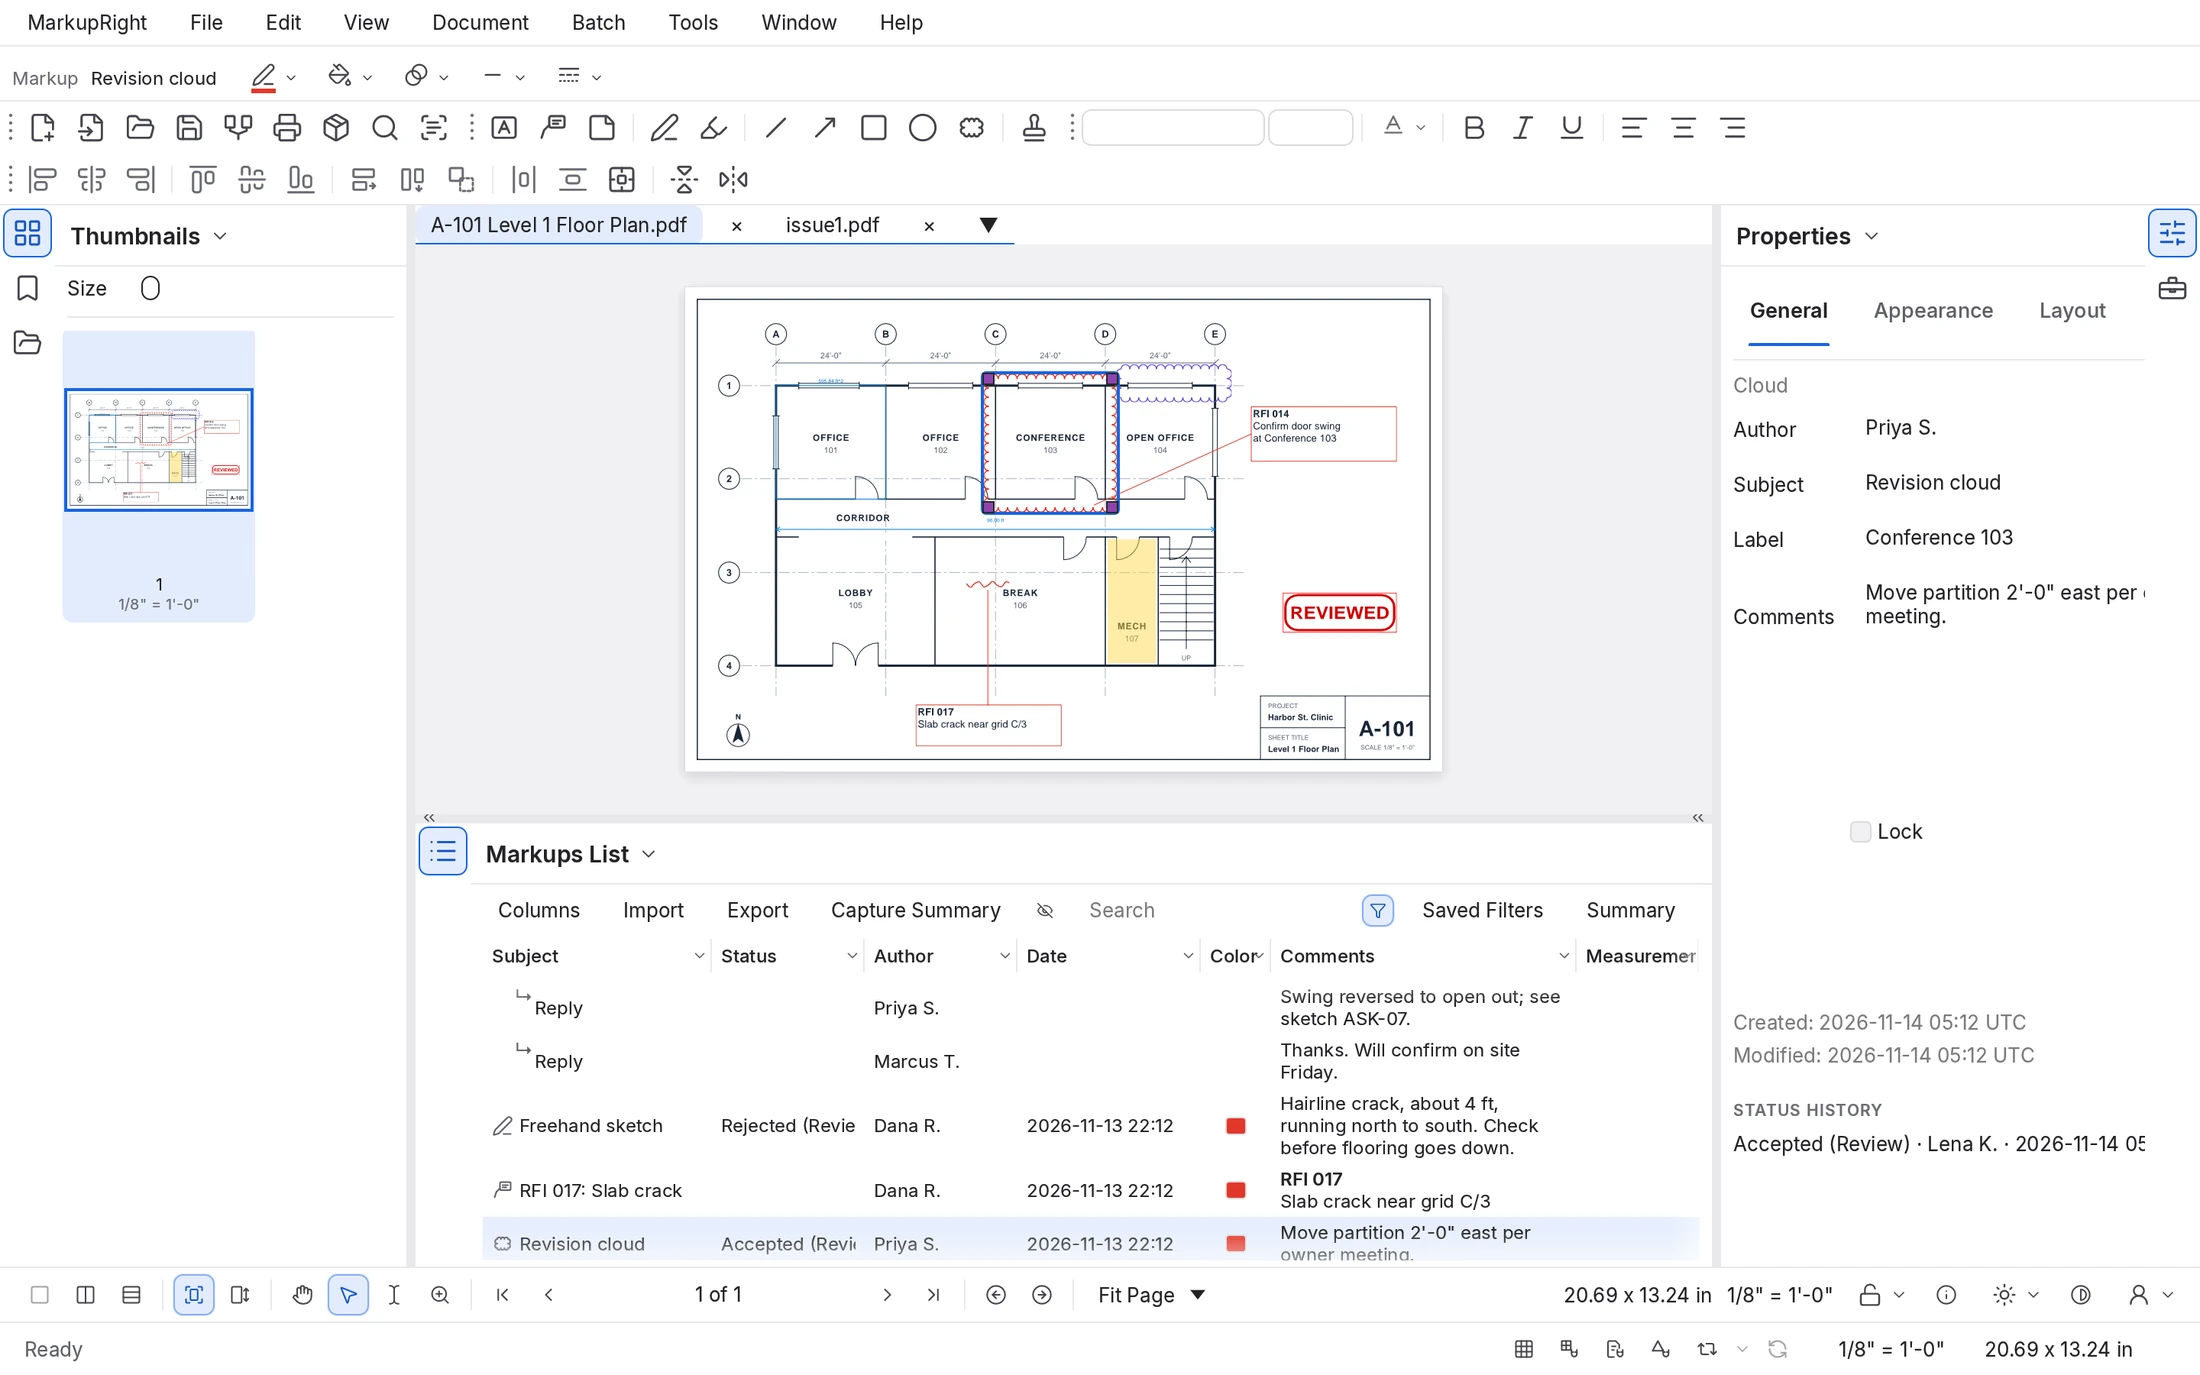 1
2
3
4
- The selected markup. A blue outline, with handles to drag.
- Properties toolbar. The markup's Subject and its look.
- Properties panel. Everything about the markup, on four tabs.
- Markups List. Its row is highlighted; clicking a row selects that markup.
| To select | Do this | |
|---|---|---|
| One markup | Click it. Where markups overlap, click the same spot again within a second for the one underneath. Shift+click adds or removes one. | |
| An area | Drag left to right to take what's entirely inside the box, or right to left (a dashed box) to take anything it touches. Hold Shift to add to the selection. | |
| An irregular area | Lasso Shift+O: draw a free outline around them. | |
| The whole page | Edit ▸ Select All Ctrl+A | |
| The next one | With one selected, press Tab, or Shift+Tab to go back. |
That's why Select All takes only the current page's markups. Esc clears the selection; press it again to switch to Pan.
Move, copy and delete
- Move: drag the markup. It stays on its page.
- Nudge: the arrow keys move the selection 1 point, or 10 points with Shift.
- Copy: hold Ctrl while you drag. The copy drops where you let go.
- Delete: press Delete or Backspace.
Resize, rotate and reshape
A single selected markup shows handles, colored by what they do. A locked markup shows none.
| Handle | Drag it to |
|---|---|
| Yellow squares | Resize from a corner or edge, move a point of a polyline, polygon or cloud, or move a line's end. |
| Orange circle, above the top | Rotate in 15° steps, or freely with Shift. Only rectangles, ellipses, text boxes, images and stamps have one. |
| Purple squares | Scale polylines, polygons, clouds, ink and arcs, keeping proportions unless you hold Shift. On the four-sided cloud above they sit on its corners. Several markups, or a group, get purple handles around them all. |
| Blue | Move a measurement's caption. |
Control points and curves
With one polyline, polygon, cloud or point measurement selected:
- Shift+click a segment to add a point, or a point to remove it.
- Ctrl+click a point to turn a corner into a curve, or back. Ctrl-drag a point to pull out handlebars, then drag a handlebar to shape the curve (Ctrl for a sharp cusp, Shift for 45° steps).
- Right-click the outline for Add Control Point, Subtract Control Point, Convert to Curve, Convert to Straight or Convert to Arc (which can't round a right angle).
The Control Point toolbar offers these for your next click. On a rectangle, Ctrl-drag a yellow handle to bend that side (Preferences ▸ Tools ▸ Markup ▸ Drag Behavior for Shapes swaps this).
The Properties panel
Open the Properties panel with Window ▸ Panels ▸ Properties or Alt+P. With markups selected it has four tabs: General, Appearance, Layout and Options. For several markups it shows only the fields they share; a blank field means their values differ, and what you type applies to all. Each change is one undo step, and on a locked markup only Lock can change.
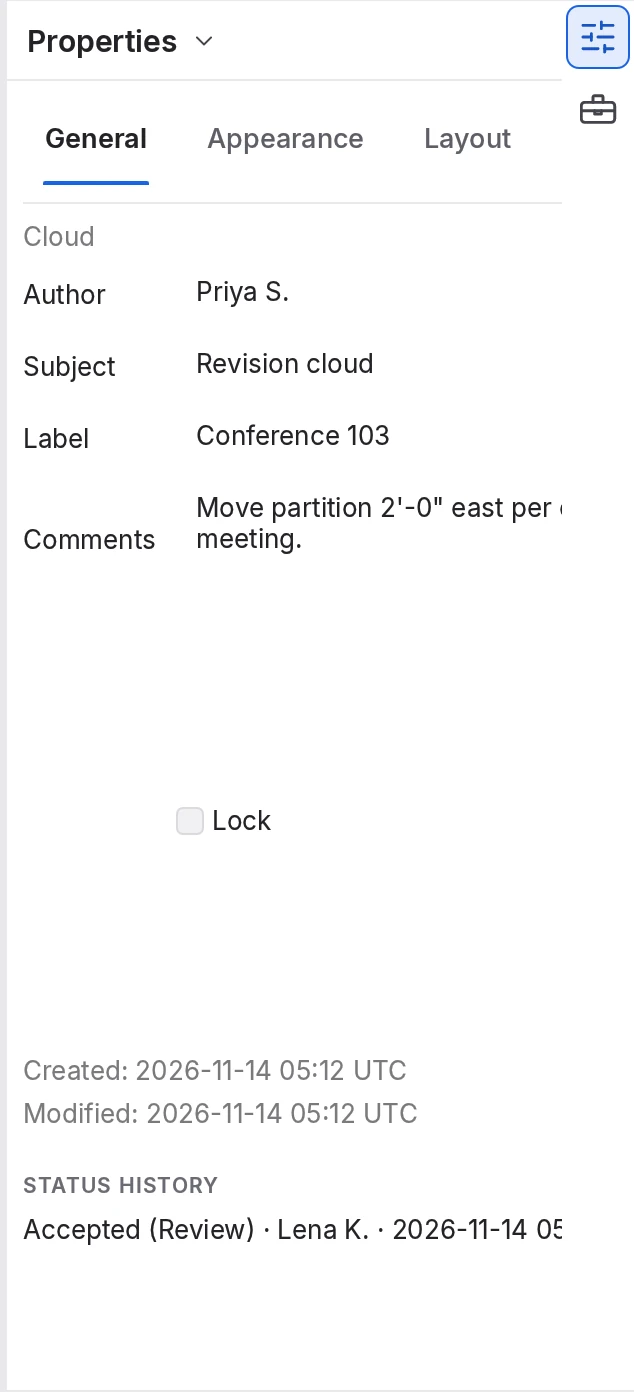
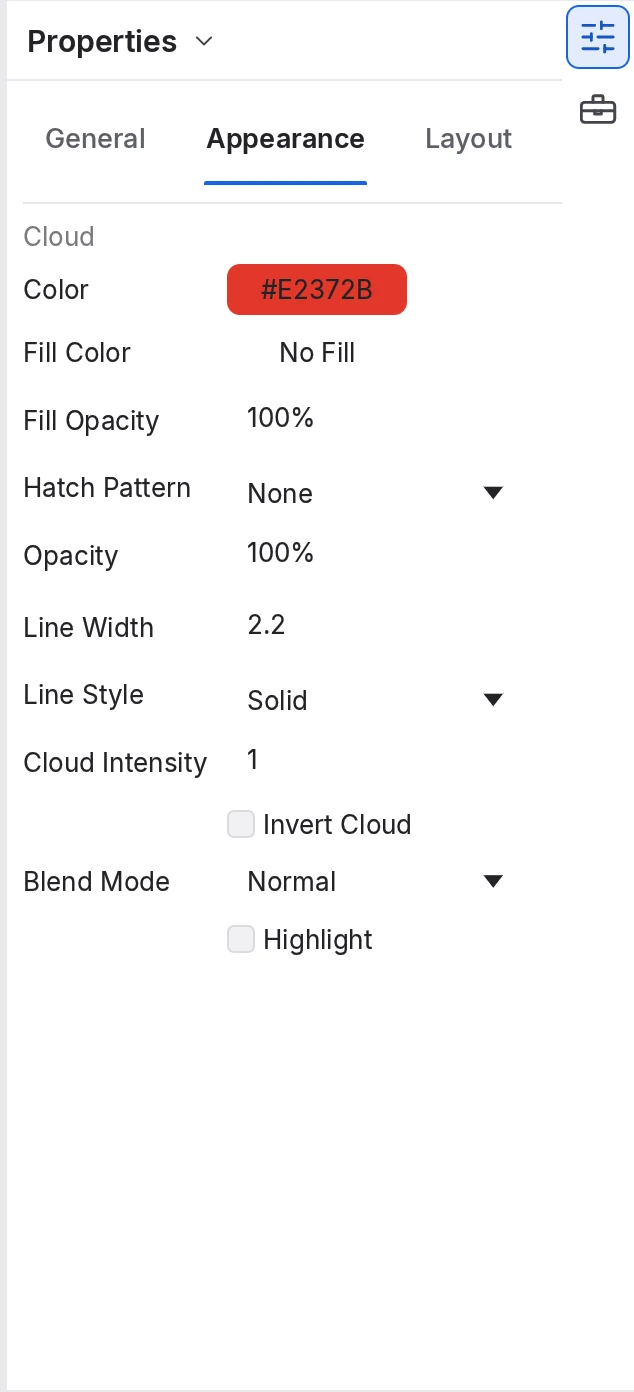
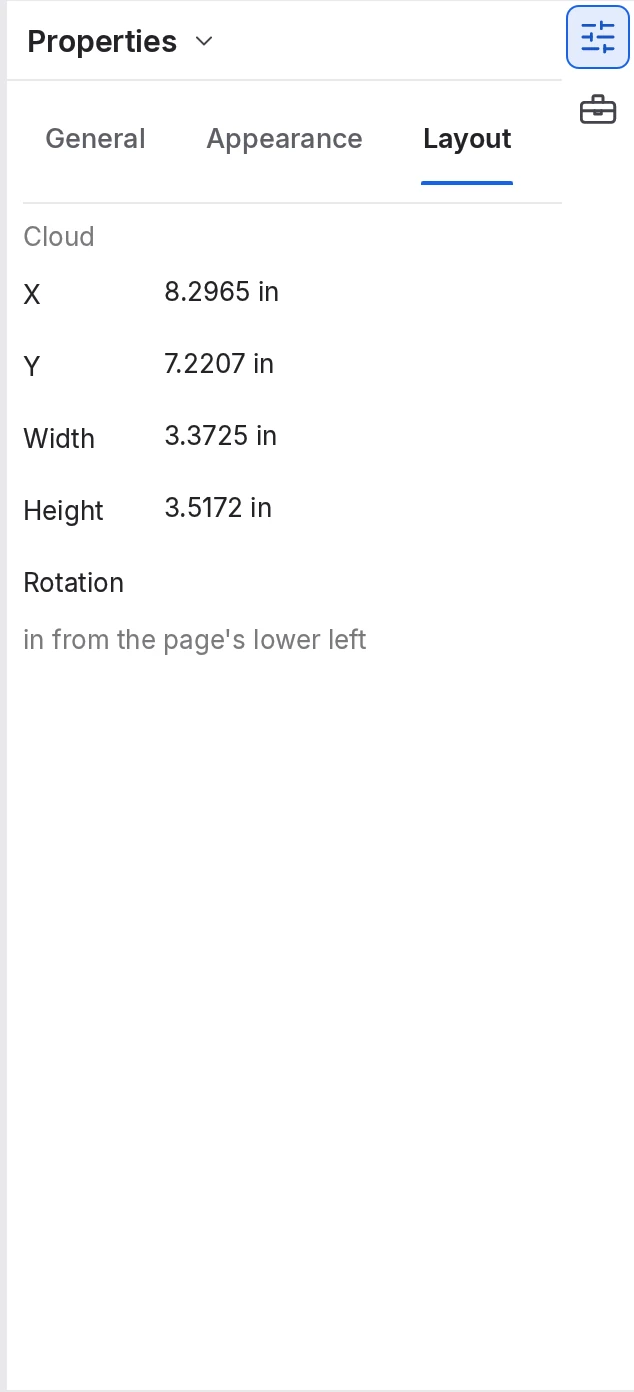
At its starting width the panel can cut off the Options tab and the … buttons beside Line Style and Hatch Pattern, as in these pictures. Drag the dock's edge to make it wider.
General
| Field | What it holds |
|---|---|
| Author | Who made it: the name in Preferences ▸ General ▸ Options ▸ User. |
| Subject | What it is ("Revision cloud"). It starts as the tool's name. |
| Label | A short tag of your own, such as a room. |
| Comments | What you have to say about it. Text Box, Callout, Cloud+, Typewriter and Note markups have none: their text is the comment. |
| Lock | Stops it being moved, changed or deleted. |
| Created, Modified, Status History | When it was made and changed (in UTC), and every status it has had, with who and when. |
There's no Status field: see Statuses.
Appearance
The fields follow the kind of markup. Shapes (Rectangle, Ellipse, Polygon, Cloud) have Color, Fill Color, Fill Opacity, Highlight (a see-through fill), Hatch Pattern, Opacity, Line Width, Line Style and Blend Mode; clouds add Cloud Intensity (the size of the arcs) and Invert Cloud. Lines, arrows and polylines have Color, Opacity, Line Width and Line Style, plus Line Start, Line End and Endpoint Scale. Markups with text (Text Box, Callout, Cloud+, Typewriter) add Font, Font Size, Bold, Italic, Underline, Alignment and Text Color. A Note has an Icon, and images and stamps have a Picture or Stamp section.
The choices in each list
| Field | Choices | |
|---|---|---|
| Color, Fill Color, Text Color | 16 named colors, from Black to Purple, or any #RRGGBB code. Fill Color also has No Fill. | |
| Line Width | 0 to 72 points; 0 hides the line. | |
| Line Start, Line End | None, Square, Circle, Diamond, Open Arrow, Closed Arrow, Butt, Reverse Open Arrow, Reverse Closed Arrow, Slash. A blank Endpoint Scale sizes them automatically. | |
| Line Style | Solid, Dashed, Dotted, the standard library (BORDER, CENTER, DASHED, HIDDEN, PHANTOM, ZIGZAG and more) and your own style sets. The … button opens Manage Line Style Sets…. | |
| Hatch Pattern | None, or ANSI31 to ANSI38, AR-CONC, AR-SAND, BRICK, CROSS, DASH, DOTS, EARTH, GRASS, HONEY, LINE, NET, NET3, SOLID, SQUARE or ZIGZAG. Hatch Scale is 50% to 200%. The … button opens Manage Hatch Sets…. | |
| Blend Mode | Normal, Multiply, Screen, Overlay, Darken, Lighten, ColorDodge, ColorBurn, HardLight, SoftLight, Difference, Exclusion, Hue, Saturation, Color, Luminosity. Multiply and Darken keep black linework visible under a fill. | |
| Opacity, Font Size, Cloud Intensity | 0–100%; 1–144 points; 0.25–2. |
Layout and Options
Layout places a markup exactly: X, Y, Width and Height, in inches from the page's lower-left corner, and Rotation for rectangles, ellipses, text boxes, images and stamps. Options holds Set as Default and Add to Tool Chest, plus Replace Image… for an image and Open File and Save File… for a file attachment.
Quick changes from the Properties toolbar
For everyday changes the Properties toolbar under the menus is quicker. It shows whichever of Color, Fill Color, Opacity, Line Width, Line Style, Line Start, Line End, Font and Font Size the selection shares.

The Font toolbar (shown at first), and the Line Style and Appearance toolbars from Tools ▸ Toolbars, also act on the whole selection.
Make a look the default
To make new markups look like one you styled
- Style a markup the way you want new ones of its kind to look.
- Right-click it and choose Set as Default (or Properties ▸ Options ▸ Set as Default).
MarkupRight confirms, for example: "New Cloud markups look like this one".
The look is saved in your active Profile, so it's there next time and goes wherever the Profile goes. Preferences ▸ Tools ▸ Markup ▸ Dynamically Set as Default Properties makes every Properties panel change the default. For several looks of one tool, use the Tool Chest.
Align, distribute, flip and order
Use the Alignment toolbar (shown at first) or the right-click menu's Alignment and Order submenus. Markups line up with the one you selected first.
| Command | Needs | What it does | |
|---|---|---|---|
| Align Left, Center, Right, Top, Middle, Bottom | 2 or more | Lines up edges or centers. | |
| Align Width, Height, Size | 2 or more | Matches the first one's width, height or both. | |
| Distribute Horizontally, Vertically | 3 or more | Spaces them evenly. | |
| Center in Document | 1 or more | Moves them to the middle of the page. | |
| Flip Horizontal Ctrl+Alt+H, Flip Vertical Ctrl+Alt+V | 1 or more | Mirrors polylines, polygons, clouds, ink, images, stamps and groups. | |
| Bring to Front, Send to Back, Bring Forward, Send Backward | 1 or more | Changes which markup is on top. |
Group, lock and hide
Group Ctrl+G
Markups move and scale as one. Click a member to select the group; Alt+click to pick just that member. Ungroup Ctrl+Shift+G removes one level.
Lock Ctrl+Shift+L
A locked markup can't be moved, restyled or deleted. Lock and Unlock are also in the right-click menu.
Hide
Right-click ▸ Hide hides that one markup; Undo brings it back. Edit ▸ Hide hides all of them from view until you choose it again.
The right-click Group submenu also has Remove Selected from Group and Remove Group Nesting. Locked markups, and markups with embedded photos or videos, can't be grouped.
Copy a look with Format Painter
To give other markups the same look
- Select the markup whose look you want, then press Ctrl+Shift+C (or Edit ▸ Format Painter).
"Click or drag around markups to paint them; ESC stops."
- Click a markup, or drag a box around several.
They take the look, one undo step each. Locked markups are left alone.
- Press Esc when you're done.
Offset and Multiply
Offset O (Edit ▸ Offset) copies the outline of each selected line, polyline, shape or point measurement a set distance away, for a setback line or a clearance zone. A closed shape grows outward; an open line moves to its left. It uses the Offset toolbar's settings, even when hidden: Distance (0.25 in; a real-world distance on a page with a scale, and negative to go the other way), Replace Markup (off), Angle Miter Limit (4) and Offset As (Same Type, Polyline, Polygon or Cloud).
Multiply… Ctrl+M makes evenly spaced copies: X Offset (in) (0.5), Y Offset (in) (0) and Count (1), measured on paper, in one undo step.
Copy markups to other pages
Right-click and choose Apply to Pages… to copy the selection to the same position on All Pages, a Custom Range (such as 1-3, 5), Even Pages, Odd Pages, Landscape Pages, Portrait Pages or Selected Thumbnails. Copies that would fall off a smaller page are moved inside it.
Copy and paste
Cut Ctrl+X, Copy Ctrl+C and Paste Ctrl+V work as usual; a paste lands at the pointer, or in the middle of the view. Paste in Place Ctrl+Shift+V keeps the exact position, so markups land in the same spot on another sheet. Text copied from another app pastes as a Typewriter markup.
You can also paste into another copy of MarkupRight. Pictures and file attachments don't carry across, and a stamp pastes only if that copy has a stamp of the same name in its stamp folder; MarkupRight tells you when something couldn't be pasted.
Undo and Undo History
Undo is Ctrl+Z and Redo is Ctrl+Shift+Z on every platform. Each drag, field change or paint is one named step. Edit ▸ Undo History lists the last 30 ("Add Rectangle", "Line Width"…); choose one to undo it and every step after it.
Comments, replies and statuses
A comment says what a markup is about: an RFI question, a field note. Type it in Properties ▸ General ▸ Comments, or double-click a markup that has no text of its own (a cloud, say) to open its pop-up note; right-click ▸ Open Pop-up Note does the same. For a text box, callout or other markup with its own text, double-click to edit that text.
To reply to a markup
- Right-click the markup, or its row in the Markups List, and choose Reply….
- Type your reply in the Reply box and click OK.
The reply is saved with your name and the time, under the markup in the Markups List.
On A-101, Priya S. answered RFI 014 ("Swing reversed to open out; see sketch ASK-07") and Marcus T. replied under it, so the whole exchange stays with the callout.
See which markups have replies
Turn on View ▸ Always Show Reply Indicators (off at first) to put a speech-bubble icon beside every markup with replies. Hover over the icon to read them; click it to open the Markups List.
Statuses
To record a decision, right-click the markup and choose Set Status ▸ Review ▸ Accepted (or another state), or use the Status column of the Markups List. Each change adds a line to the Status History with your name and the time. Check, in the same menu, gives a markup a private tick of your own. See Markups List and reports.
Flatten and unflatten
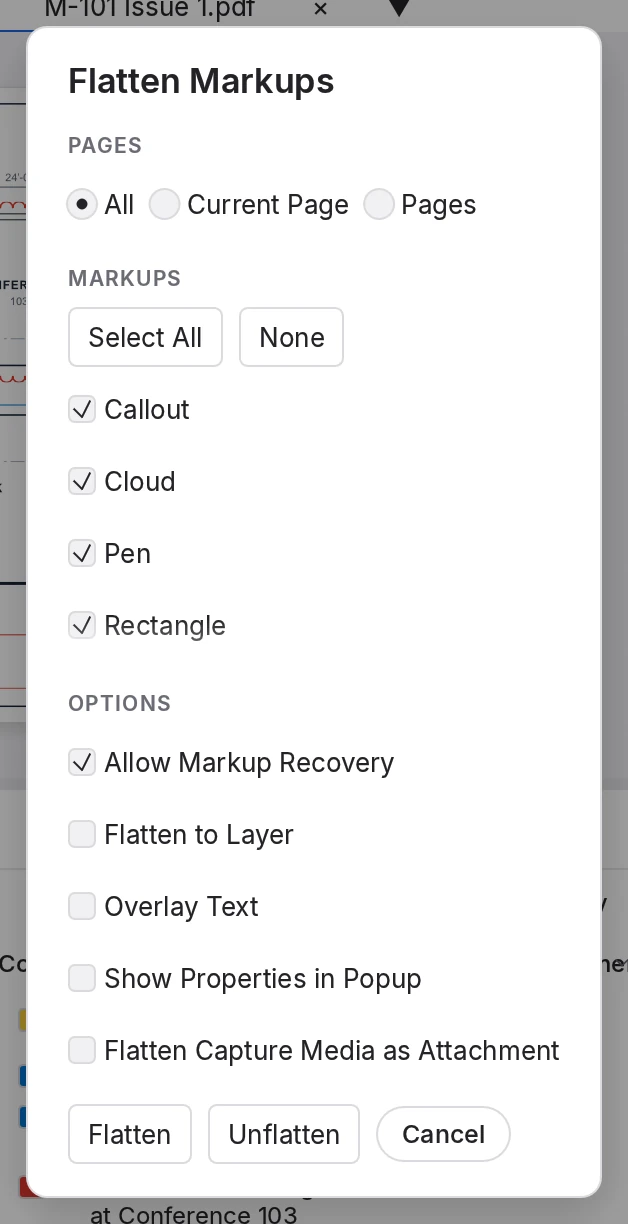
Flattening turns markups into part of the page: they look the same in any PDF viewer but can no longer be edited, so flatten when you issue a set, not mid-review. Right-click ▸ Flatten flattens the selection and keeps recovery data. For the whole document, choose Document ▸ Flatten… Ctrl+Shift+M.
 1
2
3
4
5
- Pages. All, the Current Page, or Pages such as 1-3, 5.
- Markups. The kinds to flatten. Opened with a selection, it starts on Currently Selected Markups; with the Markups List filtered, it also offers Exclude Filtered Markups.
- Allow Markup Recovery. On at first. Leave it on unless you mean it to be permanent.
- More options. Flatten to Layer, Overlay Text (each markup's comment printed on it), Show Properties in Popup and Flatten Capture Media as Attachment.
- Flatten, Unflatten. Unflatten restores the pages chosen above; Document ▸ Unflatten Ctrl+Shift+U restores every page.
With Allow Markup Recovery off, MarkupRight asks you to confirm, and Unflatten can never bring those markups back. Even with recovery on:
- A document keeps at most 50 MB of recovery data; pages past that are flattened without it, and MarkupRight says which.
- Unflatten refuses a page changed since, for example by Edit Text, Erase Content, Cut Content, Color Processing or redaction.
- Hidden markups, links and form fields aren't flattened. Embedded photos and videos are dropped unless you tick Flatten Capture Media as Attachment.
File ▸ Publish As ▸ Flattened… writes a flattened copy and leaves your document as it is. For many files, use Batch ▸ Flatten Markups… (Batch processing).
For power users Expert
- Preferences ▸ Tools ▸ Markup: Enable Selection Cycle (
markup.selection_cycle), Dynamically Set as Default Properties (markup.dynamic_set_as_default), Scale Appearance Properties for Grouped Markups (markup.scale_group_appearance: resizing a group scales line widths and text too), Retain Layer Information when copying Markups (markup.retain_layer_on_copy), Show Author and Date in Pop-Ups (markup.show_author_date_in_popups) and Drag Behavior for Shapes (markup.drag_behavior_shapes). - Style sets. Manage Line Style Sets… and Manage Hatch Sets… import .blx, .bhx, .lin and .pat files into the Style Sets Folder (
Documents/MarkupRight/Styles). Markups keep their own copy of a style, so editing a set never changes existing markups. - Change Colors… (right-click) swaps every use of a color across the selection, a group or a tool set, in one step.
- Undo depth. A document keeps 100 undo steps; Undo History shows the latest 30.
- Automation.
markup_set_appearance,markup_transform,markup_align,markup_distribute,markup_order,markup_flip,group_create,markup_control_points,markups_paste_in_place,comment_reply,status_set,doc_flattenanddoc_unflatten, with coordinates in PDF points from the page's lower-left corner. See Command line and AI agents.