Mark up drawings
Clouds, callouts, notes, highlights and sketches are how a review gets written down. This page covers every markup tool: when to use it, how to draw it, and the key that picks it.
- You'll learn
- How to draw each kind of markup, finish or cancel it, and draw precisely with snapping.
- Where
- The Markup toolbar, and Tools ▸ Markup
- Fastest
- One key per tool: C Cloud, Q Callout, T Text Box
What a markup is
A markup is a mark you add on top of a PDF page: a shape, some text, a highlight, a stamp. It never changes the drawing underneath, and you can move, restyle or delete it at any time.
Every markup also carries information: who made it (Author), what it is (Subject), when it was made, a Label, Comments, a review Status and replies. That's what turns a marked-up sheet into a list you can sort, filter and report on in the Markups List.
 1
2
3
4
5
6
7
8
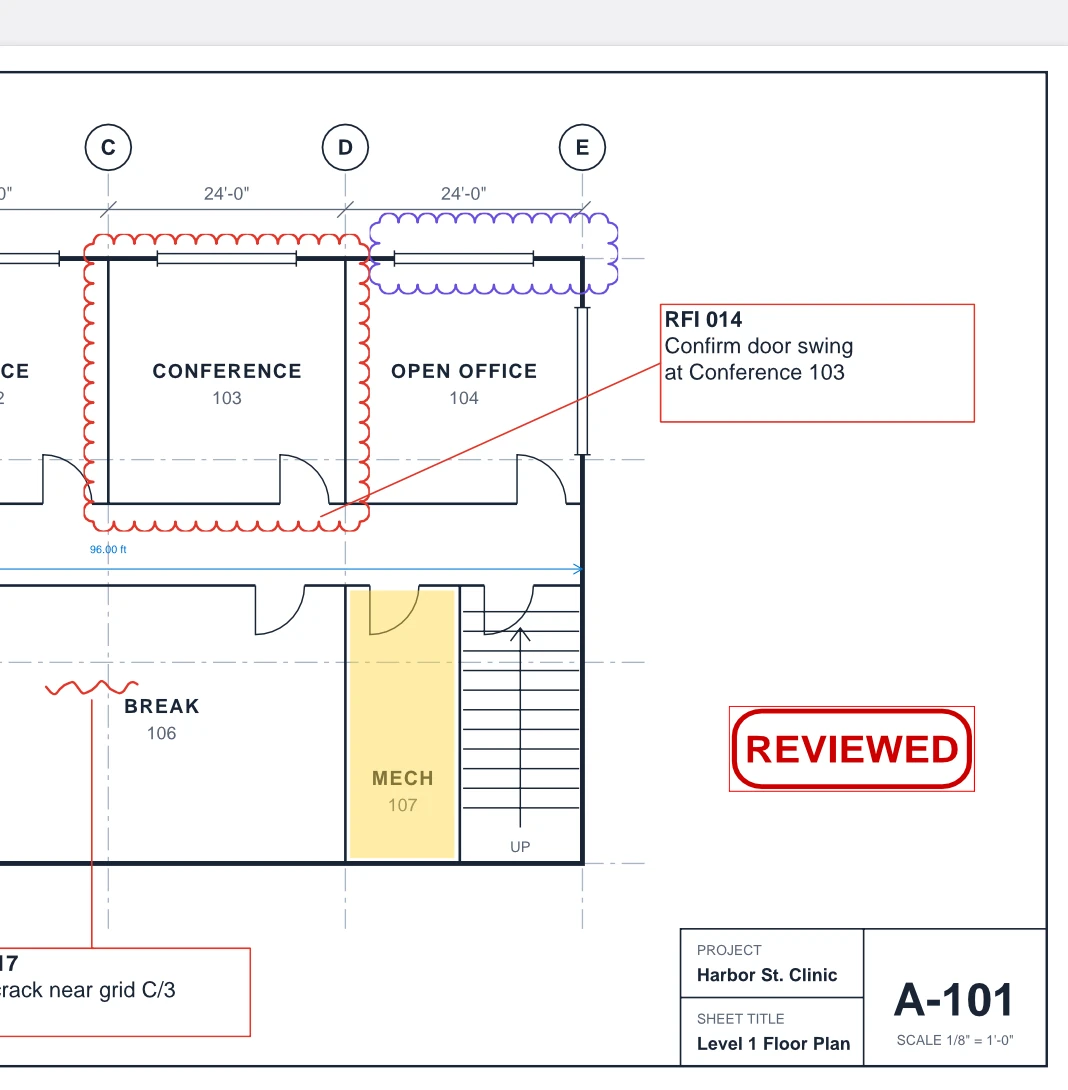
- Cloud around a changed area (Priya S., architect).
- Cloud in another colour for another discipline (Arjun K., structural).
- Callout: text in a box with a leader pointing at the problem.
- Rectangle with a see-through yellow fill, used as a highlight.
- Pen: a freehand sketch of a slab crack.
- Stamp: a ready-made REVIEWED stamp.
- Length measurement along the corridor (see Measure and take off).
- Callout for a second RFI.
MarkupRight saves markups as standard PDF annotations with their appearance, so colleagues using other PDF viewers see them too. The extra review data (status, labels, measurements) travels inside the same file.
Pick a tool
There are three ways to choose a markup tool. They all do the same thing, so use whichever is closest.
- The Markup toolbar. Shown when you first start, with the tools you'll use most:

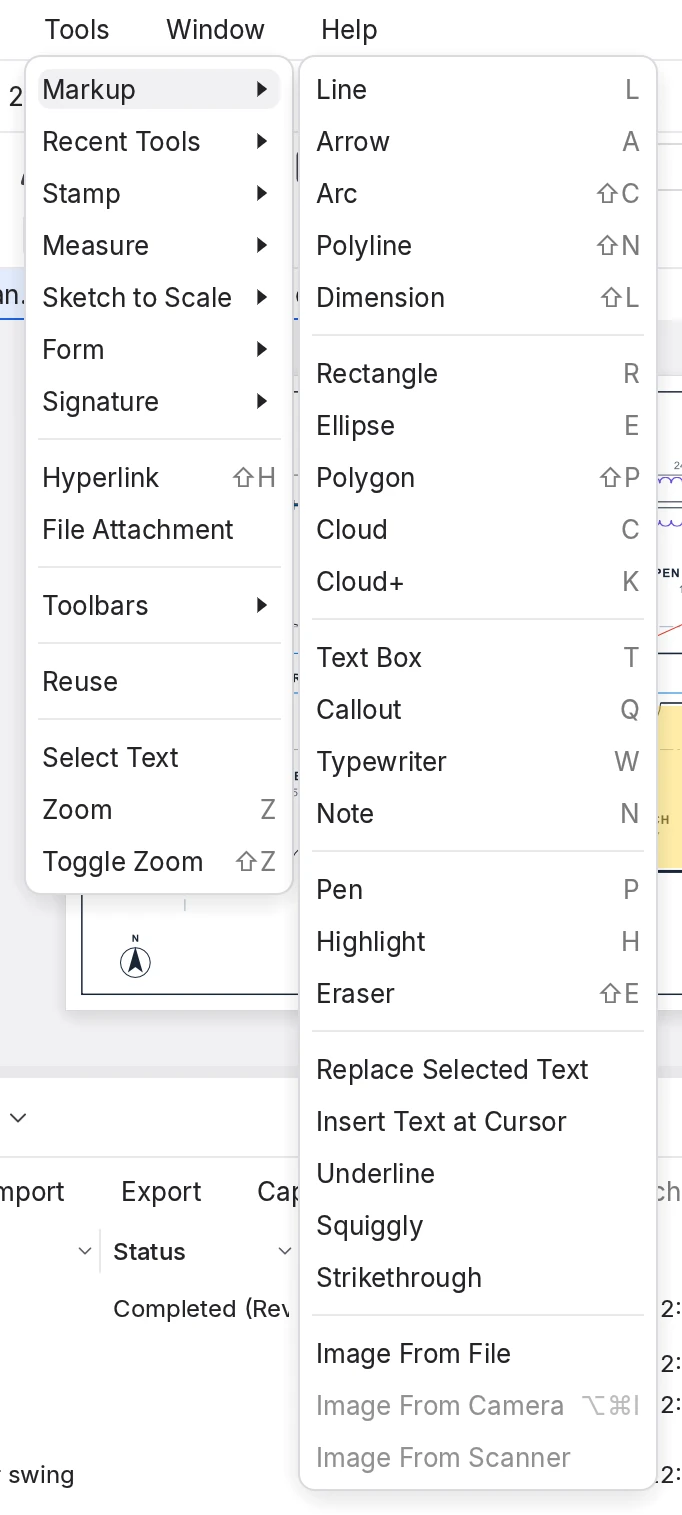
- The Tools menu. Tools ▸ Markup lists every markup tool with its key.
- The keyboard. Each tool has a single key, shown in the menu and in the tool tables below. With the page focused, press C and you're drawing a cloud.
You can also type a tool's name in Help ▸ Find Tools + Commands Ctrl+K, or reuse a tool you've just used from Tools ▸ Recent Tools (the last 12).
Draw, finish, cancel
Every tool follows the same rhythm:
- Pick the tool. The pointer changes over the page.
- Click or drag on the page, as described for that tool below.
- For tools with several points (polyline, polygon, cloud), finish with Enter, a double-click, or by clicking the first point again.
- For text tools, type, then press Esc or click away.
The markup is placed and the tool hands back to Select, ready for you to adjust it.
While you're drawing:
| Press | To |
|---|---|
| Shift | Keep lines and segments at 0°, 45° or 90°; make rectangles square and ellipses round. |
| Alt | Draw an ellipse from its centre; make an arc pass through three points. |
| Backspace | Remove the last point you placed. |
| C | Close a polyline, polygon or cloud back to its first point. |
| Enter | Finish the shape. |
| Esc | Throw the shape away. Pen strokes already drawn and text already typed are kept. |
Keys you press mid-shape go to the tool first, so pressing C to close a polygon won't switch you to the Cloud tool.
Text and notes
Text Box T
Drag a box and type. Click once for a standard 2 × 0.5 in box. Hold Shift for a square.
Callout Q
Click the point the leader should touch, then click where the text box goes, and type.
Typewriter W
Click and type text with no box, in a typewriter font. An empty one is removed.
Note N
Click to drop a note icon, then type in its pop-up. Hover over it later to read it.
- Edit the text later: with the Select tool, double-click the markup. Ctrl+B and Ctrl+I make the selected words bold or italic.
- Fit the box to the text: while you're typing, press Alt+Z (Autosize Text). To fit boxes automatically as you type, turn on Preferences ▸ Tools ▸ Markup ▸ Autosize Text Box and Callout Markups.
- Point a text box at something: right-click it and choose Add Leader, then drag the leader's tip and knee. A callout's leader has no arrowhead until you choose one in Line End.
Shapes and clouds
Cloud C
The classic revision cloud. Click corner points around the area; close on the first point or press Enter. Drag from the first point for a rectangle.
Cloud+ K
A cloud with a callout. Draw the cloud, click where its text box goes, then type.
Rectangle R
Drag a box, or click for a 1 in square. Give it a see-through fill to use it as a highlight.
Ellipse E
Drag an ellipse. Shift makes a circle; Alt draws from the centre.
Polygon Shift+P
Click three or more corners, then close it like a cloud.
Lines and arrows
Line L
Drag, or click the start and then the end. Shift keeps it at 45° steps.
Arrow A
Like Line, with an arrowhead at the end.
Polyline Shift+N
Click each point; finish with Enter or a double-click.
Arc Shift+C
Click the two ends. Hold Shift on the first click for a half circle, or Alt for an arc through three points.
Dimension Shift+L
Drag between two points. Drawn left to right, the dimension sits above them; right to left, below.
A Dimension markup's caption shows the distance on paper, in inches, whatever the drawing's scale. To measure real-world lengths at the sheet's scale, use Tools ▸ Measure ▸ Length instead. See Measure and take off.
Pen, highlighter and eraser
Pen P
Draw freehand. Strokes drawn within a second of each other become one markup. Shift draws straight segments.
Highlight H
A see-through yellow marker for freehand strokes.
Eraser Shift+E
Drag over Pen and Highlight ink to rub it out. It never touches other markups.
To highlight words in the text of a PDF instead of drawing freehand, turn on Preferences ▸ Window ▸ Tablet ▸ Enable Text Highlighting; then the Highlight tool selects text, and holding Ctrl draws freehand. The eraser's size (Small, Medium, Large) and mode (cut strokes or remove whole markups) are in the Properties panel while the eraser is active.
Text review
For documents with real text, such as specifications and reports, these tools mark the words themselves. Drag across the text, or double-click a word.
Replace Selected Text
Mark words for replacement and type the new wording in the pop-up.
Insert Text at Cursor
Click between characters and type the text to insert.
Underline
Underline the selected words.
Squiggly
A wavy underline, often used for "check this".
Strikethrough
Strike out words to delete.
The marked words are copied into the markup's comments, so they show up in the Markups List.
Images, stamps, attachments and links
Image From File
Pick a PNG, JPEG, TIFF, GIF or BMP picture. Click to place it at its own size, or drag to fit it.
Crop Image
On the Shapes toolbar. Select one image, choose Crop Image and drag over the part to keep.
Stamp
Place your default stamp, or choose one from Tools ▸ Stamp. See Tool Chest and stamps.
File Attachment
Pick a file, then click to pin it to the page. Double-click the pin to open it.
Hyperlink Shift+H
Drag an area, then choose what clicking it does: jump to a page, a place or a Space, open a file, or open a web address.
Snapshot G
Copy an area of the page (with its markups) to paste elsewhere, in MarkupRight or another app.
Drop a photo or video file onto any markup to embed it there. A camera badge appears on the markup, and the media travels with the PDF and can be collected into a report (Capture Summary).
What new markups look like
New markups are red, with a 1-point line and 10-point Helvetica text; highlights are see-through yellow. The Subject is the tool's name ("Cloud", "Callout") and the Author is the name in Preferences ▸ General ▸ Options ▸ User. Set that once so your colleagues know who wrote what.
To change how a tool draws from now on, style one markup the way you like it, right-click it and choose Set as Default. To keep several looks of the same tool (a red cloud for the architect, a violet one for structural), save them in the Tool Chest. Changing a markup that's already placed is covered in Edit and style markups.
Keep a tool on with Reuse
After you place a markup, the tool hands back to Select so you can adjust what you drew. When you have several to place, such as clouds around every change on a sheet, turn on Reuse and the tool stays on until you press Esc.
Turn it on in any of three places, which are all the same setting: Tools ▸ Reuse, the Reuse toggle in the status bar, or Preferences ▸ Tools ▸ Markup ▸ Reuse Tools.
Draw precisely with snapping
Snapping pulls the point you're placing onto something exact: a line in the drawing, a corner of another markup, or a grid point. A small marker shows what you've snapped to: a square for an end point, a triangle for a midpoint, a circle for a centre, a plus for a grid point.
| Toggle | Shortcut | Snaps to | |
|---|---|---|---|
| Snap to Content | Ctrl+Shift+F8 | Lines, curves, end points, midpoints and intersections in the drawing (vector lines, not text or pictures). | |
| Snap to Markup | Ctrl+Shift+F7 | Points of other markups. Rest on a point to get guidelines you can follow. | |
| Snap to Grid | Ctrl+Shift+F9 | The grid (show it with Shift+G). |
The same toggles are in the View menu and on the right of the status bar. Markups win over drawing content, and content over the grid. Hold Ctrl while you place a point to ignore the grid just for that point. Pen, Highlight, Eraser and the text tools never snap.
For power users Expert
- Snapping settings are in Preferences ▸ General ▸ Grid & Snap: grid spacing (0.25 in by default) and units, which kinds of content to snap to, page boundaries, Ignore Tiny Line Segments, Sensitivity (how far the pointer reaches) and the snap marker's colour. On very dense sheets the status bar says Snap limited on this page.
- My Tools keys. The first nine tools in the Tool Chest's My Tools set run with 1 to 9. Put your standard cloud, RFI callout and stamp there.
- Pen timing. How long MarkupRight waits before ending a pen markup is Preferences ▸ Window ▸ Tablet ▸ Pen Commitment Interval (250–3000 ms, default 1000). The same page sets the pen cursor and right-click lasso while inking.
- Images. Pictures larger than the page are shrunk to fit; files over 100 MB are refused. Default Image Encoding chooses JPEG, lossless or automatic compression.
- Hyperlinks can open only
https,httpandmailtoaddresses, and links to other files can use relative paths so they survive when a project folder moves. Any markup can carry an action: right-click it and choose Edit Action…. - Automation. The
markup_addtool adds any markup type from JSON, andmarkup_set_appearancerestyles it; see Command line and AI agents.