Measure and take off
Give each page its scale once, then measure lengths, areas, volumes and counts straight off the drawing. Every measurement is a markup, so it shows up in the Markups List and adds up in totals.
- You'll learn
- How to set or calibrate a scale, use every measure tool and total a takeoff.
- Where
- Tools ▸ Measure and Window ▸ Panels ▸ Measurements
- Shortcuts
- Length Alt+Shift+L · Area Alt+Shift+A · last tool again Alt+Shift+M
Why scale matters
A PDF knows only paper distances, measured in points (72 to the inch). The drawing's scale turns paper into the real world: at 1/8" = 1'-0", every inch on the sheet stands for 8 feet. Once MarkupRight knows a page's scale, the measure tools report feet, square feet and cubic feet instead of inches of paper.
Each page keeps its own scale, saved in the PDF, so one file can mix plans and details. Every measure tool needs a scale except Count, the two cutouts and Dynamic Fill's Polygon and Space results; pick another tool on an unscaled page and Set Scale opens first. If a sheet doesn't state its scale, or was printed to fit, calibrate on a dimension you trust:
On sheet M-101 the 30'-0" dimension is 3 3/4" long on paper, so calibrating on it gives 3 3/4" = 30'-0": exactly 1/8" = 1'-0".
Set the scale
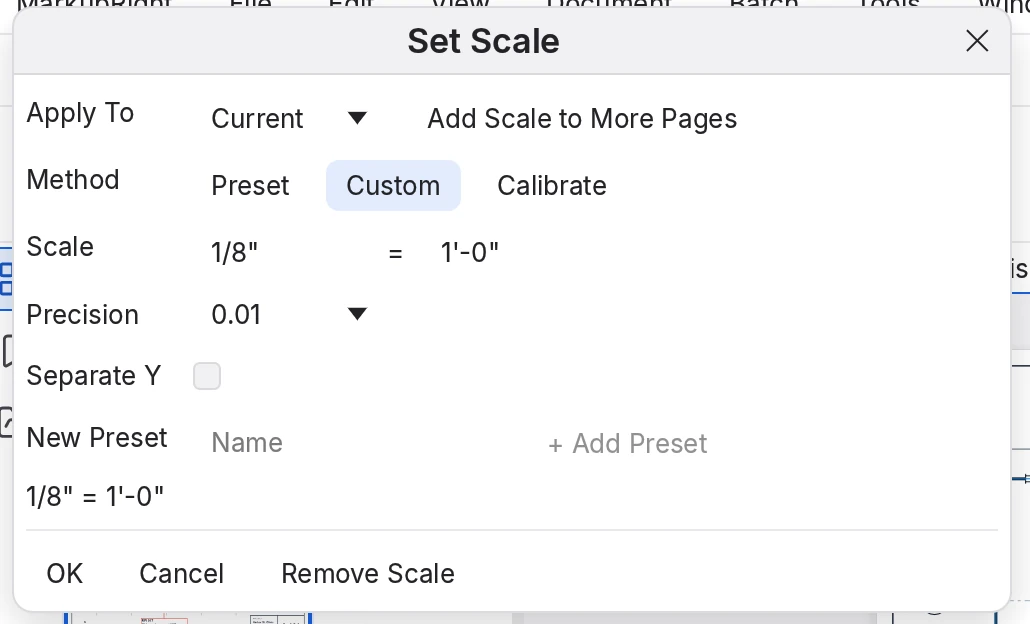
Open Set Scale from Tools ▸ Measure ▸ Set Scale…, by clicking the scale on the navigation bar, with Set Scale… in the Measurements panel, or by right-clicking a page in Thumbnails (or double-clicking the scale line under a thumbnail).
 1
2
3
4
5
6
7
8
9
- Apply To. Current (the default), All, Selected (pages selected in Thumbnails) or Custom, which takes ranges such as
1-3, 5. - Add Scale to More Pages. Switches to Custom, starting from this page.
- Method. Preset, Custom or Calibrate.
- Scale. Drawing length = real length.
- Precision. How readings are rounded.
- Separate Y. A second ratio for vertical distances, as on profiles.
- New Preset. Name the scale and click + Add Preset to keep it.
- Preview. The scale as the read-outs will show it.
- Remove Scale. Takes the scale off the chosen pages.
Preset, Custom or Calibrate
| Method | Use it when | What you enter |
|---|---|---|
| Preset | The title block states a standard scale. | A scale from the list: your presets first, then architectural 1/32" to 3" = 1'-0" (precision 1/16), engineering 1" = 10' to 1" = 100' (0.01) and metric 1:1 to 1:1000 (millimeters up to 1:25, meters from 1:50). |
| Custom | The scale is unusual, or you want another precision. | Both lengths with their units, such as 1" = 20'. |
| Calibrate | There's no usable scale, the sheet was printed to fit, or you want to check one. | Two points on the page and the real Distance between them. |
Precision is a decimal step (1 to 0.000001) or a fraction (1/2 to 1/64); presets carry their own. New scales start at the precision in MarkupRight ▸ Preferences ▸ Tools ▸ Measure (1/16).
Lengths take any unit, even mixed: 1'-6", 3 ft 6 in, 150mm. But in Custom a bare number on the drawing side means inches, and on the real side it takes the drawing side's unit: 1" = 20 means 1" = 20". Type 20'. A bare Distance in Calibrate means feet.
To calibrate a sheet
- Choose Tools ▸ Measure ▸ Set Scale…. If every page shares the scale, set Apply To to All.
- Click Calibrate, then Calibrate….
The dialog steps aside so you can click on the page.
- Click both ends of a dimension you trust. Hold Shift to keep the line at 0°, 45° or 90°; the points snap to the drawing's lines.
Set Scale returns, with Points reading, for example, "270.0 pt apart on page 1".
- Type the real length in Distance, such as
30', and choose a Precision. - To reuse the scale, name it in New Preset and click + Add Preset. A taken name offers Replace or Rename.
- Click OK.
The navigation bar, status bar and thumbnail show the new scale, such as 3 3/4" = 30'-0".
A slightly-off click matters less over 30 feet than over 3. Then check the scale by measuring another known dimension with Length.
Where the scale shows
The navigation bar and status bar show the current page's scale, and each thumbnail shows its page's scale under the label. A preset or custom scale reads 1/8" = 1'-0"; a metric one shows both sides, so 1:100 reads 1 mm = 0.1 m; a calibrated one shows the span you clicked, 3 3/4" = 30'-0"; and a page without one says Scale Not Set.
Protected files and temporary scales
A file that's read-only, signed, certified or locked as PDF/A can't store a scale, so the one you set lasts only for this session. Set Scale warns "Protected: the scale is temporary, for this session only, and isn't saved", the read-outs add (temporary) and the status bar shows Scale not saved. If the page has measurements, you're offered Recalculate or Not Now. Protected files can't take viewports.
The measure tools
The tools are in Tools ▸ Measure, in the Measurements panel and on the Measure toolbar (Tools ▸ Toolbars ▸ Measure). The same rules apply to all of them:
- Points snap to markups, the drawing's lines and the grid; hold Ctrl to ignore the grid. Shift keeps line-like tools at 0°, 45° or 90°.
- Backspace removes the last point. Esc cancels, except that a Count keeps what you've clicked.
- A small Measurement window at the lower right shows the live value. Close it and the value follows the pointer; Show Preview in the panel's Totals brings it back.
- After each measurement you're back on Select unless Reuse is on.
Measure Alt+Shift+M
Picks up the last measure tool you used (Length at first) and reports what that tool reports.
Length Alt+Shift+L
Drag from end to end, or click both ends. Reports the distance.
Polylength
Click each point along a path; press Enter or double-click to finish. Reports the total length, plus any Rise/Drop.
Perimeter Alt+Shift+P
Click around the shape, click the start again, then press Enter. Reports the length; with a Depth, also the wall area (WA).
Area Alt+Shift+A
Click each corner, then the first again (or press Enter or C, or double-click). Or drag from the first point for a rectangle. Reports the area, net of cutouts.
Volume
Draw it like an Area and set a Depth. Reports net area × depth (one unit of the scale while Depth is blank).
Diameter
Drag across the circle, edge to edge. Reports the diameter (Ø).
Angle
Three clicks: one arm, the corner, the other arm. Reports the angle, up to 180°.
Center Radius
Click the center, then click the rim for a circle, or drag along it for an arc of up to 180°. Reports the radius (R).
3-Point Radius
Click three points on an arc. Reports its radius (R).
Count
Click each item; press Enter or Esc to finish. Needs no scale. Reports how many.
Polygon Cutout
Outline a hole inside an Area or Volume, the way you'd draw an Area. The host's reading drops.
Ellipse Cutout
Drag an ellipse inside an Area or Volume. Shift makes a circle; Alt draws from the center.
Dynamic Fill
Press inside a room to fill it out to its walls, then click Apply. Makes one markup per region.
Right-click a measurement for Reset Caption Position. On a Polylength or Perimeter, Split into Length takes the segment under the pointer out as a Length of its own; Split All into Lengths splits a whole Polylength.
A worked takeoff
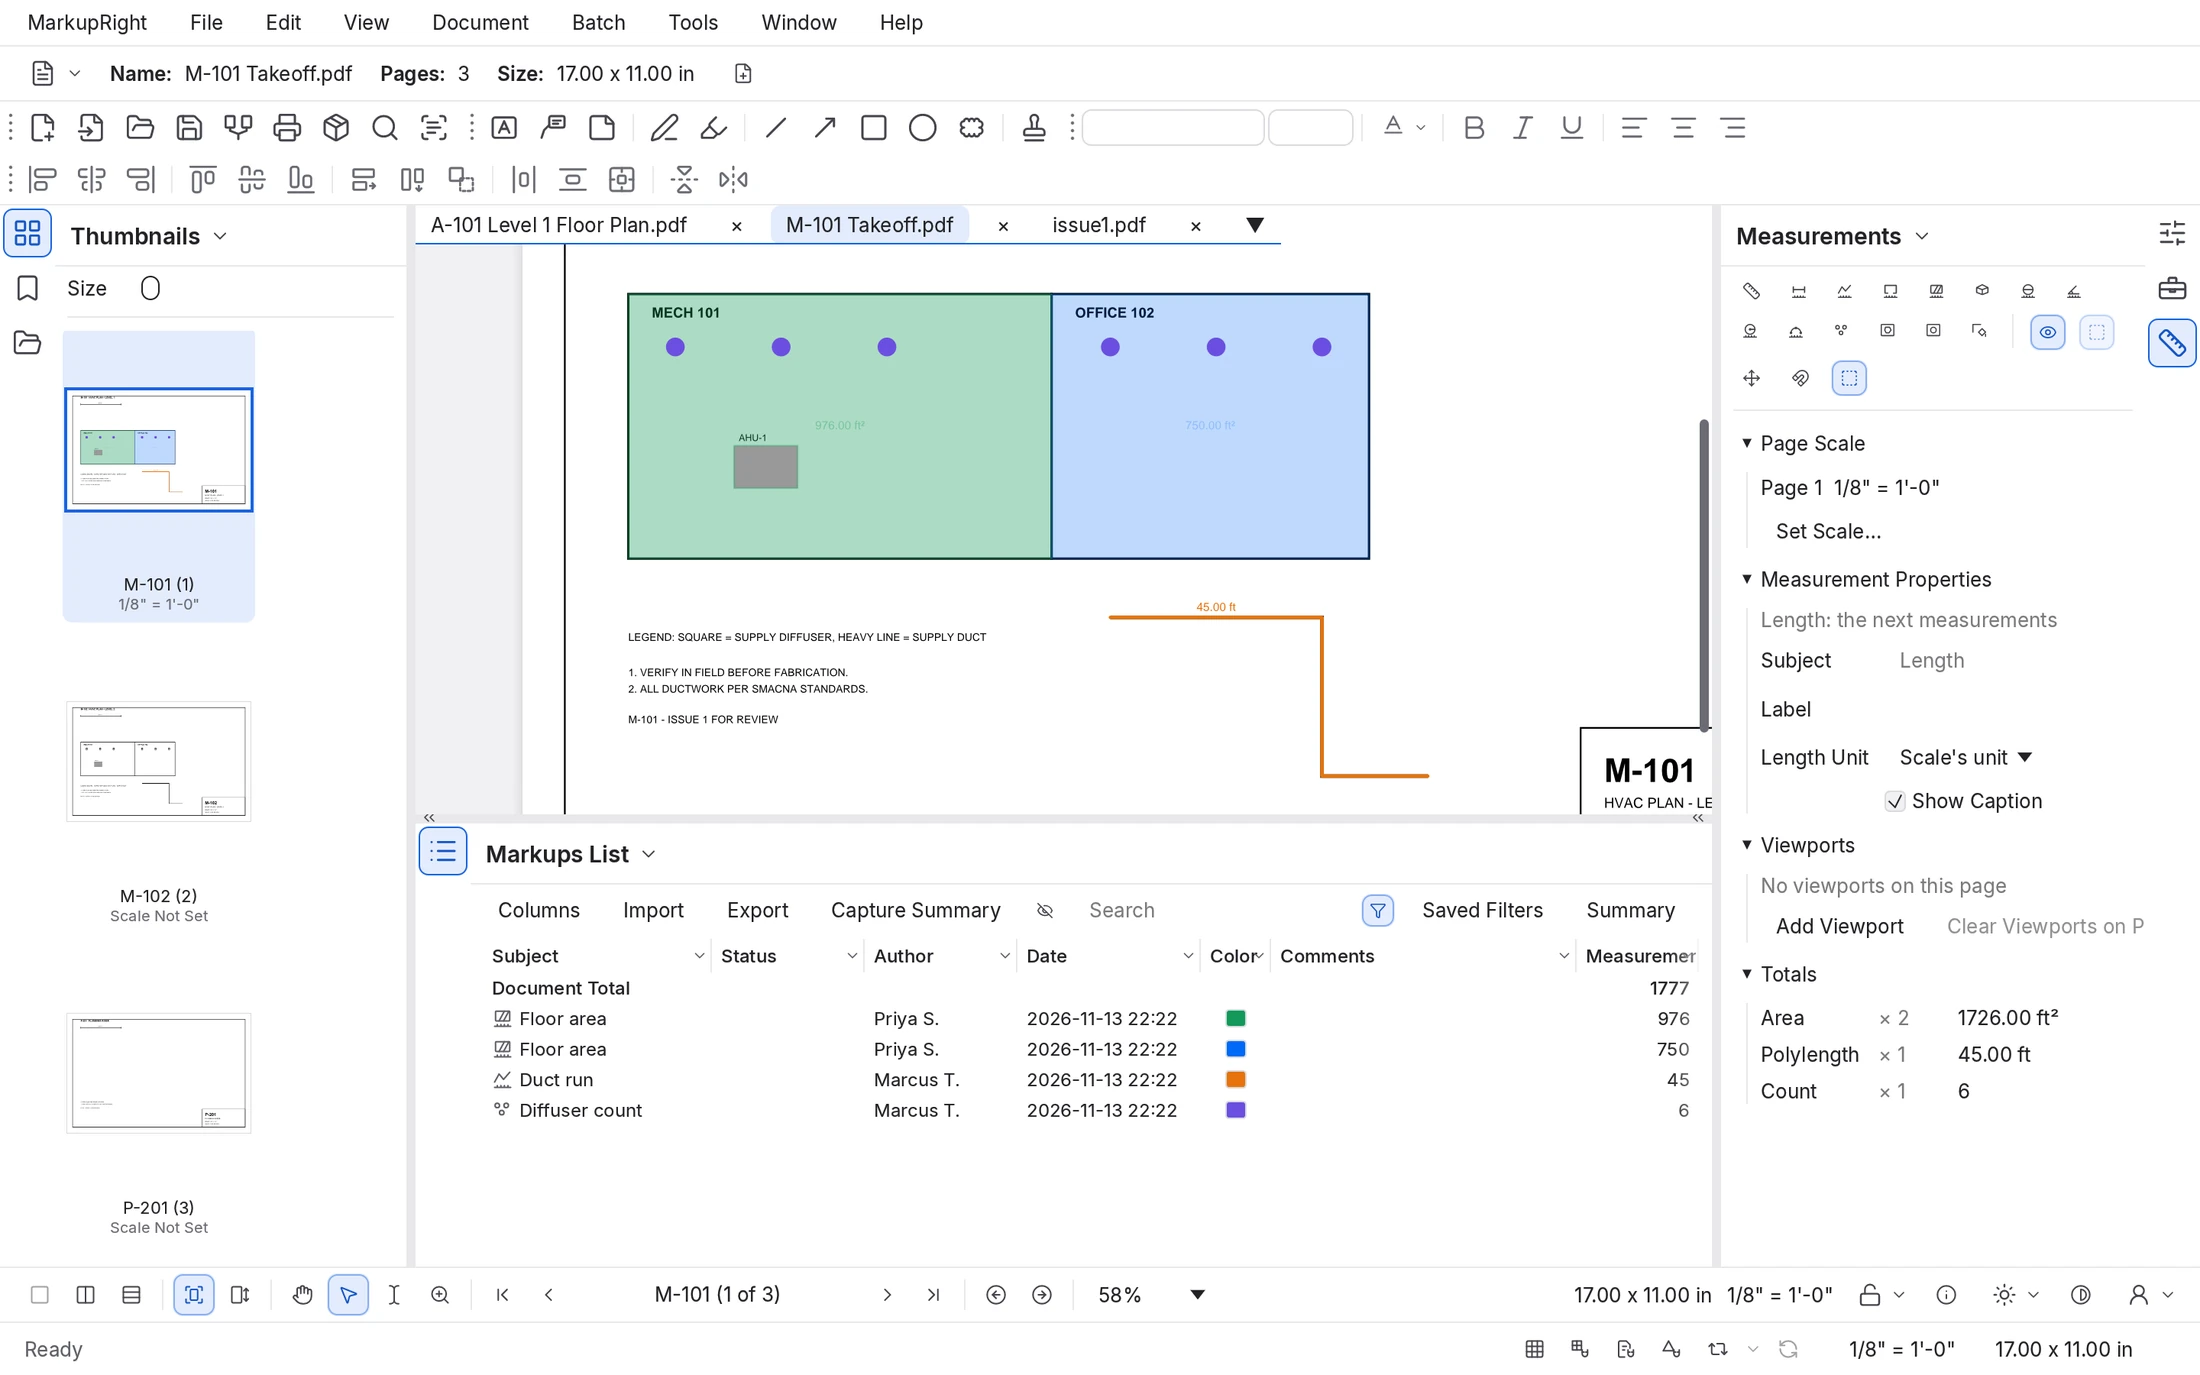
Here is a small HVAC takeoff on sheet M-101, a mechanical plan at 1/8" = 1'-0". Priya S. measured the rooms, and Marcus T. took off the supply duct and the diffusers.
 1
2
3
4
5
6
7
8
9
- Thumbnails. Each page's scale: M-101 is 1/8" = 1'-0"; the others say Scale Not Set.
- MECH 101. An Area of 976.00 ft²: 1,000 sq ft less the pad.
- AHU-1 pad. A Polygon Cutout that takes 24 sq ft out of the room.
- OFFICE 102. An Area of 750.00 ft².
- Supply duct. A Polylength of 45.00 ft.
- Diffusers. One Count markup with six marks.
- Page Scale. The current page's scale.
- Totals. The page summed by kind: Area × 2, 1726.00 ft²; Polylength × 1, 45.00 ft; Count × 1, 6.
- Markups List. A row per measurement, with its main value in the Measurement column.
To take off sheet M-101
- Check that the thumbnail under M-101 says 1/8" = 1'-0". If it says Scale Not Set, set the scale first.
- Choose Window ▸ Panels ▸ Measurements. Click Area in its tool grid, then type
Floor areain Subject. - Click the four corners of MECH 101, then the first corner again.
The room fills and reads 1000.00 ft².
- Choose Tools ▸ Measure ▸ Polygon Cutout and click around the AHU-1 pad, finishing on its first corner.
MECH 101 now reads 976.00 ft².
- Press Alt+Shift+A and outline OFFICE 102 the same way.
750.00 ft², with the same Subject.
- Click Polylength, type
Duct runin Subject, click the start of the duct, each bend and the end, and press Enter.45.00 ft.
- Click Count, choose a Symbol, type
Diffuser countin Subject, click the six diffusers and press Enter.One count markup that reads 6.
- Read the results in the panel's Totals, or press Alt+M to see them in the Markups List.
A Subject or Label typed in the panel belongs to the armed tool, and switching to another measure tool clears it. Keep subjects consistent ("Floor area" on every room) and the Markups List can sort and subtotal by them.
Counts, cutouts and more
Counting
A count is one markup holding a numbered mark for each click; the pointer shows the tally as you go ("Count 4 · 6 on the page").
- Symbol. Circle (the default), Square, Triangle, Diamond, Cross, Check or Numbered Circle. To count with another markup's look, select it and click Use Selected Markup.
- Width and Height. Give the items a size and the count also reports their total area, handy for ceiling tiles.
- Right-click a count for Resume Count, Delete from Group (the rest renumber), Split Counts, Split All and Merge Counts, which pulls the page's other unlocked counts into this one.
- Count from a search. In the Search panel Alt+1, tick the results and choose Actions ▸ Apply Count Measurement to count every "FD-1" tag, say. See Search.
Cutouts
A cutout takes a hole out of an Area or Volume, such as a shaft or an equipment pad. Draw Polygon Cutout or Ellipse Cutout over the measurement; it highlights when you're on it. Overlapping polygon cutouts merge ("Merged with 2 cutouts"), and one across the edge trims the shape. An ellipse cutout must sit fully inside and overlap no other cutout. Right-click a cutout for Delete Cutout, or Convert Cutout to make the hole an Area or Volume of its own; hold Shift to convert them all.
Dynamic Fill
Dynamic Fill finds a room's walls for you. Choose Tools ▸ Measure ▸ Dynamic Fill and a toolbar appears over the page:
| Control | What it does | |
|---|---|---|
| Fill | Press inside a room: the fill spreads to the walls while you hold. Drag while holding to take in more rooms. | |
| Add Boundary | Drag a line across a doorway or gap the fill leaks through. | |
| Create | What Apply makes: Polygon (the default), Area, Polylength, Perimeter, Volume, or a Space with a name, color and opacity. | |
| Apply | One markup per region, as a single undo step. Boundaries stay until cleared. | |
| Clear | Clear All, Clear Fill or Clear Boundaries. | |
| Fill Settings | Boundary and fill size and color, Fill Speed and Edge Sensitivity, for this session. |
Walls come from the drawing's lines, with small gaps bridged according to Edge Sensitivity; on a scanned sheet, dark pixels count as walls. Press where nothing is enclosed and you'll see "Nothing encloses this point: add a boundary or click inside a closed area". The measured kinds need the page to have a scale.
Viewports: two scales on one sheet
A viewport is a rectangle of the page with its own scale, for a detail or enlarged plan drawn at another scale. Choose Tools ▸ Measure ▸ Add Viewport (or Add Viewport in the panel), drag around the detail, then give it a Name and a scale by Preset, Custom or Calibrate, as in Set Scale.
A measurement uses the innermost viewport under its first point, and otherwise the page's scale. Highlight Viewports lights up the one under the pointer. In the panel's Viewports section, double-click a name to rename it, use Scale… or the bin to change or delete one, or Clear Viewports on Page and Clear from Document. An unnamed viewport shows an Unnamed viewport badge in the status bar; name it so its measurements say which scale they use.
Recalculate after a scale change
A new scale never rewrites measurements already placed. Choose Tools ▸ Measure ▸ Recalculate to read every measurement in the document again with the scale at its first point, as one undo step. A notice says how many changed ("12 readings recalculated") or "Every reading is up to date".
Sketch to Scale
Draw shapes at sizes you type, on a scaled page. Choose Tools ▸ Sketch to Scale ▸ Polygon, Rectangle, Ellipse or Polyline Sketch to Scale, and click the first point. A box by the pointer asks for a rectangle's Length, Width and Rotation, an ellipse's Width, Length and Rotation or Radius (Ctrl switches circle and ellipse), or each segment's Length and Rotation. Tab moves between boxes and Enter commits; pressing it twice on empty boxes finishes a polygon or polyline, and Esc discards it.
Rectangles and polygons become Area measurements, polylines become Polylengths, and ellipses stay Ellipse markups. MarkupRight ▸ Preferences ▸ Tools ▸ Sketch sets Rotation Input (Relative to the last segment, or Absolute) and Ellipse Mode.
The Measurements panel
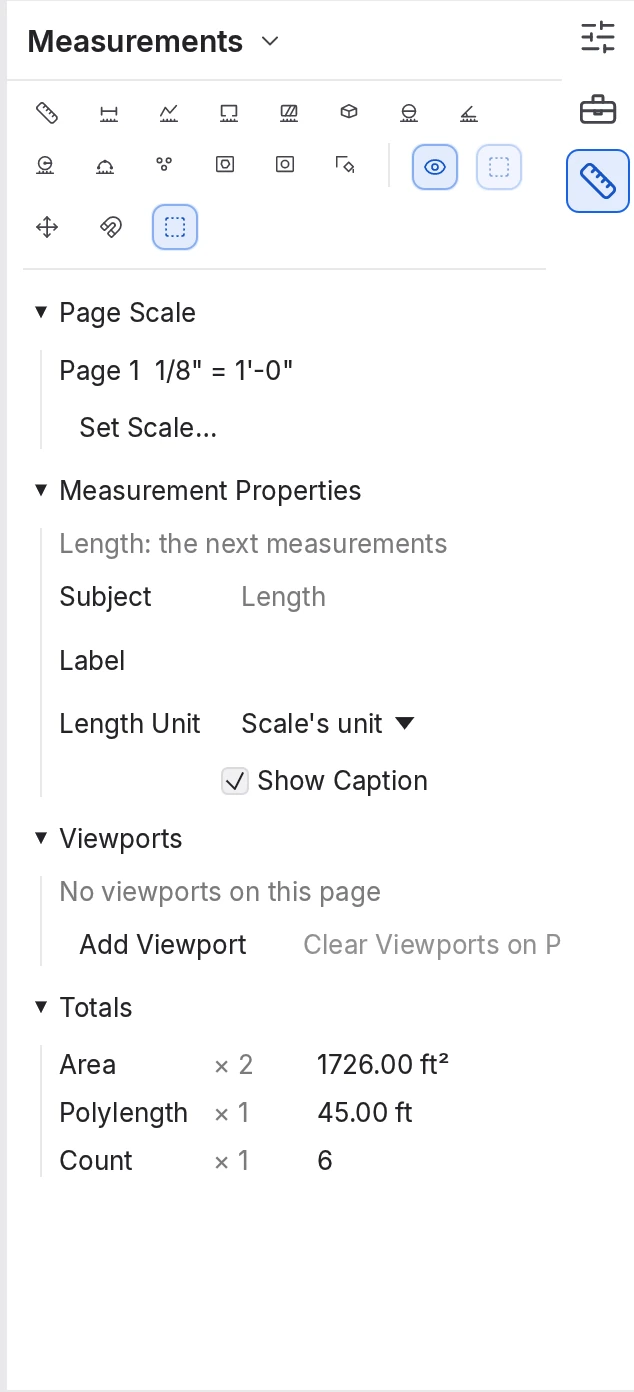
Open it with Window ▸ Panels ▸ Measurements; it docks on the right. It gathers the tools, the page's scale, the settings for your next measurement and the page's totals.
 1
2
3
4
5
6
7
- Tool grid. Measure, then every measure tool. Click one to arm it.
- Show Measurement Tools. Hides or shows the tool grid.
- Snap Orthogonal, Snap to Content, Highlight Viewports. 45° steps; snapping to the drawing's lines Ctrl+Shift+F8; the viewport under the pointer lit up.
- Page Scale. The current page's scale, and Set Scale….
- Measurement Properties. Settings for the armed tool's next measurements.
- Viewports. The page's viewports.
- Totals. The page's measurements, summed by kind.
Measurement Properties
These apply to the armed tool's next measurements; the heading names the tool ("Length: the next measurements"). For a measurement already placed, select it and open the Properties panel Alt+P: the same settings are under Measurement on its Appearance tab.
| Setting | Tools | What it does |
|---|---|---|
| Subject, Label | All | What the Markups List shows in its Subject and Label columns. |
| Depth | Area, Volume, Perimeter | A height or thickness, for volume and wall area. A bare number is in the scale's unit. |
| Symbol, Width and Height | Count | The mark each click places; each item's size, for a total item area. |
| Length Unit, Area Unit, Volume Unit | Measuring tools | Scale's unit, or in, ft, yd, mi, mm, cm, m, km or pt. |
| Show All Measurements | Area | Adds the perimeter (P) and, with a Depth, wall area (WA) and volume (V). |
| Slope | Area | None, Pitch, Degree or Grade: the sloped surface's area, as for a roof. |
| Rise/Drop | Polylength | Adds a vertical run, such as a riser, to the length. |
| Show Caption, Show Segment Values, Show Centroid | Varies | Show the value on the page, each segment's length, and an area's center. |
Totals
Totals adds up the current page by kind, with how many markups went into each: Area × 2, 1726.00 ft². Select measurements and a Selection block totals just those. On a page with Spaces, counts are also split by Space ("Count in MECH 101", "Count outside Spaces"), unless you turn off Automatically Split Count Measurements by Space in MarkupRight ▸ Preferences ▸ Tools ▸ Measure. For the whole document, see the Document Total in the Markups List.
Spaces
A Space is a named, colored region of a page, such as a room or a zone. Spaces can nest but never partly overlap. Every markup belongs to the innermost Space that holds the center of its bounding box, so a takeoff can be sorted and totaled room by room: the Markups List has a Space column, count totals split by Space, and a Markup Summary can start a new page per Space.
Open the Spaces panel with Alt+S:
| Button | What it does | |
|---|---|---|
| Add Space | Click around a polygon or drag a rectangle, then set its Name, Color and Opacity. | |
| Highlight | Tints every Space on the page. | |
| Edit Spaces | Drag Spaces or their corners; double-click a wall to add a corner. | |
| Properties, Delete, Paste | Change, remove or paste the selected Spaces. |
Right-click a Space for Create Area Markup, Create Hyperlink, Snapshot and the clipboard commands. Dynamic Fill can make Spaces too: set Create to Space.
Flags
Flags are MarkupRight's own page markers for moving around a long document (Window ▸ Panels ▸ Flags). Add Linked Flag Shift+F marks the current page; Add Unlinked Flag runs an action instead: Jump to Page, Hyperlink or Open File. Click a flag in the panel to use it.
Units and number formats
A measurement shows its own unit if you set one, and otherwise the scale's real unit. The precision decides the format:
| Reading | Fractional precision (1/16) | Decimal precision (0.01) |
|---|---|---|
| A length in feet | 10'-6" | 10.50 ft |
| A length in inches | 6 1/2" | 6.50 in |
| An area or volume | 976.00 ft² | 976.00 ft² |
Areas, volumes and lengths in units other than feet and inches are always decimal, with two places under a fractional precision. A measurement with several values shows one per line: A (area), P (perimeter), WA (wall area) and V (volume). M-101's scale uses 0.01, which is why its duct reads 45.00 ft rather than 45'-0".
For power users Expert
- Defaults. MarkupRight ▸ Preferences ▸ Tools ▸ Measure holds Length Unit (
measure.units, Scale's Unit), Precision for new scales (measure.precision, 1/16), Show Caption (measure.show_caption, on), Show Segment Values and Show Centroid (off), Automatically Split Count Measurements by Space (measure.split_counts_by_space, on) and the Dynamic Fill defaults (measure.fill.*). Use legacy persist behavior for Subject and Label (markup.persist_subject_label) keeps a typed Subject across every measure tool. - Dynamic Fill tuning. Dynamic Fill Input (
measure.fill.input_dpi, 150 dpi; 100 to 300) is the resolution scans are searched at, with large sheets held to 12 million pixels. Edge Sensitivity 1 bridges gaps up to 5 pt and 10 only 0.5 pt; on scans, higher values also take fainter lines as walls. - Where scales live. Page scales and viewports are saved in the PDF. Presets are in
scale_presets.jsonin the settings folder, included in Back Up Settings and shared with a Tool Chest set's Set Scale…. A preset can be replaced but not deleted in this version. - Calibrate from the keyboard. Run Calibrate from Find Tools + Commands Ctrl+K, click two points, and Set Scale opens with them filled in.
- Automation. When MarkupRight ▸ Preferences ▸ Admin ▸ MCP allows it, AI agents can take off through the MCP connector with
measure_set_scale,viewport_add,viewport_list,viewport_remove,measure_add,measure_recalculate,measure_totals,measure_count_split,measure_count_merge,measure_cutout_add,measure_cutout_convert,fill_run,sketch_add,space_list,space_addandspace_at. Coordinates are PDF points; temporary scales are refused. See Command line and AI agents.