Pages and document tools
Put a drawing set's pages in order, label and number them, and run the tools that work on a whole document: headers and footers, bookmarks, links, layers, OCR, file size, repair and archiving.
- You'll learn
- How to rearrange, insert, split and label pages, and when to reach for OCR, Reduce File Size, Repair PDF and PDF/A.
- Start here
- Document ▸ Organize Pages Alt+T opens Thumbnails. Right-click a page for its tools.
- Signed or secured?
- Signed files refuse page changes, and so do files whose security limits them. Hover over a grayed command to see why.
Thumbnails: see and arrange pages
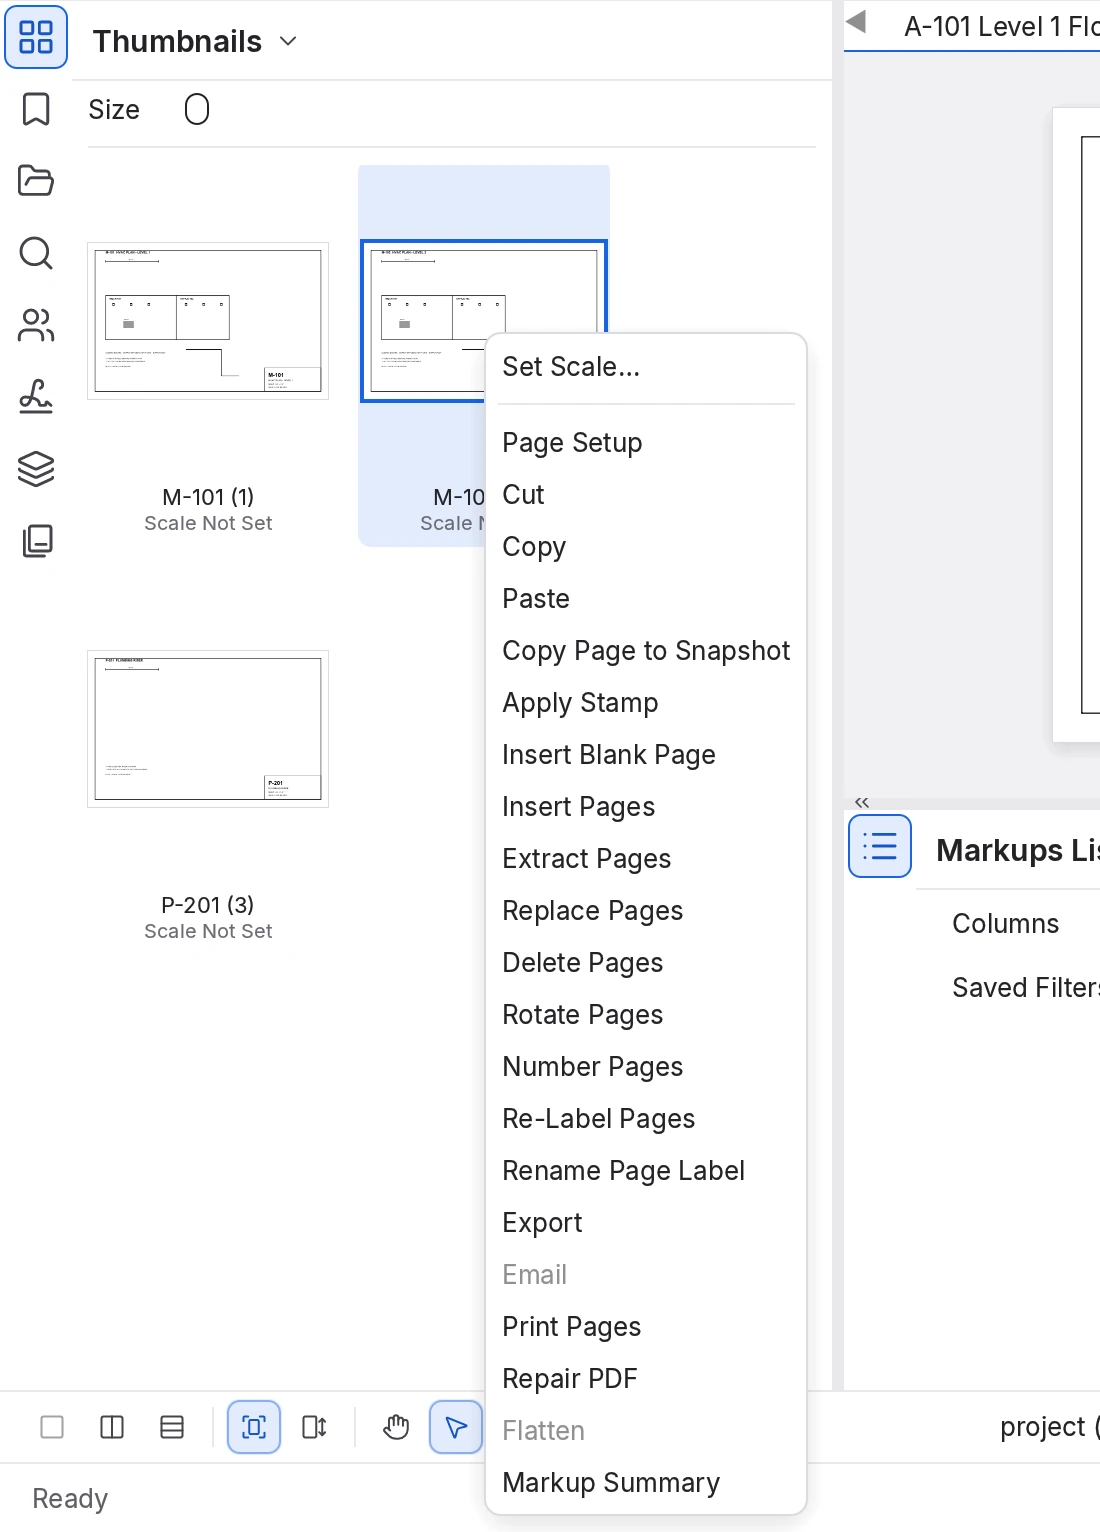
The Thumbnails panel shows every page as a small picture, with its page label, its page number in brackets and its drawing scale. Most page work starts here: select pages, then right-click them.
 1
2
3
4
5
- Size. Drag to make the thumbnails larger or smaller.
- Label and scale. M-101 (1) is page 1, labeled M-101. Under it is the page's scale, or Scale Not Set.
- Selected page. Selected pages are tinted; the page on screen has a blue frame.
- Page menu. The page tools, applied to every selected page.
- Grayed items. Flatten needs markups on the document. Email isn't available in this version.
- Select pages: click one, Shift-click to select a range, or Ctrl-click to add pages one at a time.
- Move pages by dragging them into the gap between two others. Bookmarks follow their pages while the Preferences setting General ▸ Document ▸ Automatically Reorder Bookmarks is on, as it is at first.
- Add another PDF by dragging it from your desktop onto the panel: Insert Pages opens, set to put the pages where you dropped them.
- Move pages between documents with Cut or Copy, then Paste in the other document. Pasted pages go after the selected page.
Every page change is a single Undo step Ctrl+Z.
To rename page labels in one pass
- Click the first page and press F2, or double-click its label.
The label becomes a text box.
- Type the sheet number, for example
M-101. - Press Tab.
The label is saved and the next page's label opens. Shift+Tab goes back one.
- After the last page, press Enter. Esc cancels the label you're typing.
Insert pages
The Document menu holds every page tool. Its Insert submenu adds pages:
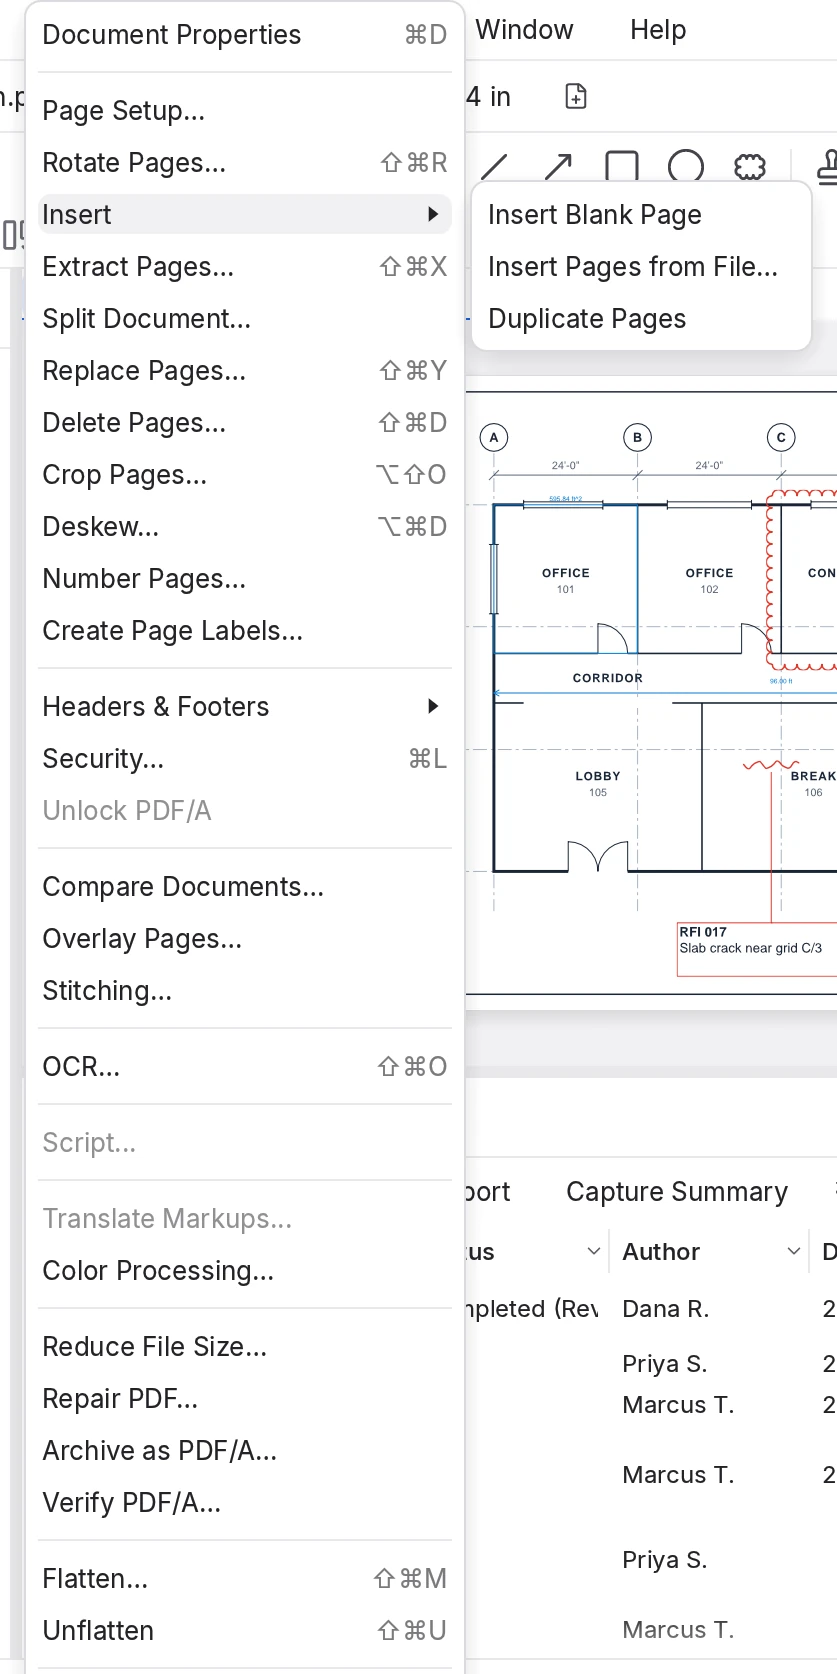
- Insert Blank Page adds empty pages: choose the Size (Letter, ARCH, ISO or Custom), Style, Orientation, Page Count and Position. Set as Default keeps your choices.
- Insert Pages from File… brings in pages of other PDFs, with options such as Include Bookmarks, Use Filename as Page Label, Interleave Pages (to pair scanned fronts and backs) and Each File as a Layer.
- Duplicate Pages copies the selected pages and puts the copies after the last of them.
To insert pages from another file
- Choose Document ▸ Insert ▸ Insert Pages from File…
- Choose Add... and open the PDF.
It joins the list with its Name, Pages and Path.
- In Pages, type the pages you want, such as
1-3. Leave it empty for all of them. - Under Position, choose After Page and type
5. - Choose OK.
The pages appear after page 5.
Extract, split, replace and delete
| Command | What it does | |
|---|---|---|
| Extract Pages… Ctrl+Shift+X | Copies pages into a new PDF, named like M-101 (pages 2-4).pdf. It can also Delete Pages After Extracting, or Extract Pages as Separate Files named by their page labels. | |
| Split Document… | Breaks the file into several: by Page Count (1 gives one file per page), by File Size in MB, or at Top Level Bookmarks, with a prefix, a suffix or the bookmark names. | |
| Replace Pages… Ctrl+Shift+Y | Swaps pages for pages of another PDF. With Replace page content only on (the default), the counts must match, and the old pages' markups, links and bookmarks stay: the way to drop a revised sheet under existing comments. | |
| Delete Pages… Ctrl+Shift+D | Deletes the current page, the selected pages or a range. A document always keeps at least one page. |
Extract and Split work on a signed file, but the new files won't carry its signatures. Extracting pages from a secured file, or splitting it, gives files with no passwords or permissions.
Rotate, crop and straighten
- Rotate Pages… Ctrl+Shift+R turns pages 90° either way or 180°. Rotate Pages Clockwise and Rotate Pages Counterclockwise, near the bottom of the Document menu, turn the selected thumbnails at once; with none selected, the current page, or every page if the Preferences setting General ▸ Document ▸ Rotate all Pages by Default is on.
- Crop Pages… Alt+Shift+O and Page Setup… open Crop and Page Setup: a new Page Size, with an Anchor for where the old page sits on it, and a Crop (Keep Crop, Remove Crop, Margins, or a Rectangle you draw with Get Rectangle).
- Deskew… Ctrl+Alt+D straightens a crooked scan.
To straighten a scanned sheet
- Go to the crooked page and choose Document ▸ Deskew…
- Draw a line along something that should be level or plumb, such as the sheet border.
The Deskew dialog opens and the page turns to preview the correction.
- Adjust the Angle if needed (up to 45°), or choose Get Line to draw again. Then choose OK.
The page is straight. Markups don't turn with it, so deskew before you mark up.
Page labels and numbering
A page label is the name a page shows instead of its number: M-101 rather than 1. Type a label in the navigation bar's page box to jump to that sheet; Batch Compare can pair sheets by label, and headers can print it.
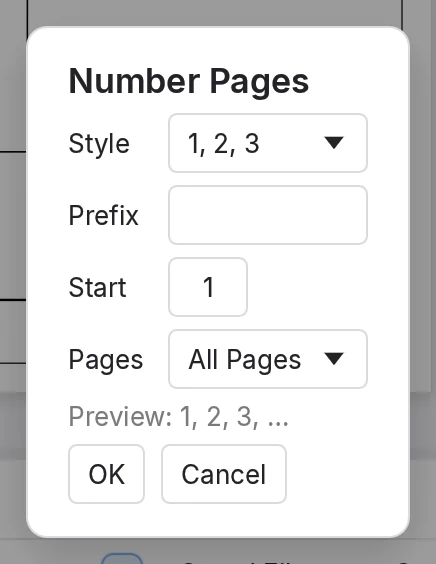
- Number Pages… labels a range of pages with a Style (1, 2, 3; I, II, III; i, ii, iii; A, B, C; a, b, c; or None), a Prefix and a Start number. Other pages keep their labels. Style None with an empty Prefix removes labels.
- Create Page Labels…, called Re-Label Pages on the Thumbnails menu, gives each bookmarked page its bookmark's title.
- Rename Page Label F2 edits labels one by one (see above).
To label sheets A-101 to A-110
- Choose Document ▸ Number Pages…
- Keep the Style 1, 2, 3. Type
A-in Prefix and101in Start.The preview reads A-101, A-102, A-103, …
- Leave Pages at All Pages, or choose Custom and type
1-10. - Choose OK.
The thumbnails read A-101 (1), A-102 (2) and so on.
Headers and footers
Document ▸ Headers & Footers ▸ Add… prints text on the pages you choose: a project name, page numbers, the date, a Bates number or details of the file. Headers & Footers ▸ Edit… changes them later.
 1
2
3
4
5
6
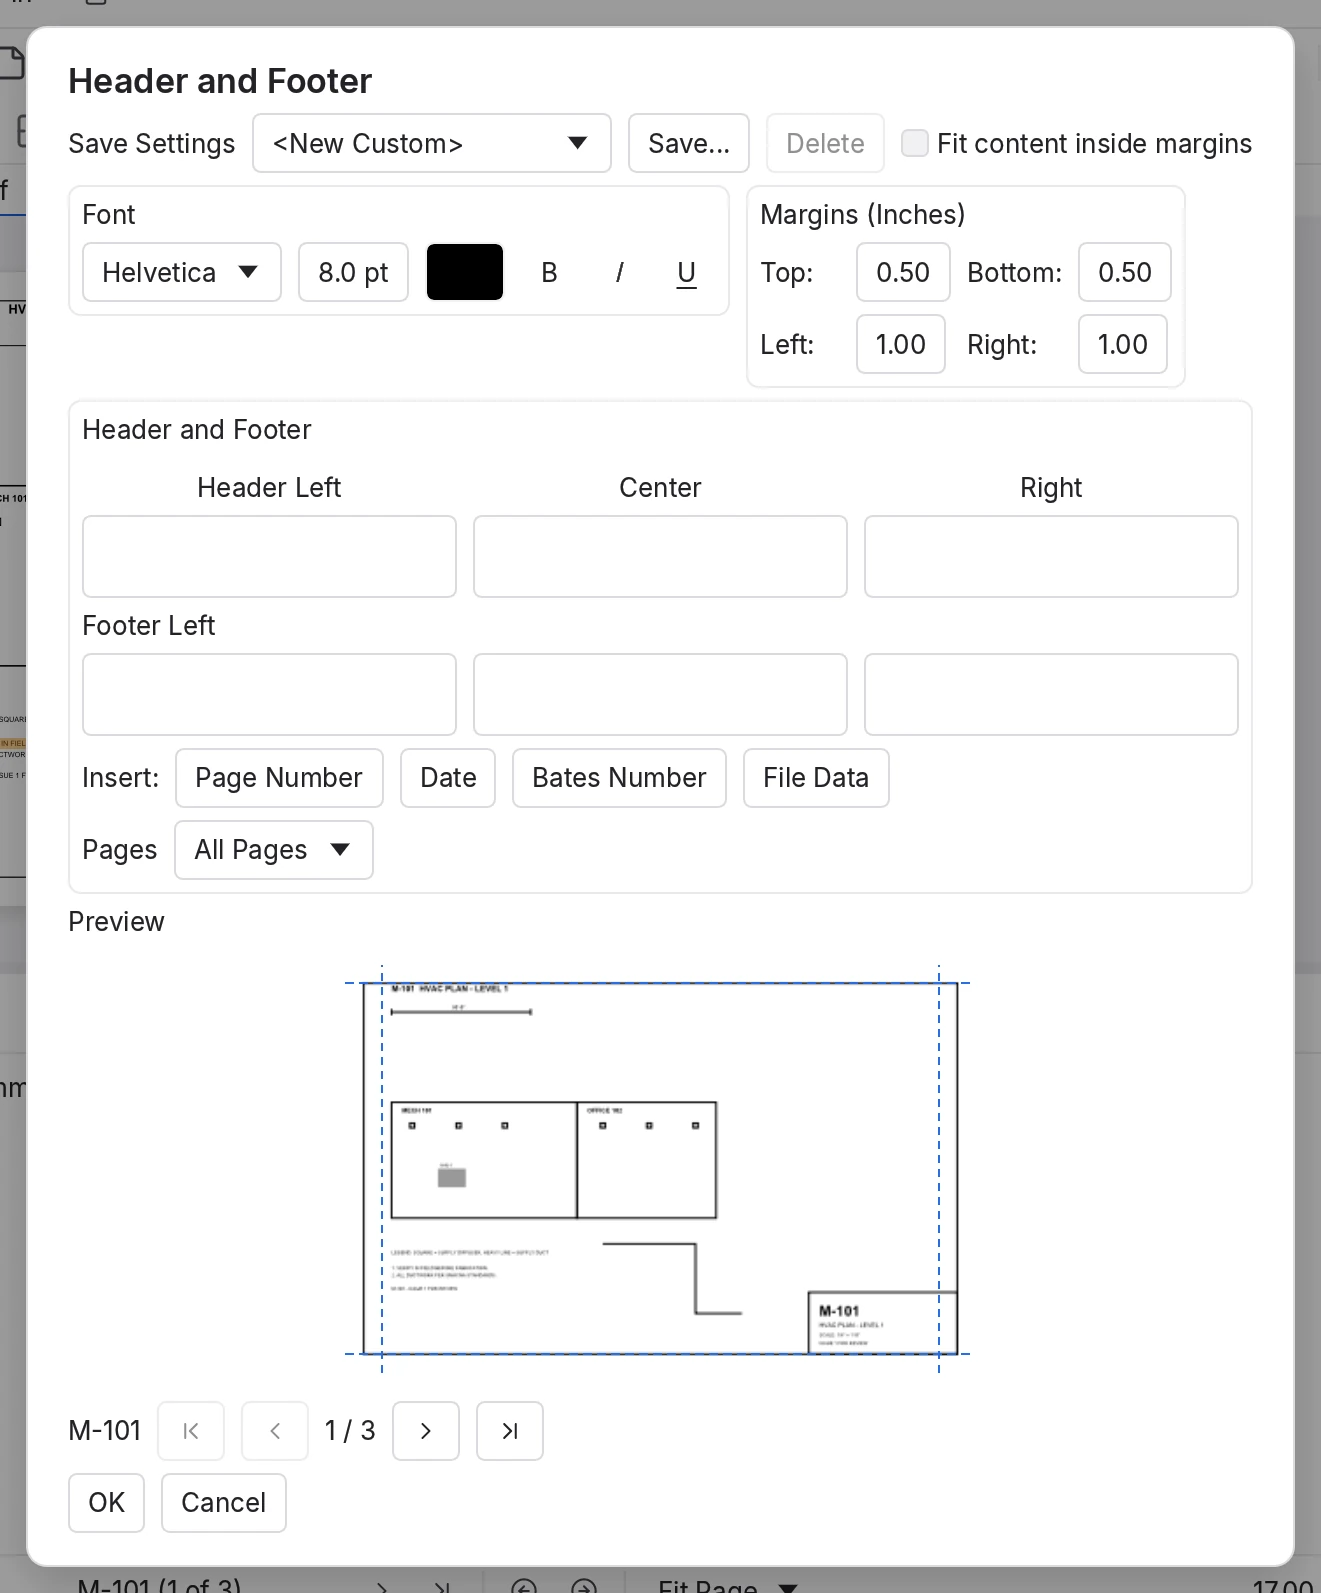
- Save Settings. Keep a layout to use again.
- Font and margins. 8 pt Helvetica at first; margins in inches.
- Six boxes. Left, center and right, for header and footer. Click one before inserting a code.
- Insert. Page Number, Date (18 formats), Bates Number and File Data, such as FileName or PageLabel.
- Pages. Which pages get them.
- Preview. Step through the pages to check placement.
To add "Page 1 of n" to every page
- Choose Document ▸ Headers & Footers ▸ Add…
- Click in the footer box under Right.
- Choose Page Number, pick Page 1 of n and choose OK.
The box shows the code
<<Page 1 of n>>. - Check the Preview, then choose OK.
Each page reads Page 1 of 3, Page 2 of 3 and so on at its bottom right. Save to keep them.
The first header and footer you add is the master: Edit… changes it, and it reaches pages added later. Ones added after it are secondary and can't be edited; editing the master replaces them, after a warning. Delete All, in Edit…, removes every header and footer, including ones MarkupRight can't edit.
Bookmarks
Bookmarks are a clickable table of contents, in the Bookmarks panel Alt+B. Document ▸ New Bookmark Ctrl+B bookmarks the view on screen.
- The panel's toolbar has Add (before, after or as a child), Remove Bookmark, Create Bookmarks (one per page, named by its label), Audit (finds bookmarks to missing pages), Export (a tree or index, as PDF or CSV), Action and Properties.
- Drag a bookmark onto the top, middle or bottom third of another to put it before, inside or after it. Ctrl-drag to copy it.
- A bookmark structure is a saved outline of headings you reuse from set to set. Document ▸ New Bookmarks from Structure sets them up; to use one, pick it in the panel's Structure strip and click Add.
Label the pages first, then choose Create Bookmarks: every sheet gets a bookmark named by its sheet number.
Links and hyperlinks
The Links panel Alt+N has two tabs: Places, named views you can jump to, and Hyperlinks, every link in the document. To make a link, choose Tools ▸ Hyperlink Shift+H, drag an area, then pick its action:
| Action | Goes to |
|---|---|
| Jump to Page | A page of this document, at Fit Page, Actual Size, Fit Width or Inherit Zoom. |
| Jump to Place, Jump to Space | A named place, or a Space such as a room. |
| Snapshot View | An area you draw, in this or another open document. |
| Hyperlink | A web or email address: https, http and mailto only. |
| Open File | Another file. Use Relative Paths keeps the link working when the folder moves. |
New links are invisible; to show one, turn on Visible in its properties and pick a color and style. Create from URLs…, on the Hyperlinks tab, turns web addresses written in the drawing into links. MarkupRight asks before opening a web link; the Preferences setting Window ▸ WebTab ▸ Open Hyperlinks in WebTab opens them inside MarkupRight. Ctrl-click a link to another PDF to open it in the background.
Batch ▸ Link turns every sheet callout, such as M-101, into a link to that sheet, across many files. See Batch processing.
Layers
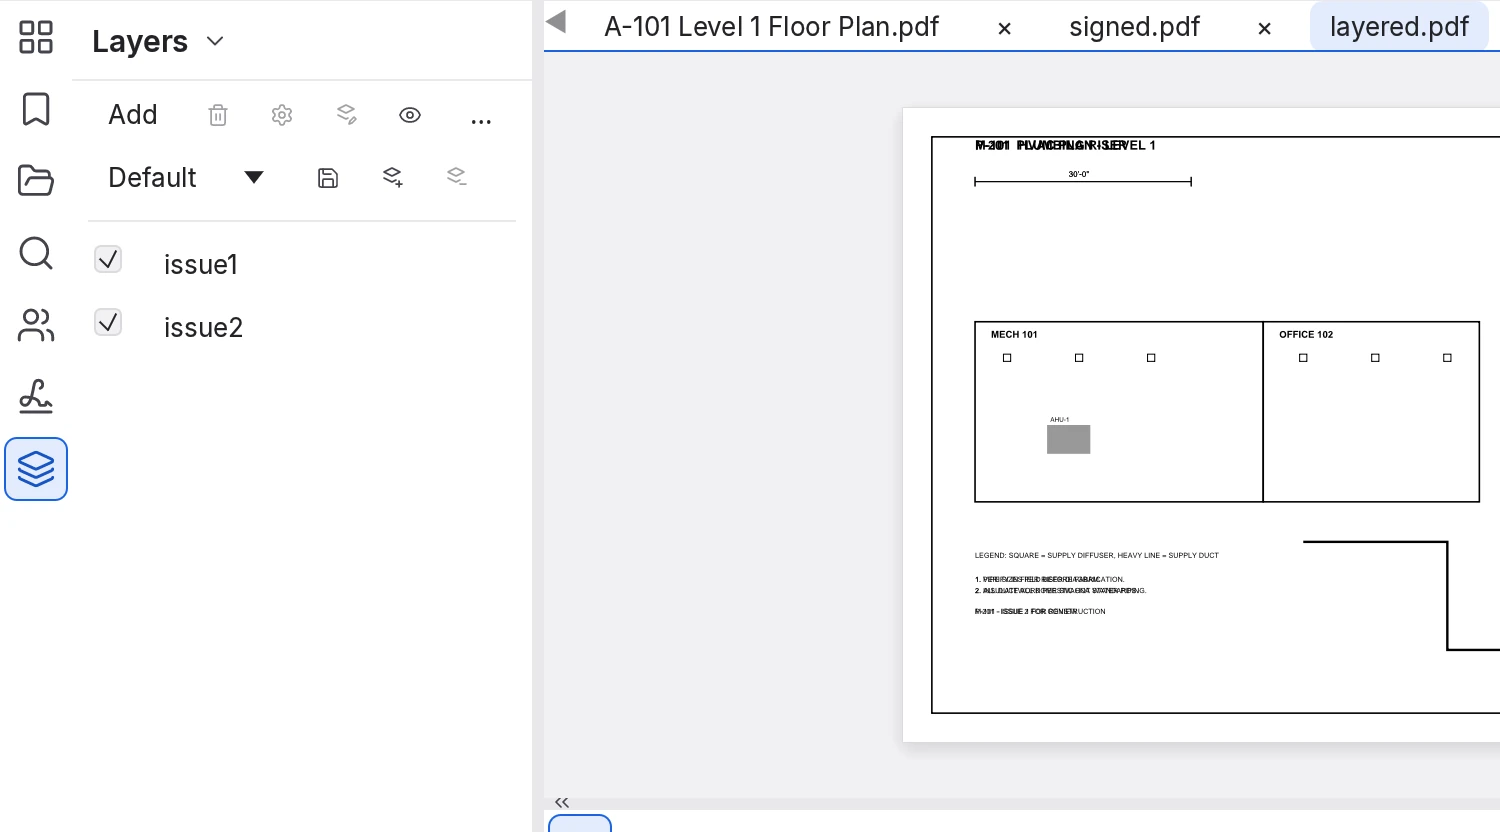
Layers are named groups of content you can show or hide. Drawings exported from CAD often keep each discipline, or each issue, on its own layer. Open the Layers panel with Alt+L.
 1
2
3
4
- Toolbar. Add, Delete Layer, Layer Properties, Set Markup Layer, Show All, and ⋯ for more.
- Configuration. A saved pattern of shown and hidden layers. Default can't be deleted.
- Layers. Tick or untick to show or hide.
- The page. With both layers shown, the notes that changed overprint.
- Ticking a layer changes only what you see. To set how the document opens for everyone, change the layer's Default State in Layer Properties.
- Add makes a layer, a child layer or a group, or brings in another PDF's page as a layer. Delete Layer moves the layer's content into the base drawing unless you tick the boxes to delete it too.
- Set Markup Layer puts new markups on the selected layer. Right-click a layer to Isolate it (show only that one), rename it or Export Layer to Page.
OCR: make scans searchable
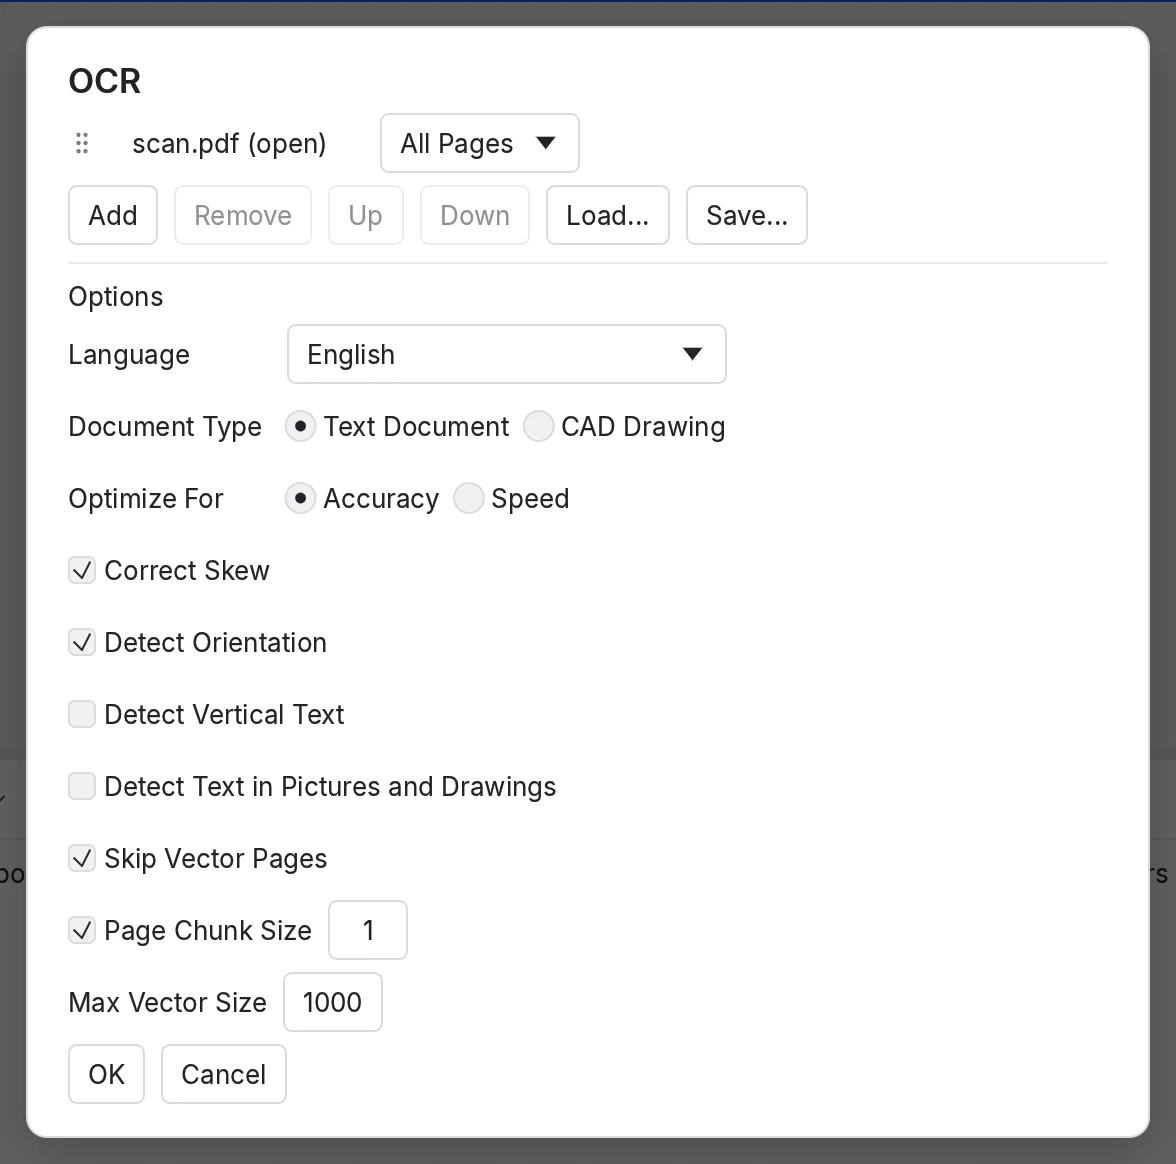
A scanned sheet is a picture, so you can't search it or select its words. OCR (optical character recognition) lays invisible text over the words it reads, and then Find, copying, links and redaction work. Choose Document ▸ OCR… Ctrl+Shift+O, also on the File toolbar.
| Option | What it does |
|---|---|
| Language | English, or one of 15 other languages written in the Latin alphabet. |
| Document Type | Text Document reads words into lines. CAD Drawing keeps words one by one, which suits sheets of scattered notes and tags. |
| Optimize For | Accuracy reads at 300 dpi; Speed at 150 dpi. |
| Correct Skew, Detect Orientation | Level the scan and turn it upright before reading. On at first. |
| Detect Vertical Text | A second pass for text running up the sheet. |
| Detect Text in Pictures and Drawings | Also reads pages that already have text, adding only the words that aren't there. Off, those pages are skipped. |
| Skip Vector Pages, Max Vector Size | Leave out pages drawn with more than this many paths (1000): sheets exported from CAD, whose text is already real. |
| Page Chunk Size | Reads each page in this many bands. Raise it for very large sheets. |
To make a scan searchable
- Open the scanned PDF and choose Document ▸ OCR…
- Choose the Language. For drawings, choose CAD Drawing.
- Choose OK.
A progress notice counts the pages, then reports how many words it found.
- Press Ctrl+F and search for a word you can see on the scan.
Find highlights it. Save to keep the text.
OCR is only as good as the scan: check dimensions and other key numbers by eye. Closed files you add are saved in place, so keep copies. OCR is refused on signed, certified and read-only files.
Reduce File Size
Scanned and photo-heavy sets can be very large. Document ▸ Reduce File Size… shrinks them, mainly by resampling images.
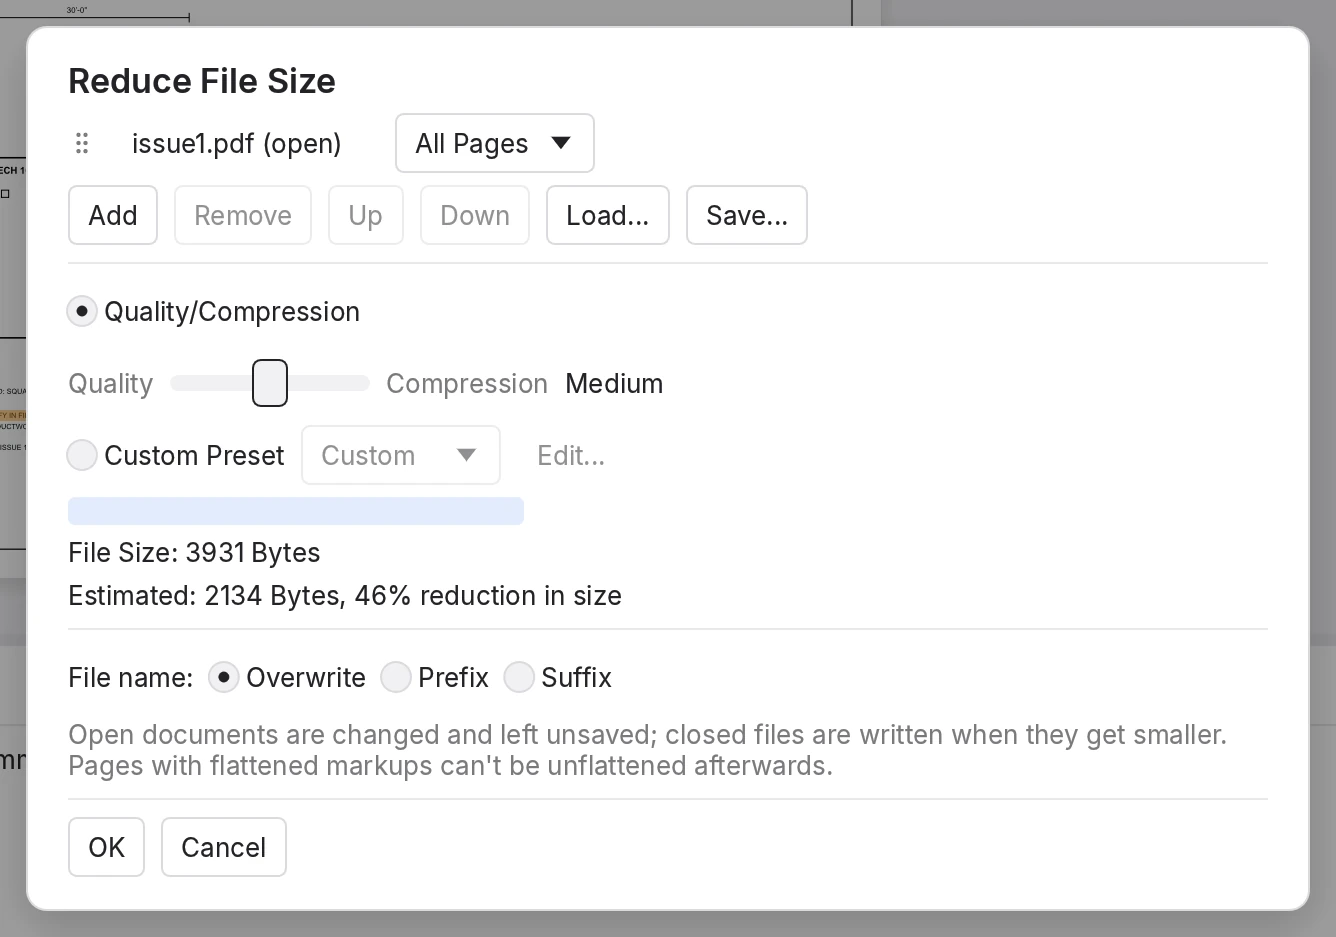
The Quality/Compression slider's five steps, Maximum Quality to Maximum Compression, resample images to 300, 225, 150, 150 and 96 dpi; Medium is the default. A Custom Preset (Edit...) holds your own settings. Closed files you add are overwritten, or written with a prefix or suffix, and only if they shrink by at least 1%.
An open document changes in memory and stays unsaved: use Save As to keep the full-quality original. Signed and locked files are refused, and pages with flattened markups can't be unflattened afterwards.
Repair PDF
MarkupRight repairs damaged files as it opens them, and Document Properties lists what it fixed. For files that open but draw slowly or wrongly, choose Document ▸ Repair PDF… and pick the passes: Process Wipeouts, Text Masks and OLE objects (on at first), Combine Adjacent Images, Optimize Solid Color Image, Remove Text Clipping, Simplify Clipping Paths and Repair Fonts, which replaces a damaged or missing font with the installed font of the same name. Fix Striped Image is grayed out while the Preferences setting Advanced ▸ 2D Rendering ▸ Blend Modes is on, as it is at first.
A report shows each file's size before and after. Open documents change and stay unsaved; closed files are rewritten. Signed and locked files are refused.
PDF/A archiving
PDF/A is the ISO standard for archiving: fonts embedded, and no transparency, layers, attachments or scripts. MarkupRight makes and checks PDF/A-1b.
- A PDF/A file opens locked: you can add markups, but page and content editing is off. To unlock it, choose Document ▸ Unlock PDF/A (also on the navigation bar's padlock, and under Standards in Document Properties), then save; it's then an ordinary PDF. The Preferences setting Advanced ▸ Archive as PDF/A ▸ Open PDF/A files as locked controls this.
- Archive as PDF/A… converts this document in place; Undo works until you save. Verify PDF/A… only reports. File ▸ Export ▸ Export to PDF/A… writes a converted copy.
- Options decide what conversion may change: Unsupported Annotations (Flatten, Delete or Error), 3D Content and Embedded Files (Delete or Error), and Transparency (Opaque or Error).
| Report entry | Means | |
|---|---|---|
| Converted | Fixed without changing how the document looks. | |
| Changed | Fixed, but the document changed in a way to know about, such as markups drawn into the page. | |
| Unresolved | Can't be made compliant. If any entry is Unresolved, nothing is changed or written. |
Converting a large file can pause the window for a while.
Color Processing
Document ▸ Color Processing… recolors the page content, never the markups: for example, to gray out a background drawing so markups stand out.
- Modify Colors maps each color on the current page to another, with a Tolerance. It changes vector content only.
- Colorize maps dark to light between two colors. Grayscale and Black and White convert every color by its brightness. Luminosity adjusts brightness, saturation and hue.
- Mask Images makes one color in the pictures transparent, such as a scan's paper.
Process Images changes pictures too. Before and After previews show the result, for All Pages, the Current Page or a range. Processed pages can't be unflattened afterwards.
Stitching
Large plans are often split across sheets at matchlines. Stitching joins them into one page, turning and moving each sheet so its matchlines meet; it never scales them. It works on the pages of one document, so combine separate files first (see Create, save and export).
To stitch two sheets
- Choose Document ▸ Stitching…
The Stitching panel opens.
- On the first sheet, choose Add Region and drag around the part of the drawing to keep.
- Choose Add Matchline and click the two ends of the matchline.
- On the second sheet, add its region and matchline the same way.
- In the panel, under the second sheet's matchline, choose the first sheet's line in Match to:
- Choose Stitch.
A new document,
<name> (stitched).pdf, opens with the joined drawing. Save it.
Include markups in stitching result (on at first) carries markups across, flattened. Erase All removes every region and matchline, after asking.
Flatten markups
Document ▸ Flatten… Ctrl+Shift+M burns markups into the page content, so they look the same in any program. With Allow Markup Recovery on, as it is at first, Document ▸ Unflatten Ctrl+Shift+U brings them back, unless the page has changed since: content editing, Color Processing, Reduce File Size, Repair PDF and redaction all prevent it. See Edit and style markups.
For power users Expert
- Many files at once. The Batch menu runs Rotate Pages, Split Documents, Headers & Footers, OCR, Reduce File Size, Repair PDF and Flatten Markups over a file list (see Batch processing). From a terminal, use
markupright batch <feature> --bcx <list>, ormarkupright-cliin Windows terminals.
The other features here aremarkupright batch split --bcx issue.bcx --pages 1 --out sheets markupright batch headers --bcx issue.bcx --template footer.json markupright batch ocr --bcx scans.bcx --language enrotate --degrees,remove-headers,reduce,repairandflatten [--no-recovery];splitalso takes--size-mbor--bookmarks. A header template is the.jsonthat the Header and Footer dialog's Save Settings writes. - Automation tools. With Preferences ▸ Admin ▸ MCP ▸ Enable the MCP connector on:
page_insert_blank,page_insert_file,page_extract,doc_split,page_rotate,page_setup,page_deskew,page_number,header_footer,bookmark_*,link_*,layer_*,ocr_recognize,files_reduce,files_repair,pdfa_archive,doc_color_process,stitch_runanddoc_flatten. Two have no dialog:doc_watermark(text or picture watermarks) andpage_set_box(trim, bleed and art boxes). See Command line and AI agents. - Preference keys.
document.rotate_all_by_default,document.reorder_bookmarks_on_page_move,document.pdfa_locked,rendering.blend_modes,pages.blank_default,reduce.presets,ocr.*andpdfa.*. - Where things are kept. Header and footer templates in
headers, bookmark structures inbookmark_structures, both in the settings folder:~/Library/Application Support/MarkupRighton macOS,%APPDATA%\MarkupRighton Windows,~/.config/MarkupRighton Linux. - Stitching limit. A stitched drawing can't exceed 200 inches on a side, the largest page a PDF allows.