Create, save and export
Make new PDFs, turn images and other files into PDFs, combine documents, save your work safely, and send it out as images, office files or prints.
- You'll learn
- How to create and combine PDFs, save and recover your work, export and print.
- Where it lives
- The File menu, and the File toolbar for New PDF, Combine and Print.
- Save
- Save Ctrl+S · Save As… Ctrl+Shift+S
Start a new PDF
To create a blank PDF
- Choose File ▸ New PDF…, or click New PDF on the File toolbar.
- Pick a Template, which is the page size: US Letter (the default), US Legal, Tabloid, A0 to A6, ARCH A to E1, ANSI C to E, or <Custom> with your own width and height in inches, millimeters or points.
- Choose Portrait or Landscape, a Style (Blank, Notebook, Grid (1/4 in) or Grid (1/2 in)) and the Page Count, from 1 to 999.
- Click OK.
A new document, "Untitled.pdf", opens. The first save asks where to put it.
Set as Default makes your choices the ones New PDF starts with next time. A grid page makes a handy sketch sheet for a field visit.
Templates
A template is a PDF you start new documents from, such as your field report form. File ▸ New PDF from Template… lists the templates in your template folder by title: choose one to start a new, untitled document, or click the pencil beside it to edit the template itself. The same submenu has Save As Template (the document in front becomes a template, listed under its title), Import Template…, Delete Template (for the template you're editing) and Change Template Folder…, for example to use a folder your firm shares. The default folder is Documents/MarkupRight/Templates; no templates come with MarkupRight.
Create PDFs from other files
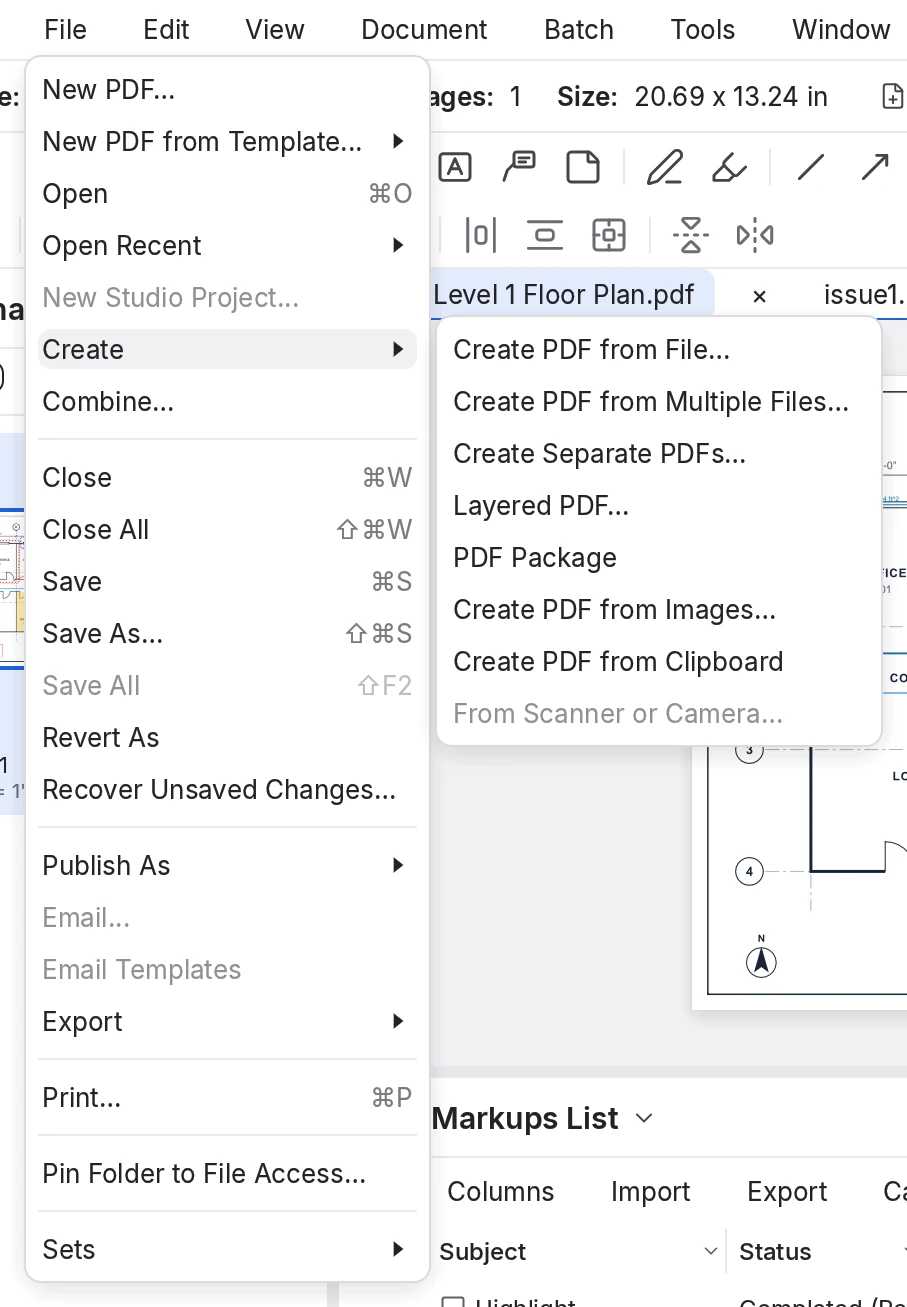
| Command | What it makes | |
|---|---|---|
| Create PDF from File… | Opens a file as a PDF: an image or text file becomes a new, untitled PDF. | |
| Create PDF from Multiple Files… | One PDF from many files and folders, with the Stapler (below). | |
| Create Separate PDFs… | One PDF for each file, also with the Stapler. | |
| Layered PDF… | One PDF whose page 1 stacks page 1 of every file as layers, page 2 every page 2, and so on: good for overlaying discipline sheets. Its dialog works like Combine. | |
| PDF Package | "Package.pdf": one PDF that holds several files, with a cover page. | |
| Create PDF from Images… | "Images.pdf", one page for each image you pick. | |
| Create PDF from Clipboard | "Clipboard.pdf", from a picture or text you copied. |
To make PDFs from many files with the Stapler
- Choose File ▸ Create ▸ Create PDF from Multiple Files… (or Create Separate PDFs…).
- Under Step 1: Add source folders and files, click Add Folder... (tick Include Subfolders to go deeper) or Add Files.... Put them in order with the arrows, or turn on Auto-sort to sort them by name.
- Under Step 2: Select Output, choose One Output File and type its name, or One Output File Per Document.
- Under Step 3: Set Output Folder, choose Use source file folder or Pick Custom Folder.
- Click Create File.
The Stapler reports "N files written", each with Open, and lists any files it skipped.
Images and text files are converted on the way. The Stapler never overwrites anything: a name that's taken gets " (2)", " (3)" and so on.
PDF Packages
A package keeps related files together in one PDF, such as a submittal and its product data. Its tab lists the files, with Add Files, Add Folder, Open All and Show Cover Page, and each file has Open, Properties and Remove. Saving a file's own tab writes it back into the package; then save the package's tab to write the package to disk.
Combine files
Combine joins whole files, or chosen pages of them, into one new PDF, such as a full issue of a drawing set.
 1
2
3
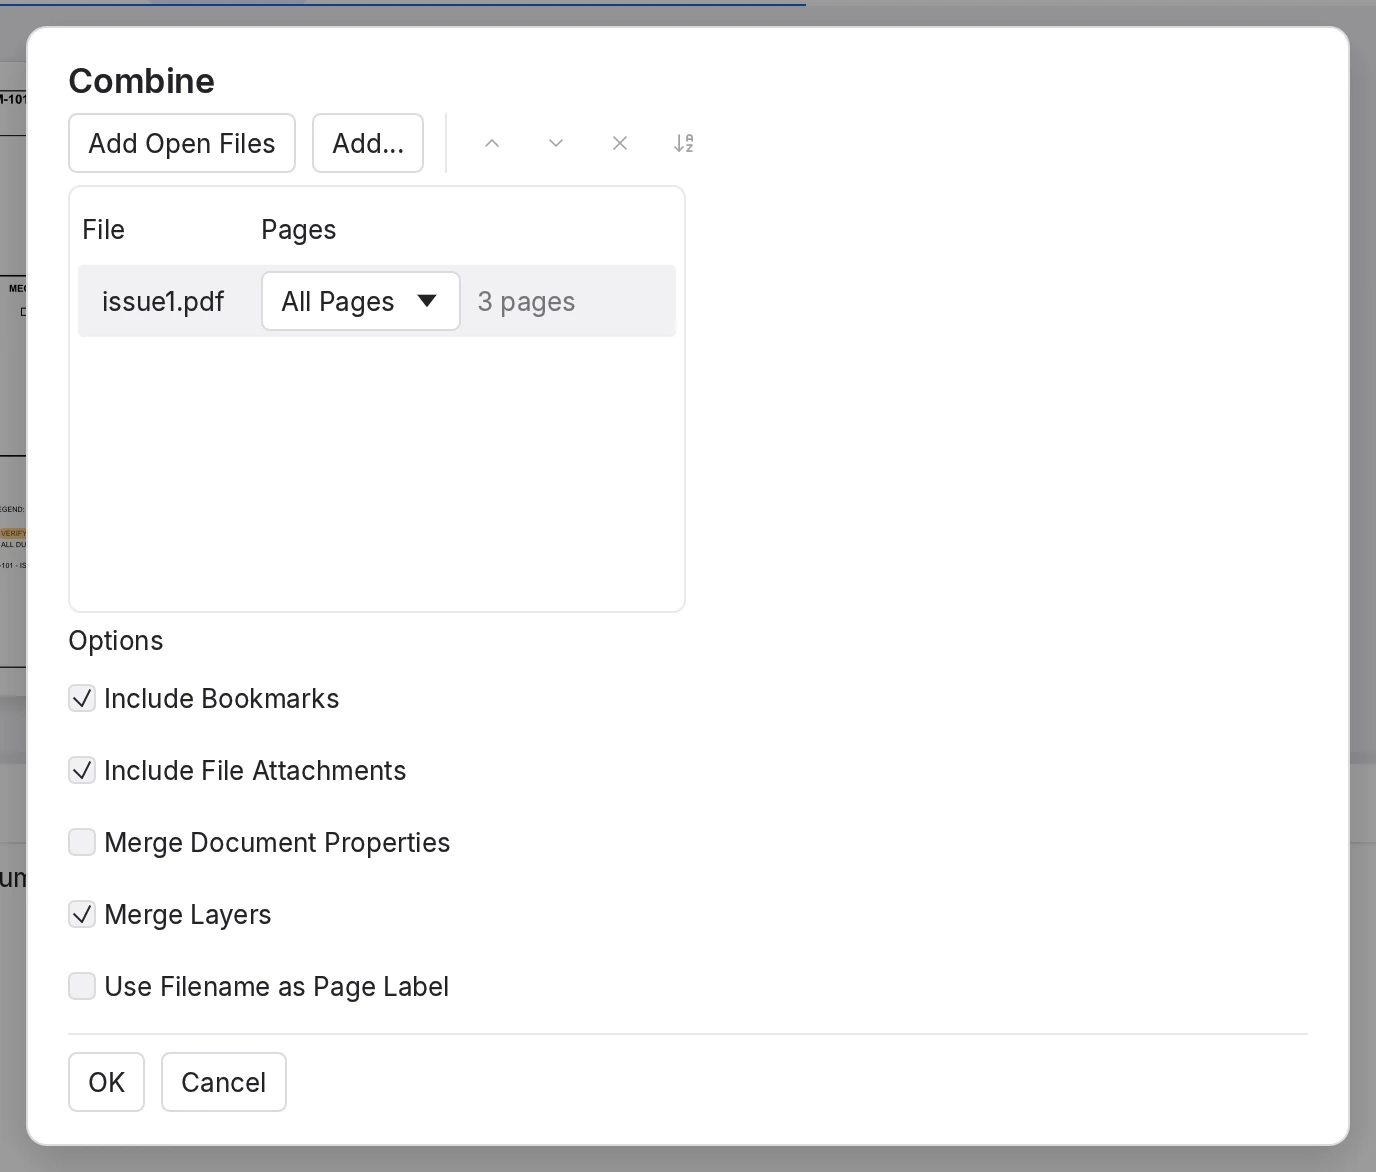
- Add and arrange. Add Open Files or Add… fill the list; the buttons move, remove and sort the files.
- Pages. All Pages, or Custom with a range such as 1-3, 5, 9.
- Options. What the new file keeps. See the table below.
To combine files into one PDF
- Choose File ▸ Combine…, or click Combine on the File toolbar.
- Click Add Open Files, or Add… to pick files.
- Put the files in order with Move Up and Move Down, or Sort by Name. For any file, choose Custom under Pages to take only some of its pages.
- Check the options and click OK.
A new, untitled "Combined.pdf" opens. Open documents go in with their unsaved changes.
- Save the new file Ctrl+S.
| Option | Default | What it does |
|---|---|---|
| Include Bookmarks | On | Keeps each file's bookmarks. Off, the new file has none. |
| Include File Attachments | On | Keeps the files attached to each document. |
| Merge Document Properties | Off | Takes the title, author and subject from the first file that has them, and keywords from all of them. |
| Merge Layers | On | Layers with the same name become one layer. Off, the layers are removed and their content stays on the page. |
| Use Filename as Page Label | Off | Labels each page with its file's name, numbered when a file gives several pages. |
A file that can't be used shows "Can't combine" in the list; hover over it for the reason. Certified files are refused. Signed files are allowed after a warning, but their signatures are cleared in the combined PDF.
Save your work
| Command | Shortcut | What it does | |
|---|---|---|---|
| Save | Ctrl+S | Saves the document in front. New, converted and read-only documents ask where to save. | |
| Save As… | Ctrl+Shift+S | Saves under a new name or in another place. | |
| Save All | Shift+F2 | Saves every document with unsaved changes. |
A tab with unsaved changes shows a dot (•) after its name. Saving runs in the background, with a spinner on the tab, and Print waits until it finishes. If a save fails, "Couldn't save …" offers Save As… and your original file is left as it was. Save All stops at the first failure and lists each file as Saved, Not saved or Not attempted.
File ▸ Close Ctrl+W and File ▸ Close All Ctrl+Shift+W ask about each document with unsaved changes: "Save changes to …?" with Save, Don't Save or Cancel. When you quit, Cancel keeps MarkupRight open.
Save Mode
Preferences ▸ General ▸ Document ▸ Save Mode decides how MarkupRight writes a file:
- Publish Without Revisions (the default) writes a clean, complete file each time.
- Maintain Revisions adds each save to the end of the file, so the earlier saved versions stay inside it and Revert As can get them back.
- Publish Compressed writes a complete file in a more compact form, for a smaller file.
Signed files always save by adding to the end, whatever the Save Mode, so their signatures stay valid.
Revert As and Publish As
File ▸ Revert As is available when a file holds two or more saved revisions, for example after saving with Maintain Revisions. Choose a "Revision N" (its size is shown) and click Save As...: the revision is saved as a new file, <name>_Rev<N>.pdf unless you change it, and opens. The original isn't touched.
File ▸ Publish As saves a copy of the document as it is now, to a new file, and leaves your document open and unchanged:
| Publish As | Suggested name | What you get | |
|---|---|---|---|
| Flattened… | <name>_Flattened.pdf | Markups and form fields burned into the page, so nobody can move or edit them. | |
| Compressed… | <name>_Compressed.pdf | A compact copy. | |
| Uncompressed… | <name>_Published.pdf | A copy in the classic PDF layout, for older PDF software. |
Marcus T., for example, sends subcontractors a Flattened copy of the marked-up set and keeps the editable original.
Recover unsaved changes
While a document has unsaved changes, MarkupRight keeps a recovery copy of it every 60 seconds. If MarkupRight or your computer stops unexpectedly, the next start shows Recover Unsaved Changes before anything else opens.
To recover your work after a crash
- In Recover Unsaved Changes, look at each file's Name, Original Location ("Not saved before" for a new document) and Last Saved time.
- Leave Recover chosen for the files you want back, and choose Remove for the rest.
- Click OK.
The recovered documents open with your changes, marked unsaved. Save writes each one back to its original place.
Later, or Esc, keeps every copy for the next start. File ▸ Recover Unsaved Changes… opens the dialog any time; it says "There are no unsaved changes to recover." when there's nothing to recover.
Files on this computer's own drives, not network drives. Password-protected files stay encrypted and ask for their password when recovered. Copies older than 30 days are deleted. It's on unless you turn off Preferences ▸ General ▸ Document ▸ Enable Document Recovery.
When a file changes on disk
If another program changes a file you have open and you haven't edited it, MarkupRight reloads it in place and keeps your page and zoom. If you have unsaved edits, a bar asks instead: "This file changed on disk. Reload it and lose your unsaved changes, or keep your version?" Click Reload or Keep; nothing reloads until you choose. The setting is Preferences ▸ General ▸ Document ▸ Reload Files Changed by Other Programs (on).
Export
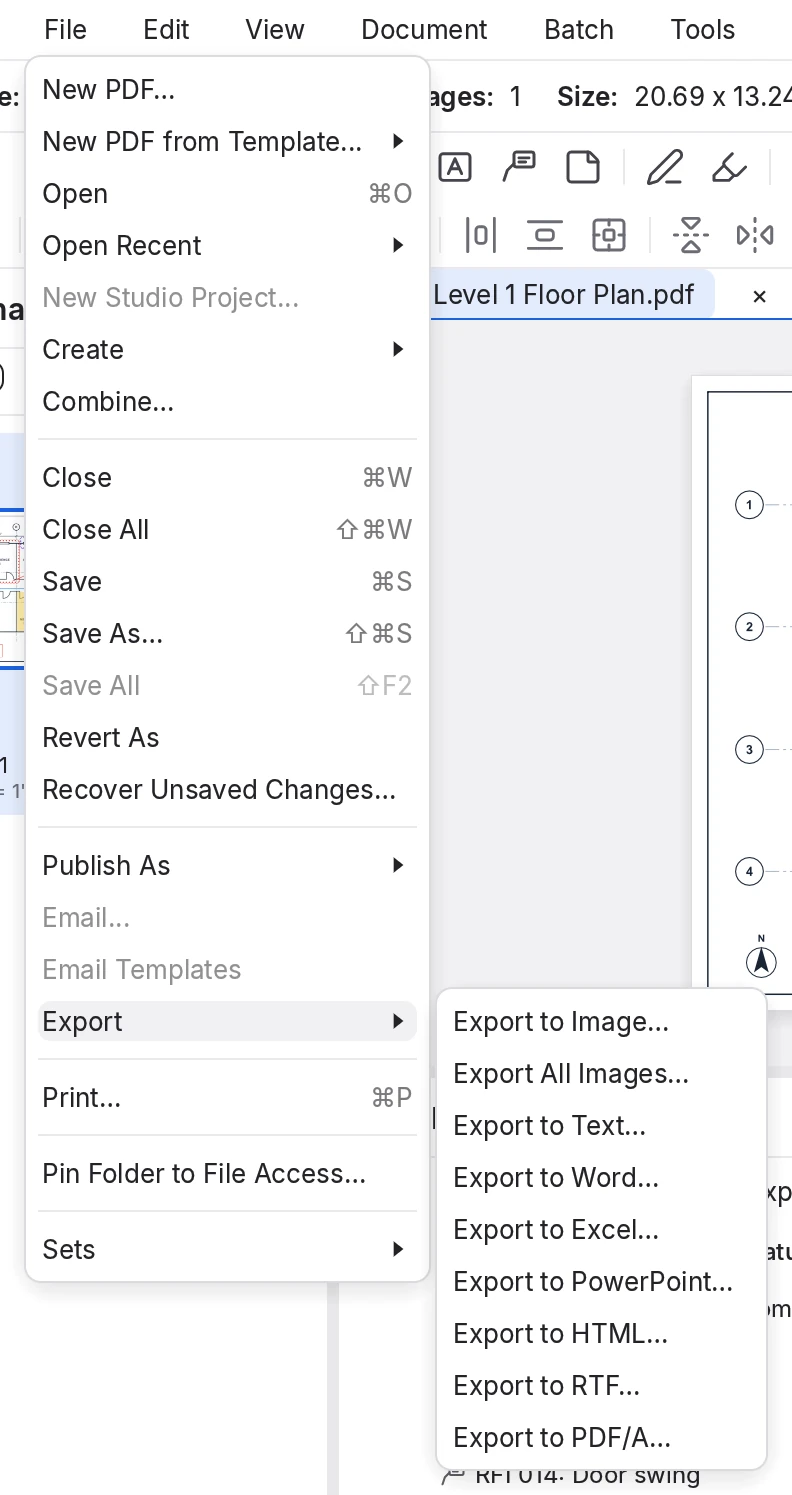
File ▸ Export writes your pages to other formats. Each Export to command opens the Export dialog with that format chosen, and you can switch format there.
To export sheets as images
- Choose File ▸ Export ▸ Export to Image….
- In Export to, pick Image: PNG, JPEG, TIFF, GIF or BMP.
- Choose the Pages (all pages unless you change it), the Resolution (72 to 600 dpi; 150 the first time) and Color or Grayscale.
- Check the Folder and File Name, then click Export.
One image per page, named like "A-101 Page 001.png". The notice says "Exported N files to …", and the first image opens.
| Export to | You get | Options | |
|---|---|---|---|
| Image: PNG, JPEG, TIFF, GIF, BMP | One image per page | Resolution; Color or Grayscale | |
| Text | One .txt file | Recover text from scanned pages (OCR) | |
| Word | One .docx file | Page Region; Recover text from scanned pages (OCR) | |
| Excel | One .xlsx file, on one worksheet or one per page (set in Preferences ▸ Import/Export ▸ Excel) | ||
| PowerPoint | One .pptx file | ||
| HTML | One .html file | ||
| RTF | One .rtf file |
- Page Region: click Get Rectangle and drag around the part you want, such as a door schedule on a sheet. The same area is exported from every page; otherwise it's the whole page.
- Recover text from scanned pages (OCR) reads the text of scanned pages first, so a scanned schedule still comes out as text.
- Export All Images… saves the pictures embedded in the document, such as photos and logos, to a folder you pick. Export to PDF/A… writes an archive copy: see Pages and document tools.
Nothing is overwritten. A document whose security doesn't allow copying can't be exported.
 1
2
3
4
5
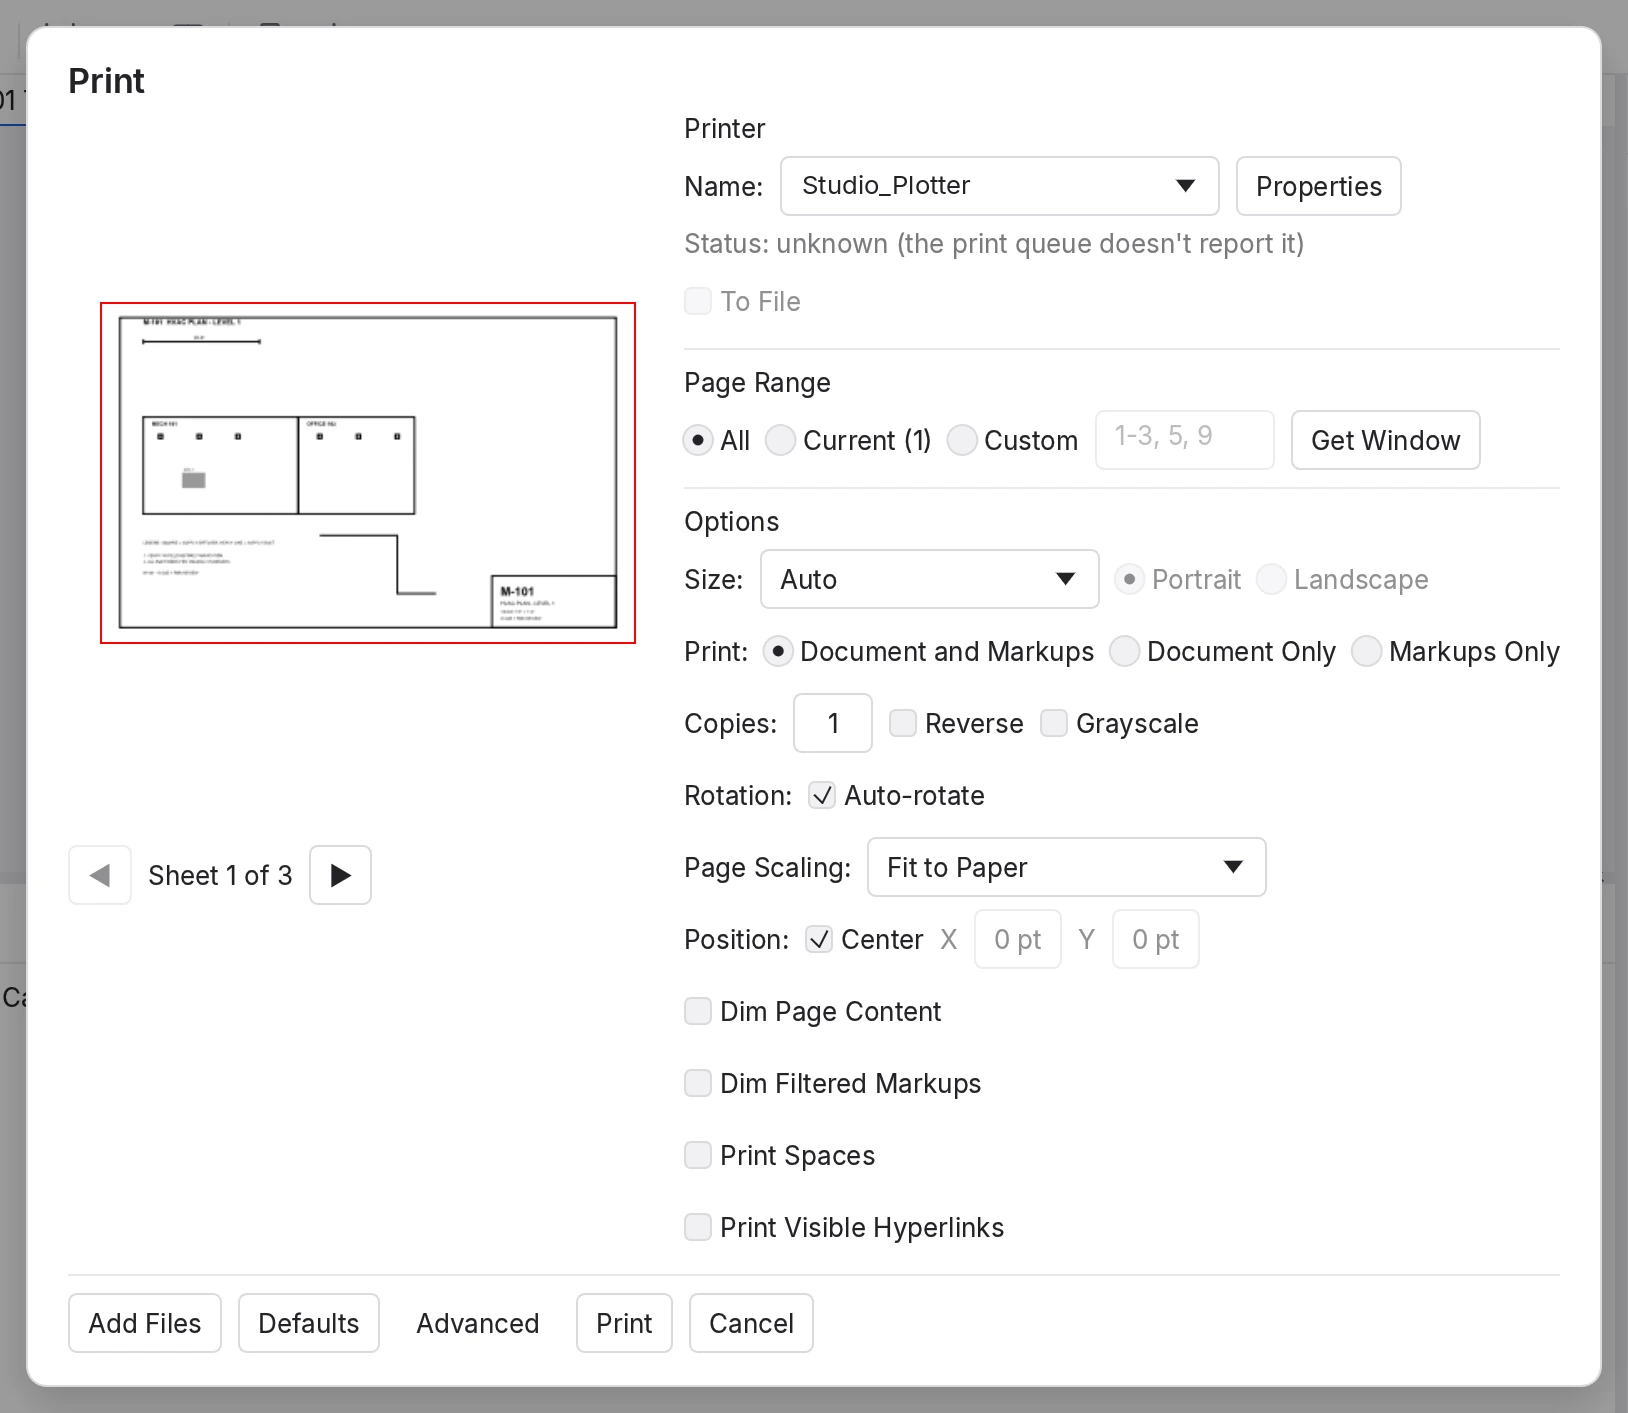
- Preview. Step through the sheets that will print; the red outline is the paper's margin.
- Printer. Your printers, or Save as PDF. Properties opens the printer's own settings.
- Page Range. All, Current, Selected or Custom. Get Window prints an area you drag on the page.
- Page Scaling. How the page fits the paper.
- Add Files, Defaults, Advanced. Add Files turns this into Batch Print; Advanced chooses the printing engine for this printer.
To print a drawing
- Choose File ▸ Print… Ctrl+P.
- Choose the printer in Name, or Save as PDF for a print-ready PDF.
- Choose the Page Range. Selected appears when you've selected several pages in Thumbnails; Custom takes a range such as 1-3, 5, 9.
- Under Print, choose Document and Markups, Document Only or Markups Only. Check the scaling and the preview.
- Click Print.
| Option | What it does |
|---|---|
| Size | Auto uses the page's own size; or pick a paper size. Portrait and Landscape apply when Auto-rotate is off. |
| Copies | With Collate (shown for more than one copy), Reverse and Grayscale. |
| Page Scaling | Fit to Paper (the default), None, Reduce to Paper, Custom Scale, Fit to Margins, Reduce to Margins, or Multiple Pages per Sheet (2, 4, 6, 9 or 16, with Print border). |
| Position | Center, or X and Y offsets in points. |
| Dim Page Content | Prints the drawing faded so the markups stand out. |
| Dim Filtered Markups | Prints faded the markups that the Markups List's filter hides. |
| Print Spaces · Print Visible Hyperlinks | Prints your Spaces as shaded areas, and the outlines of visible links. |
While View ▸ Hide Markups is on, markups don't print. A document whose security doesn't allow printing can't be printed. To print many files at once, see Batch processing.
Document Properties
Document ▸ Document Properties Ctrl+D, or the info button in the navigation bar, shows the document's details in the Properties panel:
| Section | What's in it |
|---|---|
| File Attachments | Files attached to the PDF, with Open, Save…, Add New… and Delete. |
| Document Properties | Title, Author, Subject, Keywords and Creator, which you can edit; Producer, Created and Modified, which you can't. |
| Repaired on Open | What MarkupRight fixed when it opened a damaged file. Shown only when there was something to fix. |
| Custom Properties | Your own named values, such as a project number or client name. |
| Standards | Shown when the file declares a standard such as PDF/A. Unlock makes a PDF/A file editable. |
| Security | The file's protection, with Change Permissions…. See Security and signatures. |
Property changes are edits like any other: save the document to keep them.
Edit PDF content
Markups sit on top of the page and stay editable. The commands in Edit ▸ PDF Content change the page itself: the drawing's own lines, text and images. Use them with care.
| Command | What it does | |
|---|---|---|
| Snapshot Content | Copies an area of the page without the markups. Drag a rectangle, or click the corners of a polygon and double-click to close it. Pasted in MarkupRight, it becomes a stamp that stays sharp at any zoom; other apps get a picture. | |
| Cut Content | Copies an area like Snapshot Content, then removes everything in it. | |
| Erase Content | Removes the text, images and lines in an area, hidden layers included. It asks first. | |
| Select Text Shift+T | Selects the page's text; drag with Ctrl held to select a column. Select All Text is Ctrl+Shift+A. Right-click a selection for Copy, Hyperlink…, Edit, Search and Redact. | |
| Edit Text | Click a line of text and type, then press Enter to replace the line. The text doesn't reflow onto other lines. |
"The content in the region is removed. Undo brings it back until the document is saved; after that it is gone." Cut and Erase also stop markups that were flattened on that page from being unflattened.
Cut and Erase leave markups and form fields alone. If the line you're editing uses a font that can't show what you typed, Replace Font offers to draw the line in another font. None of these commands work on signed, certified or locked files. To remove sensitive content for good, use redaction: see Security and signatures.
For power users Expert
- Stapler from the command line.
markupright --combine <files…>opens the Stapler set to one output file, and--convert <files…>set to one file per document. - Snapshot with markups. Edit ▸ Snapshot G works like Snapshot Content but includes the markups, unless you turn off Preferences ▸ Tools ▸ Markup ▸ Include Markups in Snapshots.
- Export settings. Preferences ▸ Import/Export: Open File After Export (on), Open Folder After Export (off), Text Content Recovery (Process Scanned Content Only, Process All Content or None), Word ▸ Include Markups (on), Excel ▸ Workbook Settings (Single Worksheet or Worksheet per Page), and Images ▸ Page Number, the " Page 001" added to image names.
- Preference keys.
document.save_mode(maintain_revisions,publish,publish_compressed),document.enable_recovery,document.reload_changed_files,templates.folder,new_pdf.default,export.last,import_export.page_suffix,print.printers(each printer's settings). - Advanced printing. Per printer: Printing Engine (Image/Vector/Grid by default, Vector, Image or Grid), Grid Size, Print Data Type and image band sizes. Preferences ▸ Advanced ▸ 2D Rendering ▸ Maximum Print DPI caps the resolution (300).
- Recovery copies live in the
recoveryfolder of MarkupRight's data folder (see Install and activate). - Automation tools.
doc_new,template_new,stapler_run,doc_combine,doc_layered,package_create,doc_save,doc_save_mode,doc_revert_as,doc_publish_as,recovery_list,doc_export,doc_print,content_snapshot,content_cut,content_eraseandtext_edit. See Command line and AI agents.