Tool Chest and stamps
Style a markup once, keep it as a tool, and use it on every drawing with one click. Share the same tools with your whole team, and stamp sheets Approved or Reviewed with the date already filled in.
- You'll learn
- Saving and using tools, numbering items, sharing tool sets, and placing and making stamps.
- Where
- Window ▸ Panels ▸ Tool Chest Alt+2, and Tools ▸ Stamp
- Fastest
- The first nine tools in My Tools run with 1 to 9.
What the Tool Chest is for
A tool is a saved markup with everything that makes it yours: color, line, fill, font, Subject, and its text or comment if you like. Instead of restyling a cloud every time, you click Revision cloud and draw. Tools are kept in tool sets; when a whole team uses one set, everyone's markups match and the Markups List sorts them cleanly by Subject. Open the Tool Chest with Window ▸ Panels ▸ Tool Chest or Alt+2.
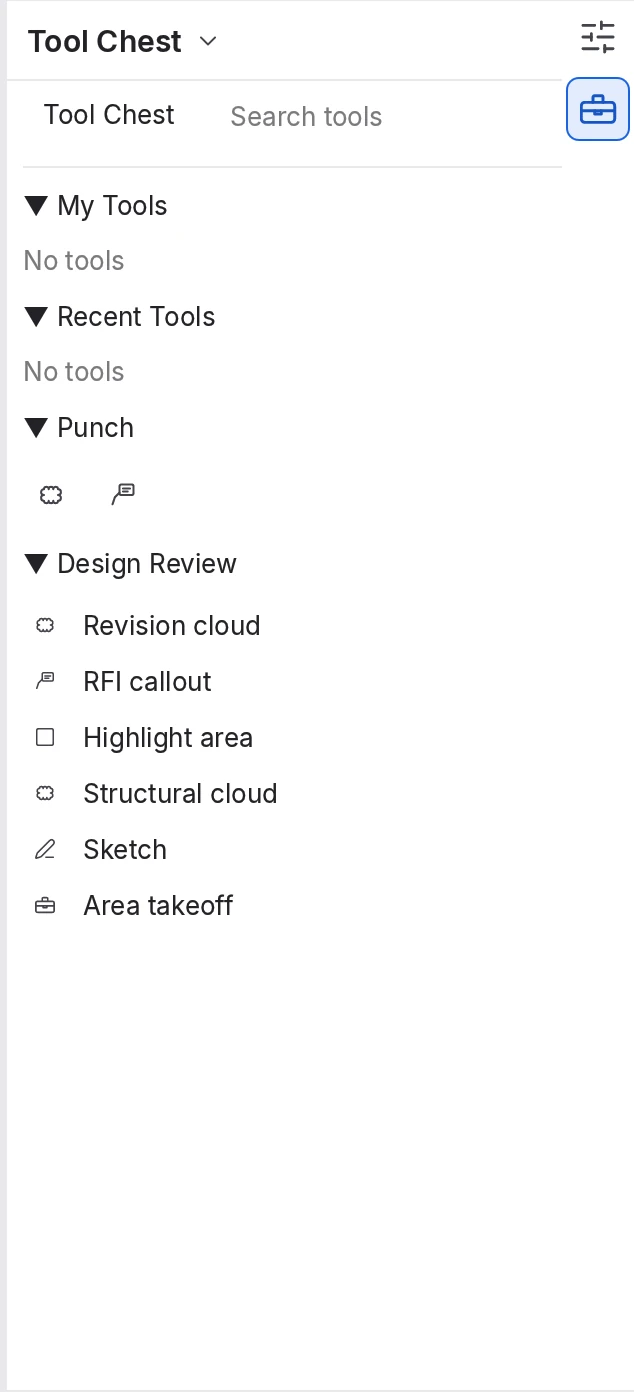 1
2
3
4
5
- Tool Chest menu and Search tools. The menu has Manage Tool Sets… and Clear Recents; the box filters tools by name.
- My Tools. Your personal set.
- Recent Tools. Tool Chest tools you've used this session.
- Punch. The built-in set, in Symbol view (icons only).
- Design Review. A set of your own, in Detail view (icons and names).
Click a set's name to fold it. Drag a tool to reorder its set, or drop it on another set's name to copy it there.
It sits at the right end of the set's title row, but at the panel's starting width it can be out of view, as in the picture. Drag the dock's edge to widen the panel.
The sets in the Tool Chest
My Tools
Always there. Its first nine tools run with the keys 1 to 9, in order.
Recent Tools
The Tool Chest tools you've used, newest first (10 by default). It empties when you quit.
Punch
Built in: Punch Cloud, and Punch Item, a red callout numbered P-001, P-002 and so on.
Your own sets
One per discipline or project, from Manage Tool Sets.
Don't confuse Recent Tools with Tools ▸ Recent Tools, the last 12 drawing tools you picked. To give My Tools other keys, change My Tool 1 to My Tool 9 in MarkupRight ▸ Keyboard Shortcuts.
Add markups to the Tool Chest
To save a markup as a tool
- Draw and style the markup, and give it a clear Subject, such as Revision cloud: the tool is named after it.
- Select it (or several), right-click and choose Add to Tool Chest.
If you have sets of your own, the Add to Tool Chest box asks for a Tool set, with My Tools first.
- Choose the set and click Add.
"Added 1 to My Tools" (or your set), and the tool appears there.
Each selected markup becomes a tool of its own, while a group becomes one tool. Preferences ▸ Tools ▸ Markup ▸ Comment Persistence decides whether text and comments come along: No, Exclude Text Boxes (the default) or All Markups. Embedded photos and videos aren't kept.
Properties mode and Drawing mode
Each tool works in one of two modes. Double-click a tool to switch, or right-click it and choose Drawing Mode or Properties Mode. The tooltip names a tool's mode, and in Detail view Drawing-mode tools say Drawing.
| Properties mode (the default) | Drawing mode | |
|---|---|---|
| Click the tool, then | draw a new shape of any size: the matching drawing tool (such as Cloud) turns on with the tool's look. | click on the page: a copy of the stored markup, same size and text, lands at each click. |
| It stops | after one markup, unless Reuse is on. | when you press Esc. |
| It brings | the look: color, line, fill and font. | everything: look, size, text, Subject, Label and comment. |
Properties mode leaves the drawing tool's own defaults alone. Stamps and groups always place in Drawing mode.
A markup drawn in Properties mode gets the drawing tool's usual Subject, such as "Cloud". When the Subject matters, use Drawing mode or set it after you draw.
Number items automatically
A sequence numbers each placement, so the tenth punch item reads P-010 without anyone typing it. The number goes into the markup's text (Text Box, Callout, Cloud+, Typewriter) or, for other kinds, its Label.
To number punch items on a site walk
- In the Punch set, click Punch Item.
"Click on the page to place the tool; ESC to stop". The tool's icon shows the next number on an orange tag.
- Click beside each item that needs work.
A red callout lands at each click: P-001, P-002, P-003…
- Press Esc, then double-click each callout to add what needs doing after its number.
Dana R., the superintendent, does this on every walk, then filters the Markups List by the Subject Punch Item.
To number a tool of your own, right-click it and choose Sequence…: set the Style (Numeric, or Alphabetic: A to Z, then AA), Prefix and Suffix (such as P-), Start Value, Increment, Width (zero padding: 3 gives 001), Reset per Page or Document, the Next number, Renumber when markups are deleted and Enabled.
The dialog previews the result ("Next placement: P-001"), and OK switches the tool to Drawing mode. Change the numbering of a tool already used in the document and MarkupRight offers to Rebuild those numbers, keeping any typed by hand. Built-in sets can't be changed: to adapt Punch Item, use Copy to ▸ My Tools on its right-click menu and change the copy.
It carries on when you move to another drawing. To start again from the Start Value, right-click the tool and choose Reset Sequence.
A tool's right-click menu
| Item | What it does | |
|---|---|---|
| Drawing Mode, Properties Mode | Switches the mode. | |
| Sequence… | Numbers its placements. Then Resume, Select and Reset Sequence, Rebuild Sequences in Document and Sequence Enabled appear too. | |
| Change Colors… | Swaps colors across the whole set. | |
| Offset As | Makes Offset copies look like this tool. | |
| Edit Action… | Gives the markups it places an action, such as a link to another sheet (Drawing mode only). | |
| Paint Format | Gives the selected markups this tool's look. | |
| Duplicate, Copy to, Delete | Copies it in its set or to another set, or removes it. |
Items that change a set appear only where you can change it: never in a built-in set, and in a shared set only while you have it checked out.
Change a tool
A tool has no editor. To change its look, place it in Drawing mode, restyle the markup it placed, then use the tool again: with Preferences ▸ Tools ▸ Markup ▸ Update Tool Set Item on Reuse on (the default), the tool takes the new look. For other changes, such as size or text, add a corrected markup as a new tool and delete the old one.
Set options: the gear menu
| Item | What it does | |
|---|---|---|
| Symbol View, Detail View | Icons only, or icons with names. | |
| Set Scale…, Remove Scale | Gives the set a drawing scale, such as 1/4" = 1'-0"; a ruler icon by its name turns it on and off. Tools marked as scaled (see For power users) are then placed at each page's scale. | |
| Save, Export… | Writes the set to its file now; saves a copy as a .btx file. | |
| Legend | Places a Tool Set Legend on the page: a table with a row per tool and how many markups match it, kept up to date. See Markups List and reports. | |
| Hide, Manage Tool Sets… | Takes the set out of the panel (Manage Tool Sets brings it back); opens the dialog below. |
Recent Tools' gear has Default Mode: Properties (or Drawing), the mode tools take there, and Clear Recents.
Manage Tool Sets
Open it from the Tool Chest menu or any set's gear. It lists your sets, where each lives and which Profiles show it. Show in this Profile and Show In All Profiles choose where a set appears; Move Up and Move Down order them. Add ▸ New… makes an empty set (Title, Display, File Name, Location, Relative Path); Add ▸ Existing… uses a .btx file where it is, for sharing. Import… copies a .btx in as a private set, as opening or dropping one on MarkupRight does. Export… and Modify… save a copy or rename a set. Delete deletes a private set's file, removes a shared set from your Profile only, and can't delete a built-in set (hide it instead).
To make a tool set of your own
- Open the Tool Chest menu and choose Manage Tool Sets….
- Click Add ▸ New…, type a Title such as "Design Review", leave Location as it is, and click OK.
The new set appears in the Tool Chest, ready for Add to Tool Chest.
Share tool sets with your team
A tool set is a single .btx file. To share one, keep it in a folder everyone can reach, such as the project's network drive, and have each person add it where it is, so one person's change reaches everyone.
To share a tool set
- Put the set in the shared folder: make it there (Add ▸ New… with Location set to that folder), or save a copy there with the gear's Export….
- Each teammate opens Manage Tool Sets…, clicks Add ▸ Existing… and picks the file.
The set appears with a lock beside its name. Changes to the file show up within a couple of seconds.
- To change the set, click its lock to check it out.
The lock opens ("Checked out by you"). Your changes save to the shared file as you make them, and the lock is released when you quit.
- One person at a time can check a set out, and the lock shows who. Check-out is refused while someone else has it, unless their check-out is over a day old, and when the folder is offline or read-only. If the file changes while you have it checked out, Tool Set Changed offers Keep My Copy or Reload.
- Profiles carry shared sets. A set added with Add ▸ Existing… is recorded in your active Profile, so exporting the Profile (MarkupRight ▸ Profiles ▸ Manage Profiles…, Export… with Include Dependencies) hands a new team member the same sets; see Preferences and profiles. Relative Path, for a set made in a shared folder, stores its location relative to the Profile's folder.
Import… is different: it makes a private copy that never picks up changes.
Stamps
A stamp is a small PDF you place like a rubber stamp: APPROVED, REVIEWED, FOR CONSTRUCTION. Each one is a PDF file in your stamp folder, and Tools ▸ Stamp lists them, the default first.
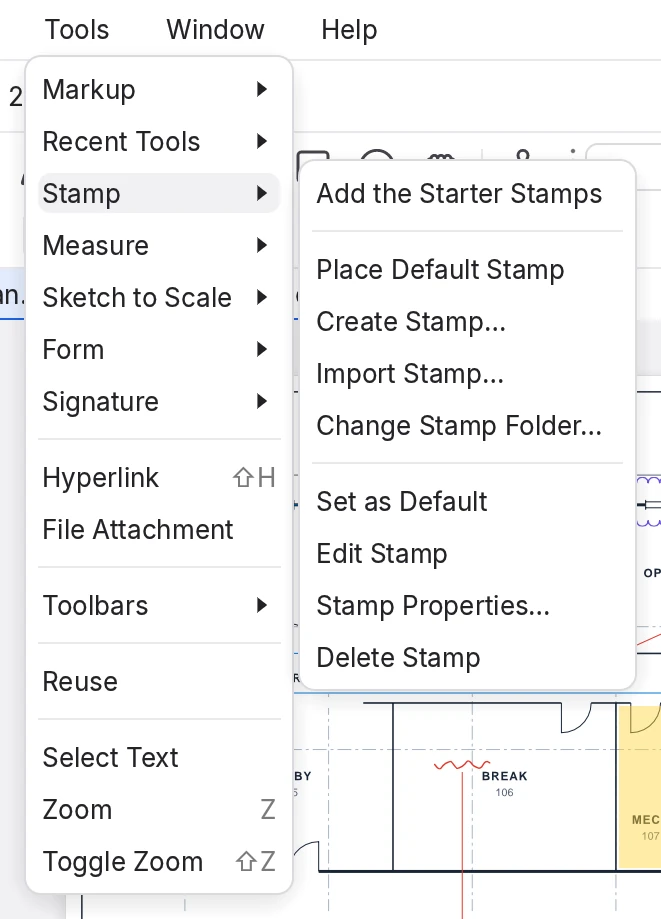
| Item | What it does | |
|---|---|---|
| Place Default Stamp | Places the stamp you used last, or the default. The Markup toolbar's Stamp button does the same. | |
| Create Stamp…, Import Stamp… | Makes a new stamp (below); copies PDF files into the folder as stamps. | |
| Change Stamp Folder… | Uses another folder, such as a shared one. | |
| Set as Default, Edit Stamp | Moves the stamp to the top of the list; opens its PDF in a tab to change it. | |
| Stamp Properties… | Changes its Subject, Author, Opacity, Rotation and Blend Mode. | |
| Delete Stamp | Deletes it from the folder, unless it's open for editing. |
The last four act on the stamp you chose last, or on the default.
The starter stamps
The first time you use stamps, MarkupRight fills an empty stamp folder with six: Approved, Reviewed, Revised, Rejected, Draft and For Construction. Approved, Reviewed and Rejected show the date and time. Until then the menu offers Add the Starter Stamps.
To place a stamp
- Choose Tools ▸ Stamp ▸ Approved, or any stamp.
- Click on the page to place it at its own size, or drag a box to fit it.
The stamp lands with the date and time filled in, inside the page, with the stamp's own opacity, rotation and blend mode.
Dynamic fields such as the date are filled in as you place the stamp, then stay fixed. To swap a placed stamp for another, choose one in the Stamp section of Properties ▸ Appearance. To stamp many files, use Batch ▸ Apply Stamp… (Batch processing).
Create your own stamp
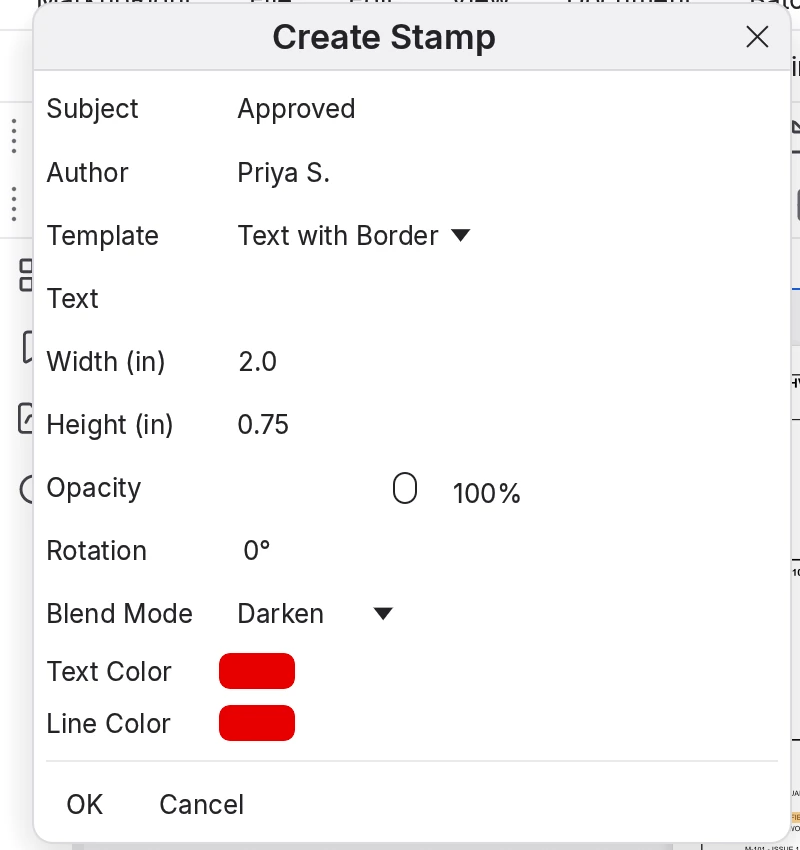 1
2
3
4
5
- Subject, Author. The Subject names the stamp in the menu and its file.
- Template. Blank, Text, Text with Border (the default), Text with Date and Border, or Text with Rounded Border.
- Text. What the stamp says; blank uses the Subject.
- Width (in), Height (in). From 0.1 to 40 inches.
- The look. Opacity, Rotation, Blend Mode, Text Color and Line Color.
To create a stamp
- Choose Tools ▸ Stamp ▸ Create Stamp….
- Fill in the fields and click OK.
The stamp is saved in your stamp folder and opens in its own tab, outlined in blue with its size above it.
- Add anything else it needs, such as a line for initials, then save the tab Ctrl+S.
Markups you add become part of the stamp.
Dynamic fields
Use these in a stamp's Subject, its Text, or text inside its PDF:
| Field | Becomes |
|---|---|
&[User] | Your name, from Preferences ▸ General ▸ Options ▸ User |
&[Date], &[Time] | 2026-11-13 and 14:05 |
&[File], &[FileNoExt], &[Path] | The document's file name, without its extension, and its full path |
&[Day], &[Month2], &[Month3], &[MonthFull] | 13, 11, Nov, November |
&[Year2], &[Year4] | 26, 2026 |
&[Hour], &[Minutes], &[Seconds] | 14, 05, 09 (a 24-hour clock) |
Field names ignore capitals; anything else in &[ ] stays as typed. The Text with Date and Border template adds &[Date] &[Time] under the text for you.
The stamp folder and a shared stamps folder
Your stamps live in Documents/MarkupRight/Stamps unless you choose another folder with Tools ▸ Stamp ▸ Change Stamp Folder… or Preferences ▸ Tools ▸ Markup ▸ Stamp Folder. Network folders work, so a team can point everyone's Stamp Folder at one shared folder. An administrator can instead set Preferences ▸ Admin ▸ Net Config ▸ Stamps, used by anyone whose own Stamp Folder is empty. Shared stamps also help copying between copies of MarkupRight, where a stamp pastes only if the other copy has one of the same name.
Once your own Stamp Folder is set, including by Change Stamp Folder…, the Net Config folder isn't used. Clear the preference to go back to it.
For power users Expert
- Files.
Documents/MarkupRight/Tool SetsholdsMy Tools.btx, your private sets andTool Chest.json(set order and hidden sets). A .btx is XML holding each tool's mode, sequence and markups, plus the set's own Comment Persistence and Update on Reuse settings; files over 64 MB are refused. Check-out writes<set>.btx.lock(user, computer, time) beside the set. The stamp folder keeps its order instamps.order.json. - Preferences ▸ Tools ▸ Markup: Maximum Recents (
toolchest.max_recents, 1–50), Comment Persistence (toolchest.comment_persistence), Update Tool Set Item on Reuse (toolchest.update_on_reuse), Recent Tools Mode (toolchest.recent_mode) and Stamp Folder (stamps.folder). The Net Config folder isadmin.net_stamps. - Scaled tools. A tool marked scaled is resized from its set's scale to the page's when placed, then keeps that size. Add to Tool Chest doesn't mark tools; use
toolset_create(with a scale) andtoolset_add_tool(withscaled: true). - Automation.
toolchest_list,toolchest_place,toolset_checkout,toolset_release,sequence_set,stamp_create,stamp_placeand more; see Command line and AI agents. - Backups. Back Up Settings, in Find Tools + Commands, includes your Tool Sets and Stamps.