Preferences and profiles
Make MarkupRight work the way you do. Change how it behaves in Preferences, keep a window layout for each kind of job as a Profile, build your own toolbars and keys, and, if you look after your team's computers, set policy for everyone.
- You'll learn
- Which settings matter, how Profiles differ from preferences, and how to back up and share both.
- Preferences
- MarkupRight ▸ Preferences Ctrl+,
- Before big changes
- Preferences ▸ Admin ▸ Options ▸ Backup saves everything in one zip file.
Preferences or Profile?
MarkupRight keeps two kinds of settings. Knowing which is which tells you where to look.
| Preferences | Profiles | |
|---|---|---|
| What they control | How MarkupRight behaves: your name on markups, the theme, how files save, grid units, how pages are drawn. | How the window looks: panels, toolbars, keyboard shortcuts and how new documents open. |
| How many | One set. | As many as you like. One is active at a time. |
| When they're saved | When you click OK or Apply. | Automatically, moments after you change the layout. |
| How you share them | An exported settings file (.xml) | An exported Profile (.tpx) |
Priya S., for example, keeps a Review Profile and a Takeoff Profile with different panels in front. Her name on markups is the same in both, because it's a preference.
Preferences
Preferences has more than 200 settings in ten groups. Most people change a handful once.
To change a preference
- Choose MarkupRight ▸ Preferences or press Ctrl+,.
Preferences opens on General ▸ Options.
- Click a group on the left, then a page along the top. Or type in Search and click a result: its page opens with the setting highlighted.
- Change the setting. A setting is grayed out while the one it depends on is off, or when it isn't available in this version.
- Click OK to save and close, or Apply to save and keep the dialog open.
Most changes take effect at once. Cancel or Esc throws away anything you haven't applied.
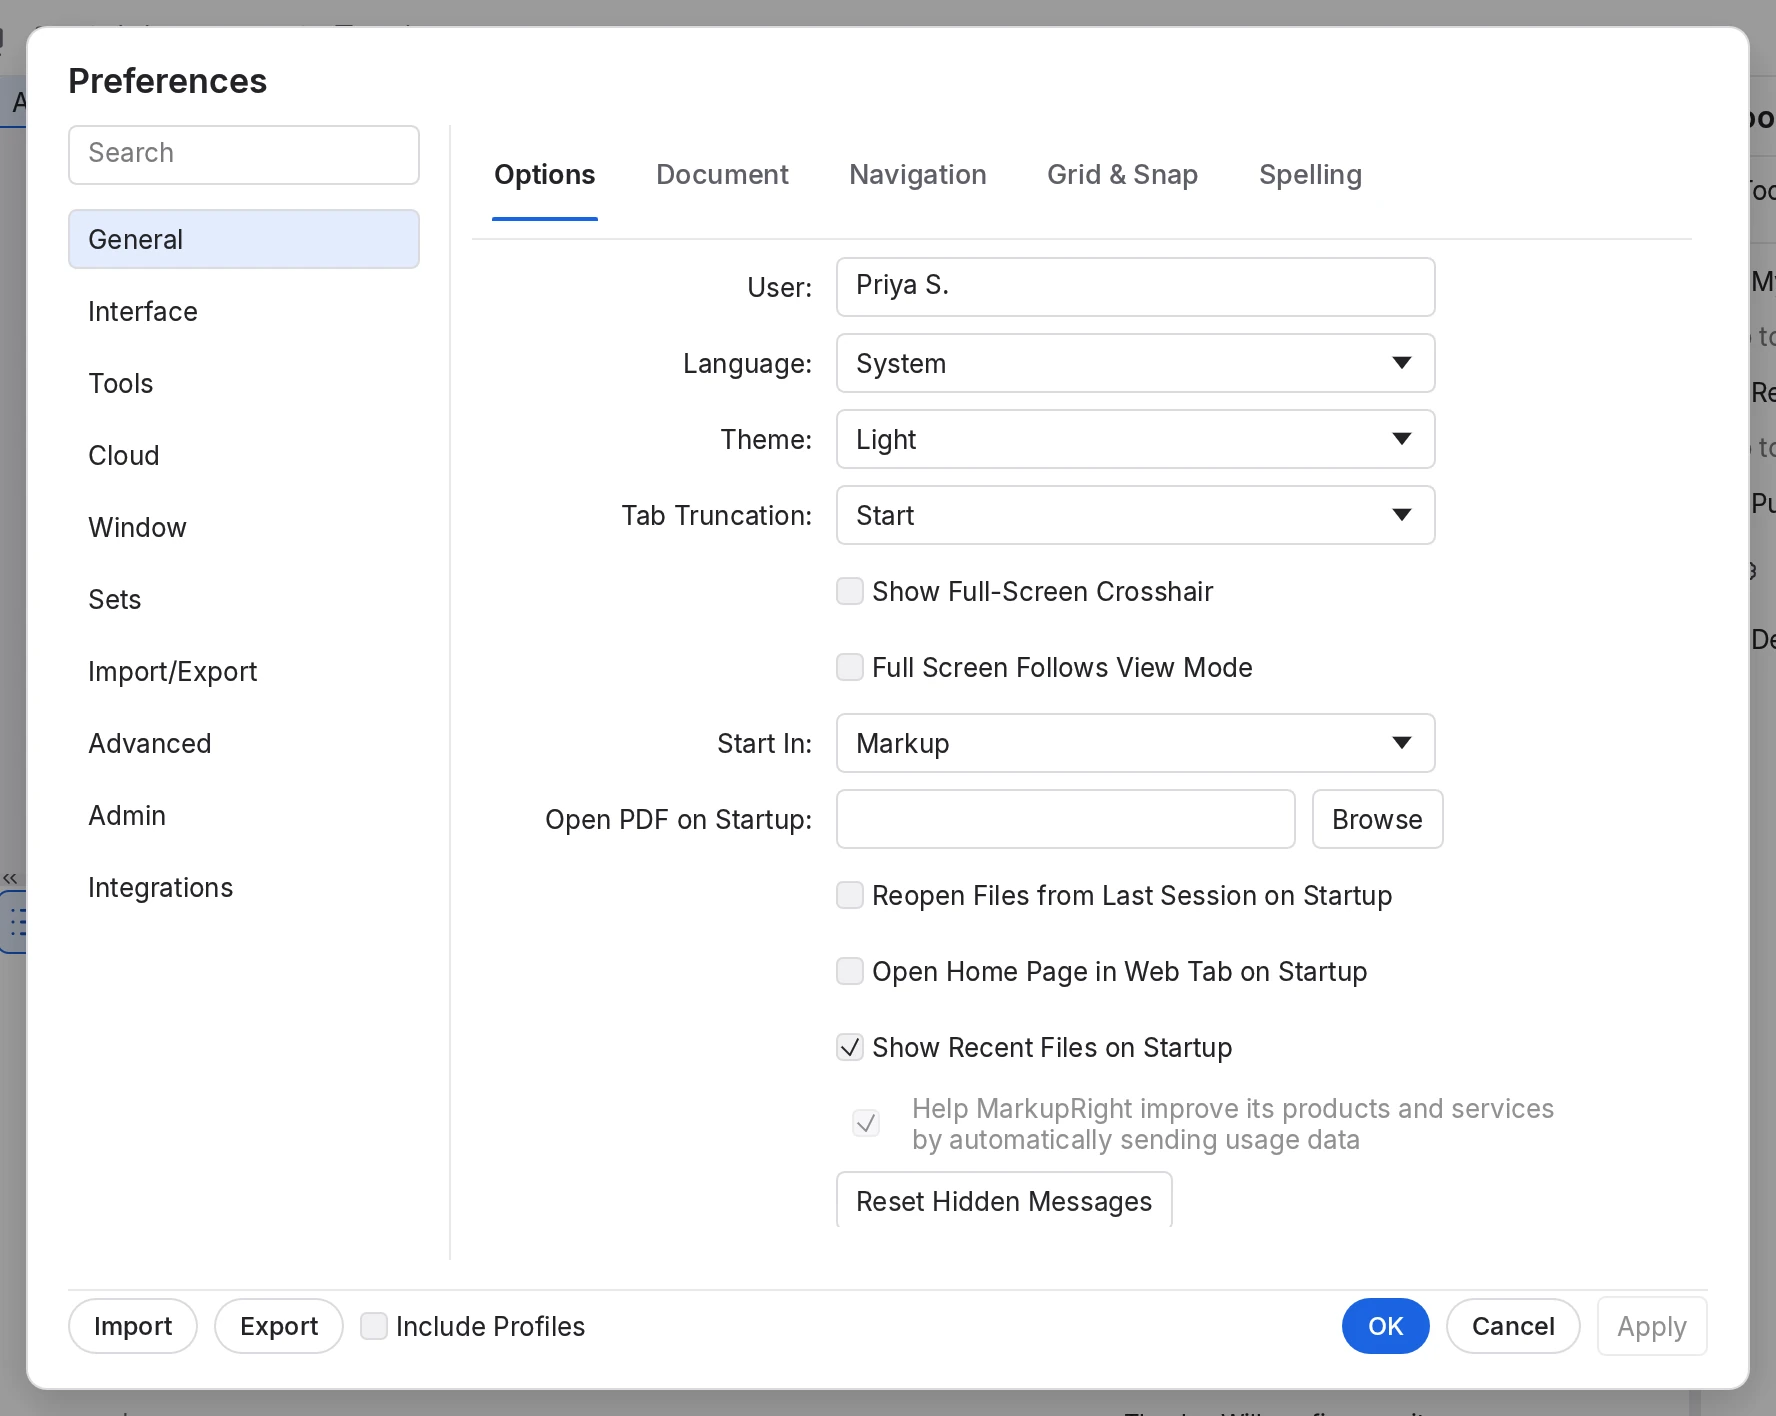 1
2
3
4
5
6
- Search. Type snap to list every snapping option.
- Groups. Ten of them, from General to Integrations.
- Pages. The chosen group's pages.
- Settings. Some show a tip when you hover over them.
- Import, Export and Include Profiles. Move settings between computers.
- OK, Cancel and Apply. Apply stays gray until you change something.
Press Ctrl+K and type a page name after Preferences:, such as Preferences: Grid & Snap.
The groups and their pages
| Group | Pages | What you'd change there |
|---|---|---|
| General | Options, Document, Navigation, Grid & Snap, Spelling | Your name, theme and startup; saving, recovery and reloading; the mouse wheel and scroll bars; grid and snapping. Spelling isn't available yet. |
| Interface | File Access, Markups List, Layers | The recent-files list; how the Markups List zooms, wraps and exports; how layers hide and sort. |
| Tools | Markup, Measure, Sketch, Forms, Signature | Reuse, default font, snapshots and the stamp folder; measurement units, precision and Dynamic Fill; Sketch to Scale input; form field highlighting; digital ID folders and the timestamp server. |
| Cloud | Cloud | Nothing yet: it arrives in a later version. |
| Window | Tablet, Presentation, WebTab | Touch and pen input; Presentation looping and background; how WebTabs open. |
| Sets | Set Options, Sorting, Categories, Tags | How a Set opens documents, sorts sheets, stacks revisions and tags sheets. |
| Import/Export | Options, Word, Excel, PowerPoint, Images | Whether an export opens when done, text recovery for scans, Word and Excel options, image resolutions. |
| Advanced | 2D Rendering, 3D Rendering, JavaScript, Archive as PDF/A | The rendering engine, Dark Mode colors, Dimmer amount and print resolution; document scripts; PDF/A conversion. 3D Rendering arrives in a later version. |
| Admin | Options, Net Config, MCP | Default programs, logs, updates, Backup, Restore and Reset; a shared stamp folder; the AI assistant connector. See Administrator and IT. |
| Integrations | Integrations | Nothing yet: it arrives in a later version. |
Settings most people change
| Setting | Page | Default | What it does |
|---|---|---|---|
| User | Options | Empty | Your name in the Author field of new markups and stamps. Left empty, MarkupRight uses your computer account name. Set it before your first review. |
| Theme | Options | System | System follows your computer's light or dark appearance; Light and Dark stay put. See Light and dark. |
| Start In | Options | Markup | Markup starts with the Select tool, View with Pan, Last Used with whichever you used last. |
| Show Recent Files on Startup | Options | On | Opens the File Access panel with your recent files at startup. |
| Save Mode | Document | Publish Without Revisions | Publish Without Revisions rewrites the whole file. Maintain Revisions adds each save to the end, so File ▸ Revert As can go back. Publish Compressed rewrites it smaller. Signed files always save by adding to the end, so signatures stay valid. |
| Enable Document Recovery | Document | On | Keeps a copy of unsaved changes every 60 seconds, for File ▸ Recover Unsaved Changes… after a crash. Files on network drives are left out. |
| Reload Files Changed by Other Programs | Document | On | Reloads an open file when another program saves over it. If you have unsaved edits, a bar asks you to Reload or Keep your version. |
| Units and Grid Spacing | Grid & Snap | Inches, 0.25 | The unit and spacing of the dot grid (Show Grid Shift+G): Inches, Centimeters, Millimeters, Points or Picas. Snapping options are on the same page. |
| Rendering Engine | 2D Rendering | Hardware (wgpu) | Draws pages with your graphics card. If pages draw wrongly, try Software (OpenGL); needs a restart. If the card can't start at all, MarkupRight switches to OpenGL by itself. |
Reset Hidden Messages (Options) brings back messages you chose not to see again. For saving and recovery, see Create, save and export.
Settings that need a restart
Three settings wait for the next start: Language (General ▸ Options), Rendering Engine (Advanced ▸ 2D Rendering) and Extended Debugging (Admin ▸ Options). Change one and Preferences shows Restart MarkupRight to apply: … above its buttons. Everything else applies when you click OK or Apply. In this version, Language offers System and English (US).
To copy your settings to another computer
- In Preferences, tick Include Profiles if you want your Profiles too.
- Click Export and save the file (MarkupRight settings.xml unless you rename it).
It holds every preference, your active Profile's name and your shortcut changes. With Include Profiles, a folder beside it holds your Profiles and the files they use.
- On the other computer, import the Profiles first: MarkupRight ▸ Profiles ▸ Manage Profiles…, then Import… for each .tpx file.
- Open Preferences, click Import and choose the XML file.
The Import Settings dialog lists each change, old value → new value. Click Import to apply them all; MarkupRight also switches to the file's Profile if you have it.
Settings this version doesn't know are kept; values that don't fit are listed as not imported. A file from a newer MarkupRight is refused.
Including your User name and recent files. A colleague who imports your file should read the list first, and set their own name afterwards.
Back up, restore or reset
Three buttons on Preferences ▸ Admin ▸ Options look after everything at once:
- Backup zips your preferences, Profiles, window positions, tool sets, styles, stamps and templates into the
backupsfolder (see Where settings live), named for the time in UTC, such as20261113-171500.zip. - Restore asks for a backup, then Replace your settings and profiles with the backup …? Backups from a newer MarkupRight are refused.
- Reset asks Set every preference back to its default? A backup of your settings is made first. Documents with unsaved changes are offered for saving and closed first. Restart MarkupRight to finish.
It changes preferences only, not Profiles, tool sets or stamps. For the original panels, use View ▸ Reset Panel Layout; for a built-in toolbar, Reset in Customize Toolbars.
Profiles
A Profile is a saved workspace. MarkupRight comes with one, Default; make your own for each kind of work, or import your team's. A Profile holds:
- the window layout: splits, docks and where every panel sits;
- the toolbars (yours too), where they sit, Lock, and the Full Screen toolbar;
- your keyboard shortcut changes;
- how new documents open: page layout, zoom and rulers;
- markup looks saved with Set as Default, status models, Markups List columns and saved filters, and security presets (never their passwords);
- links to the tool sets, line-style sets and hatch sets it uses.
It doesn't hold your open documents or your preferences.
Switch and save
To switch, choose MarkupRight ▸ Profiles and a name, click Profile at the right end of the navigation bar, or press Ctrl+K and type Switch to Profile. The window rebuilds around your open documents, whose tabs gather in the first view.
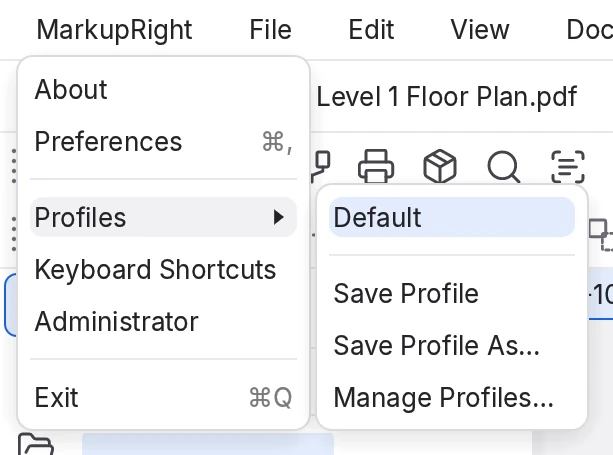
Changes save to the active Profile by themselves: about half a second after you make them, when you switch and when you quit. Save Profile saves now. Save Profile As… saves the layout under a new name and makes it active; a name can't contain / \ : * ? " < > | or repeat an existing one.
To make a Profile for a kind of job
- Choose MarkupRight ▸ Profiles ▸ Save Profile As…, type a name such as Takeoff and click OK.
A copy of your current layout becomes the active Profile.
- Arrange the window for the job. For example, choose Window ▸ Panels ▸ Measurements and Tools ▸ Toolbars ▸ Measure, and hide what you don't need.
Each change saves to Takeoff.
- To go back, choose MarkupRight ▸ Profiles ▸ Default.
The Default layout returns, and your documents stay open.
If you rearrange first, the changes save into the Profile you started in.
Manage Profiles
Choose MarkupRight ▸ Profiles ▸ Manage Profiles…:
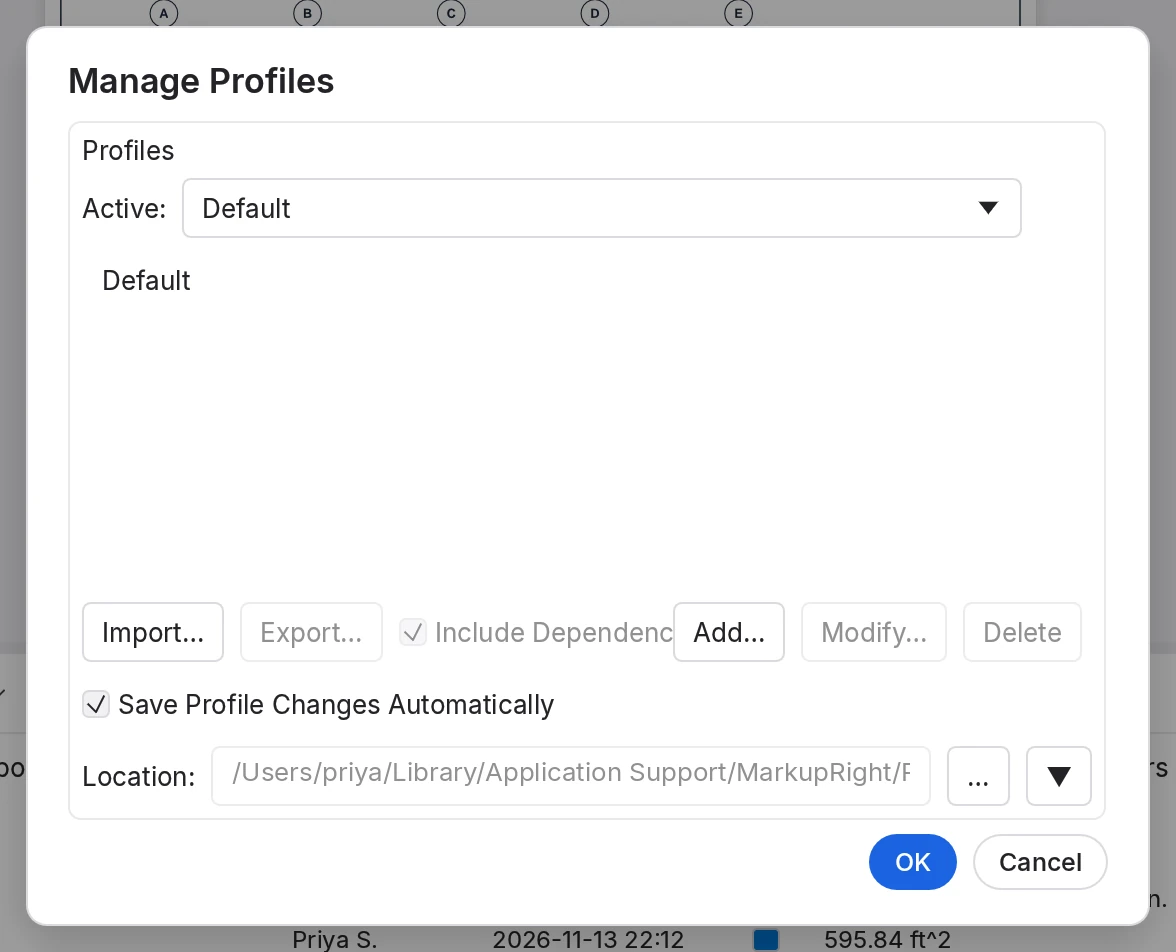 1
2
3
4
5
6
- Active. Pick a Profile and click OK to switch to it.
- Profiles. Those from a shared folder are marked (shared).
- Import… and Export…. Import adds a .tpx file as a Profile named after the file. Export writes the selected Profile as a .tpx; Include Dependencies copies the tool sets, line-style sets and hatch sets it uses beside it.
- Add…, Modify… and Delete. Add saves the current layout as a new Profile and switches to it; Modify… renames. You can't rename or delete Default, or delete the active Profile.
- Save Profile Changes Automatically. Off, changes are kept only when you choose Save Profile.
- Location. Click … to read Profiles from a shared folder too; ▼ ▸ Use the Local Folder Only stops that.
Import refuses a name that's taken, whatever its capitals: A profile named … exists. Delete the local profile or rename the file, then import again. Opening a .tpx file, dropping it on the window or double-clicking it (Windows and Linux) imports it too. Importing doesn't switch Profiles.
Shared Profiles for a team
Put the team's .tpx files in a shared folder, such as one on a network drive, and set each person's Location to it. Shared Profiles are read-only: rearrange one and the changes last only for the session, unless Save Profile keeps them as your own "name (local)". If the folder can't be reached, MarkupRight uses the copy it kept last time and says so. A Profile file that can't be read is renamed to end in .tpx.bad, and Default loads instead.
Toolbars
MarkupRight has 22 built-in toolbars. File, Markup, Font and Alignment show at first; the rest wait in Tools ▸ Toolbars. Toolbars, their places and Lock are saved in the active Profile. (The Properties toolbar under the menus follows your selection and can't be customized.)
- Show or hide a toolbar: choose Tools ▸ Toolbars and click its name. Highlighted names are showing.
- Move a toolbar: drag its grip (the dotted handle at its start) into another row, to the top or bottom edge of the workspace for a new row, to the left or right edge for a new column, or anywhere else to float it.
- Lock them: Tools ▸ Toolbars ▸ Lock removes the grips so nothing moves by accident. Choose it again to unlock.
The Customize Toolbars dialog
Choose Tools ▸ Toolbars ▸ Customize… to change any toolbar or build your own. Only commands that work in this version are listed.
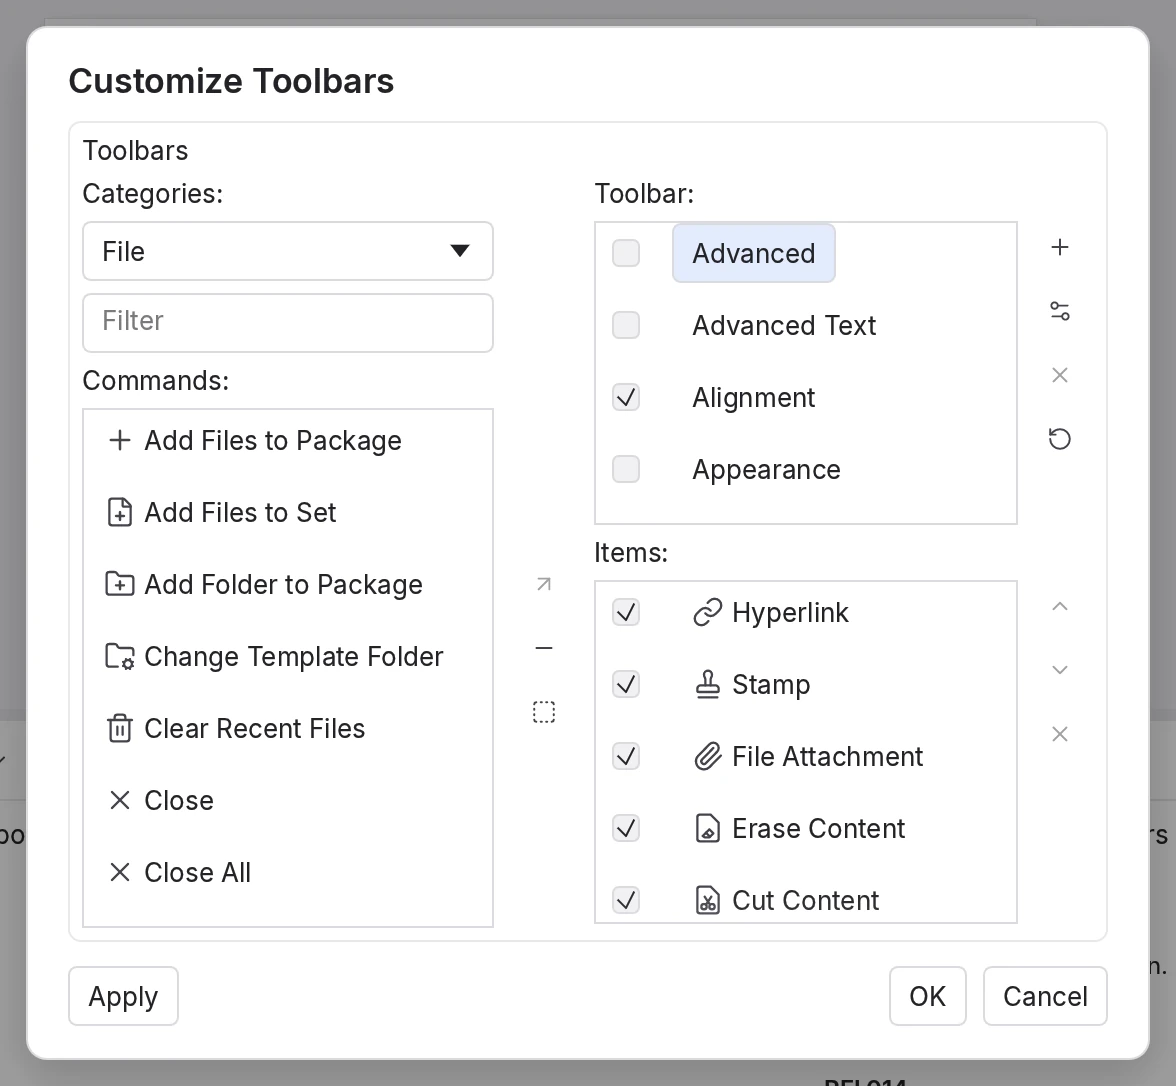 1
2
3
4
5
- Categories and Filter. Narrow the list by menu, or by part of a name.
- Commands. Everything you can put on a toolbar.
- Add buttons. Add a command, a separator or a space.
- Toolbar. Every toolbar; a tick shows it.
- Items. The selected toolbar's buttons, in order. Untick one to hide it without removing it.
Hover over a button in the dialog to see its name:
| Button | What it does | |
|---|---|---|
| Add | Puts the selected command after the selected item. Double-clicking a command does the same. | |
| Add Separator | A line between groups of buttons. | |
| Add Blank Space | A gap of 8, 16 or 32 px. | |
| New | A new, empty toolbar. Each toolbar needs its own name. | |
| Properties | Renames the selected toolbar. | |
| Delete | Deletes one of your own toolbars. Built-in toolbars can only be hidden. | |
| Reset | Puts a built-in toolbar's buttons back the way they came. | |
| Move Up, Move Down | Moves the selected item one place. | |
| Remove | Takes the selected item off the toolbar. |
Apply shows your changes and keeps the dialog open; OK (Enter) keeps them and closes; Cancel (Esc) throws them away. To change the Full Screen toolbar, right-click it in Full Screen and choose Customize….
To build your own toolbar
- Choose Tools ▸ Toolbars ▸ Customize….
- Beside the Toolbar list, click New, type a name such as Takeoff and click OK.
The new, empty toolbar is selected and ticked.
- In Categories, choose Measure. (To search every command, choose All and type in Filter.)
- Select Set Scale and click Add, or double-click it.
It appears in Items.
- Add Length, Area and Count the same way. Click Add Separator between groups, and use Move Up and Move Down to reorder.
- Click OK.
Your toolbar appears at the end of the first toolbar row. Drag its grip to put it where you like.
Keyboard shortcuts
Change any command's shortcut in MarkupRight ▸ Keyboard Shortcuts. Changes are saved in the active Profile, so a Takeoff Profile can have different keys from a Review Profile. For every default key, see Keyboard shortcuts.
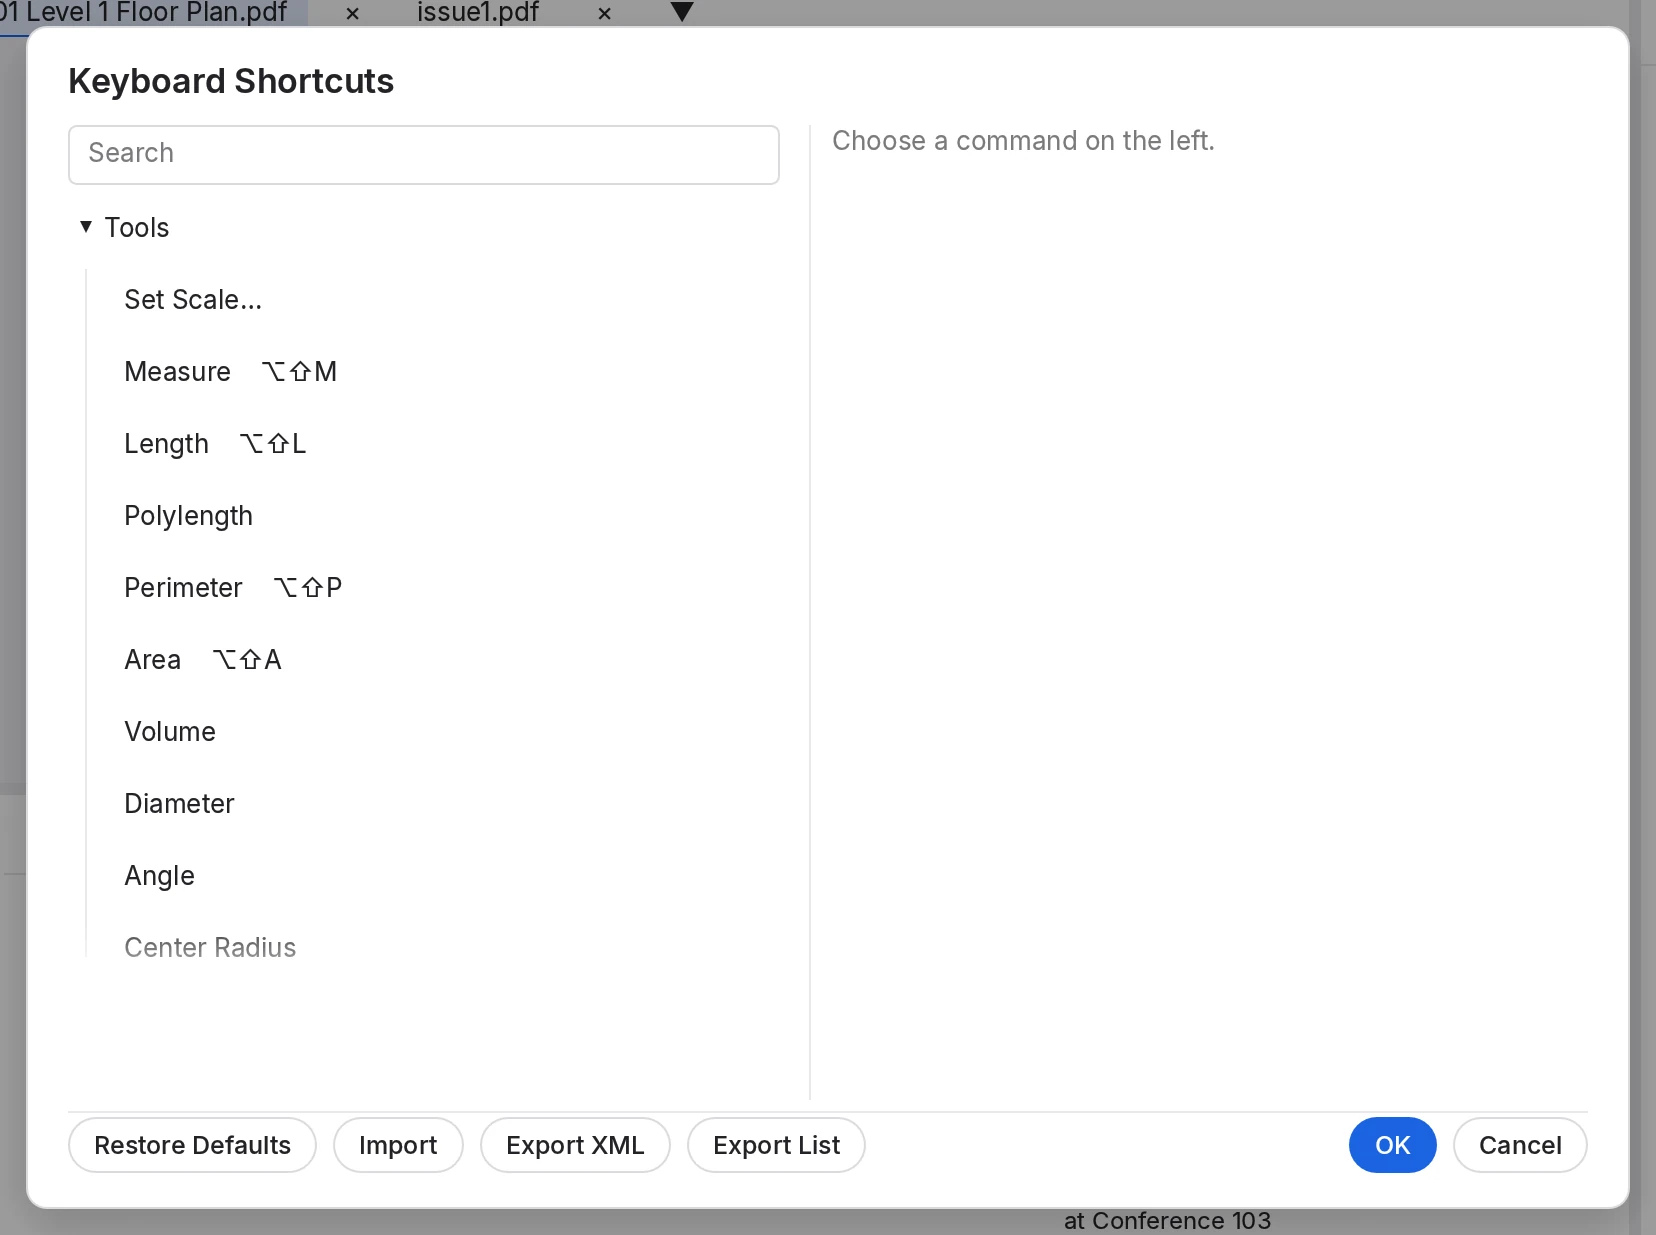 1
2
3
4
- Search. Type part of a command's name.
- Commands. In two groups, Tools and Commands.
- The chosen command. Its Shortcut button, Reassign and Remove appear here.
- Restore Defaults, Import, Export XML and Export List. See Export, import and restore.
To change a shortcut
- Choose MarkupRight ▸ Keyboard Shortcuts.
- Find the command with Search or in its group, and click it.
Its name and current Shortcut appear on the right.
- Click the Shortcut button and press the keys you want. Esc on its own cancels.
- Click Reassign.
If another command has those keys, MarkupRight asks first, for example Ctrl+R is used by Rulers. Reassign it to Count? Reassign moves the keys (the other command loses them); Change lets you press different ones.
- Click OK.
The new key works straight away.
Remove takes a command's key away. Two kinds of key are refused, with the reason: a number key on its own, because 1–9 run the first nine tools in My Tools; and keys the system keeps, such as Ctrl+Tab, Alt+Tab, Ctrl+Space and Alt+F4.
Export, import and restore
- Export XML saves your changes (keys that differ from the defaults) as MarkupRight shortcuts.xml, to import elsewhere.
- Export List saves every command that has a key as MarkupRight shortcuts.txt, one per line with a tab before the key: a ready-made cheat sheet.
- Import reads a shortcuts file or a whole settings file. Imported keys take over from commands that had them; anything refused is listed in a notice.
- Restore Defaults puts every key back as it came, once you click OK.
Administrator and IT Expert
MarkupRight ▸ Administrator opens Preferences on Admin ▸ Options. It's a shortcut, not a lock: anyone can open it, and it doesn't stop anyone changing settings.
Admin settings
| Setting | What it does |
|---|---|
| Open Default Programs | Makes MarkupRight the program for PDFs and Profiles (.tpx): Windows opens Default Apps for you to choose it, Linux sets it directly. Opening PDFs from the Finder isn't supported on macOS yet. |
| Explore Log Folder | Opens the folder of logs. |
| Extended Debugging | Writes much more detail to the log after a restart. Turn it on when support asks. |
| Reset, Backup, Restore | See Back up, restore or reset. |
| Check for Updates | Automatic update checks on or off. Help ▸ Check for Updates works either way. |
| Check When MarkupRight Starts | Checks at startup, at most once a day. |
| Update Channel | Automatic (Beta for a beta build, otherwise Stable), Stable or Beta, which gets fixes first. |
| Stamps (Net Config) | A stamp folder shared by everyone. Each person's own Stamp Folder (on the Tools ▸ Markup page) comes first. |
| Enable the MCP connector (MCP) | Lets AI assistants work with MarkupRight; off until you turn it on. See Command line and AI agents. |
IT policy: policy.json
To set updates and the licence agreement for every user of a computer, put a policy.json file in the machine-wide folder:
| Windows | macOS | Linux |
|---|---|---|
%ProgramData%\MarkupRight\policy.json | /Library/Application Support/MarkupRight/policy.json | /etc/markupright/policy.json |
{
  "eula_accepted": true,
  "updates_enabled": false,
  "channel": "stable"
}| Key | Values | Effect |
|---|---|---|
eula_accepted | true | Accepts the licence agreement for every user, so nobody is asked at first start. |
updates_enabled | true or false | Overrides each user's Check for Updates. With false, Help ▸ Check for Updates is refused too: Your administrator has turned updates off for this computer. |
channel | "stable" or "beta" | Overrides each user's Update Channel. Any other value means the build's own default. |
The Admin page doesn't show these settings as locked, so tell your users. A file that isn't valid JSON is ignored without a message: check it before you deploy it.
Copies installed from the MSI package never update themselves; deploy each new MSI instead (see Install and activate).
Logs
MarkupRight writes one log a day, markupright-YYYY-MM-DD.log, in the logs folder of its data folder, and keeps 14 days. Only warnings and errors are written unless Extended Debugging is on. Logs stay on your computer: nothing is sent anywhere.
Where settings live
| Windows | macOS | Linux | |
|---|---|---|---|
| Settings preferences.json, Profiles, window and session files | %APPDATA%\MarkupRight | ~/Library/Application Support/MarkupRight | ~/.config/MarkupRight |
| Data logs, backups, crash recovery, updates | %LOCALAPPDATA%\MarkupRight | The same folder as settings | ~/.local/share/MarkupRight |
| Machine-wide policy.json, for IT | %ProgramData%\MarkupRight | /Library/Application Support/MarkupRight | /etc/markupright |
Profiles are in Profiles inside the settings folder; logs, backups and recovery copies are in logs, backups and recovery inside the data folder. On Linux, $XDG_CONFIG_HOME and $XDG_DATA_HOME move them.
Use Reset, which makes a backup first. On Windows the per-user installer puts MarkupRight itself in %LOCALAPPDATA%\MarkupRight, so deleting that folder removes the program.
For power users Expert
- Preference keys. Each setting has a dotted key, as stored in
preferences.jsonand in exported XML: for examplegeneral.user_name,general.theme(system,light,dark),general.startup_mode(markup,view,last),document.save_mode(maintain_revisions,publish,publish_compressed),grid.unit(in,cm,mm,pt,pc),rendering.engine(hardware,software_a,software_b) andupdates.channel(auto,stable,beta). - Interface size. MarkupRight follows your system's display scale and has no control for it. To override it, quit and set
interface.ui_scale(0.5 to 3.0) inpreferences.json. - Commands with no menu entry. Ctrl+K finds Export Settings…, Import Settings…, Back Up Settings, Restore Settings…, Reset Settings…, Export Keyboard Shortcuts…, Import Keyboard Shortcuts… and Restore Default Keyboard Shortcuts.
- The settings file. Plain XML, so you can prepare one for a team by hand. Shortcuts are written the same way for every platform: the modifier that means Control on Windows and Linux means Command on macOS.
<?xml version="1.0" encoding="UTF-8"?> <markupright-settings version="1" exported="2026-11-13T17:15:00Z"> <pref key="general.theme" type="string">dark</pref> <pref key="grid.spacing" type="number">0.5</pref> <activeProfile>Takeoff</activeProfile> <shortcuts> <shortcut command="measure.count" key="Alt+Shift+C"/> </shortcuts> </markupright-settings> - Profiles (.tpx). XML. Sections MarkupRight doesn't recognize are kept when it saves; a Profile saved by a newer version isn't loaded, and Default is used instead. Relative paths to tool sets and styles are read from the folder the .tpx is in, so a shared folder can carry its own tool sets.
- Automation. With the MCP connector on, start MarkupRight with
--control <file>and runmarkupright mcp --app <file>to add tools such asprefs_get,prefs_set(it reports when a restart is needed),prefs_backup,profile_activate,profile_exportandshortcuts_assign. See Command line and AI agents. - Updates from a script.
markupright --check-update [--channel stable|beta]reports whether a newer version exists, never downloads, and ignorespolicy.json. In Windows terminals, typemarkupright-cliinstead.