Batch processing
The Batch menu runs one job over many PDFs at once: stamp a folder of drawings, secure a submittal, slip-sheet a new issue into your working set. Every batch dialog shares the same file list, so once you know it, you know them all.
- You'll learn
- How batch file lists work, what each Batch job does, and how to run batches from a script.
- Where it lives
- The Batch menu, and
markupright batchin a terminal. - Before you start
- Closed files are changed and saved in place: keep a copy of the originals.
How every batch dialog works
Every Batch dialog starts with a file list, with the document in front already on it:
- Add ▸ Files... picks PDFs. Open Files adds every open document, Folder... and Folder and Subfolders... add every PDF in a folder, and Open Set... adds the files of the open Set, or of a Set file you pick.
- Remove takes a file off the list; drag a row by its handle, or use Up and Down, to reorder.
- Save... keeps the list, with each file's pages, as a
.bcxfile, and Load... brings it back. A file that has moved since is listed in red as “(missing: skipped)”.
Page selectors
Each file's page selector says which pages the job touches. The last one you choose becomes the default for new files.
| Selector | Pages |
|---|---|
| All Pages | Every page. |
| Current Page, Current View | The page on screen, or the pages in the window. For a closed file, its first page. |
| Even Pages, Odd Pages | Every second page. |
| Landscape Pages, Portrait Pages | Pages wider than they are tall, or the rest. |
| Custom | The pages you type, such as 1-3, 5, 8- (8- runs to the last page). |
Open files and closed files
A batch treats the two kinds of file differently:
- An open document, marked “(open)”, changes in memory as one step you can undo, and stays unsaved until you save it.
- A closed file is opened behind the scenes, changed and saved in place.
There is no undo for a closed file. Copy the originals, or the whole folder, before you run a batch on them. Headers & Footers asks first (“3 closed files will be overwritten…”, with Overwrite and Back); the other jobs don't.
Skipped files
A file is skipped, with the reason, when it is signed or certified, PDF/A, read-only or missing, or when none of its pages match its selector. So is a closed file that is also open in MarkupRight (“it is open: add it as an open document”), which protects your unsaved changes: add it with Open Files instead. Open a password-protected file first and add it the same way.
Progress and the summary
A progress notice names each file in turn; Cancel stops after the file at hand. The summary then reads, for example, “Flatten Markups: 4 of 5 files done”, followed by each file that was skipped or failed and why. One batch runs at a time.
The Batch menu
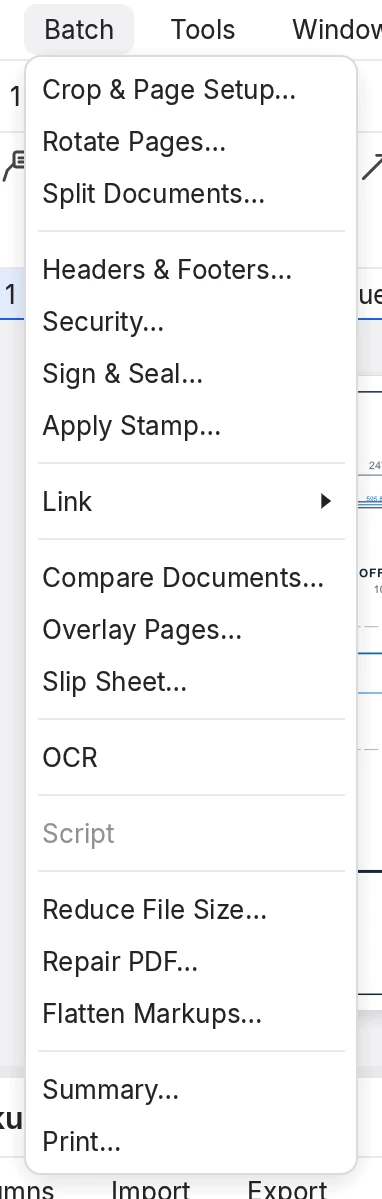
| Job | What it does | |
|---|---|---|
| Crop & Page Setup… | Page Setup changes media size, scale, offset, rotation and alignment; Crop Pages trims each edge. | |
| Rotate Pages… | Turns the chosen pages 90° either way, or 180°. | |
| Split Documents… | Splits each file by page count, file size or top-level bookmarks into new files, beside it or in one output folder. | |
| Headers & Footers… | Adds headers and footers set up in the Header and Footer dialog, or deletes them all. | |
| Security… | Applies passwords and permissions. Leaving out every password removes the files' security. | |
| Sign & Seal… | Dates, seals and digitally signs each file. See Sign & Seal. | |
| Apply Stamp… | Places one stamp on the chosen pages. See Apply a stamp. | |
| Link | Adds hyperlinks wherever chosen terms appear in the page text. See Batch Link. | |
| Compare Documents… | Marks the differences between paired pages, in new files. See Pairs of files. | |
| Overlay Pages… | Overlays paired pages in two colors, one new file per pair. | |
| Slip Sheet… | Puts a new issue's pages into your current files and carries your markups across. See Slip-sheet a new issue. | |
| OCR | Recognizes the text of scanned pages so that it can be searched. | |
| Reduce File Size… | Makes files smaller. A closed file is rewritten only when the result is smaller. | |
| Repair PDF… | Repairs damaged files. | |
| Flatten Markups… | Turns the chosen kinds of markup into page content. Keep Allow Markup Recovery on to be able to unflatten them later. | |
| Summary… | One Markup Summary report for many files. See Markups List and reports. | |
| Print… | Batch Print: many files in one go, with First Page and Last Page to limit each. |
Apply a stamp to many files
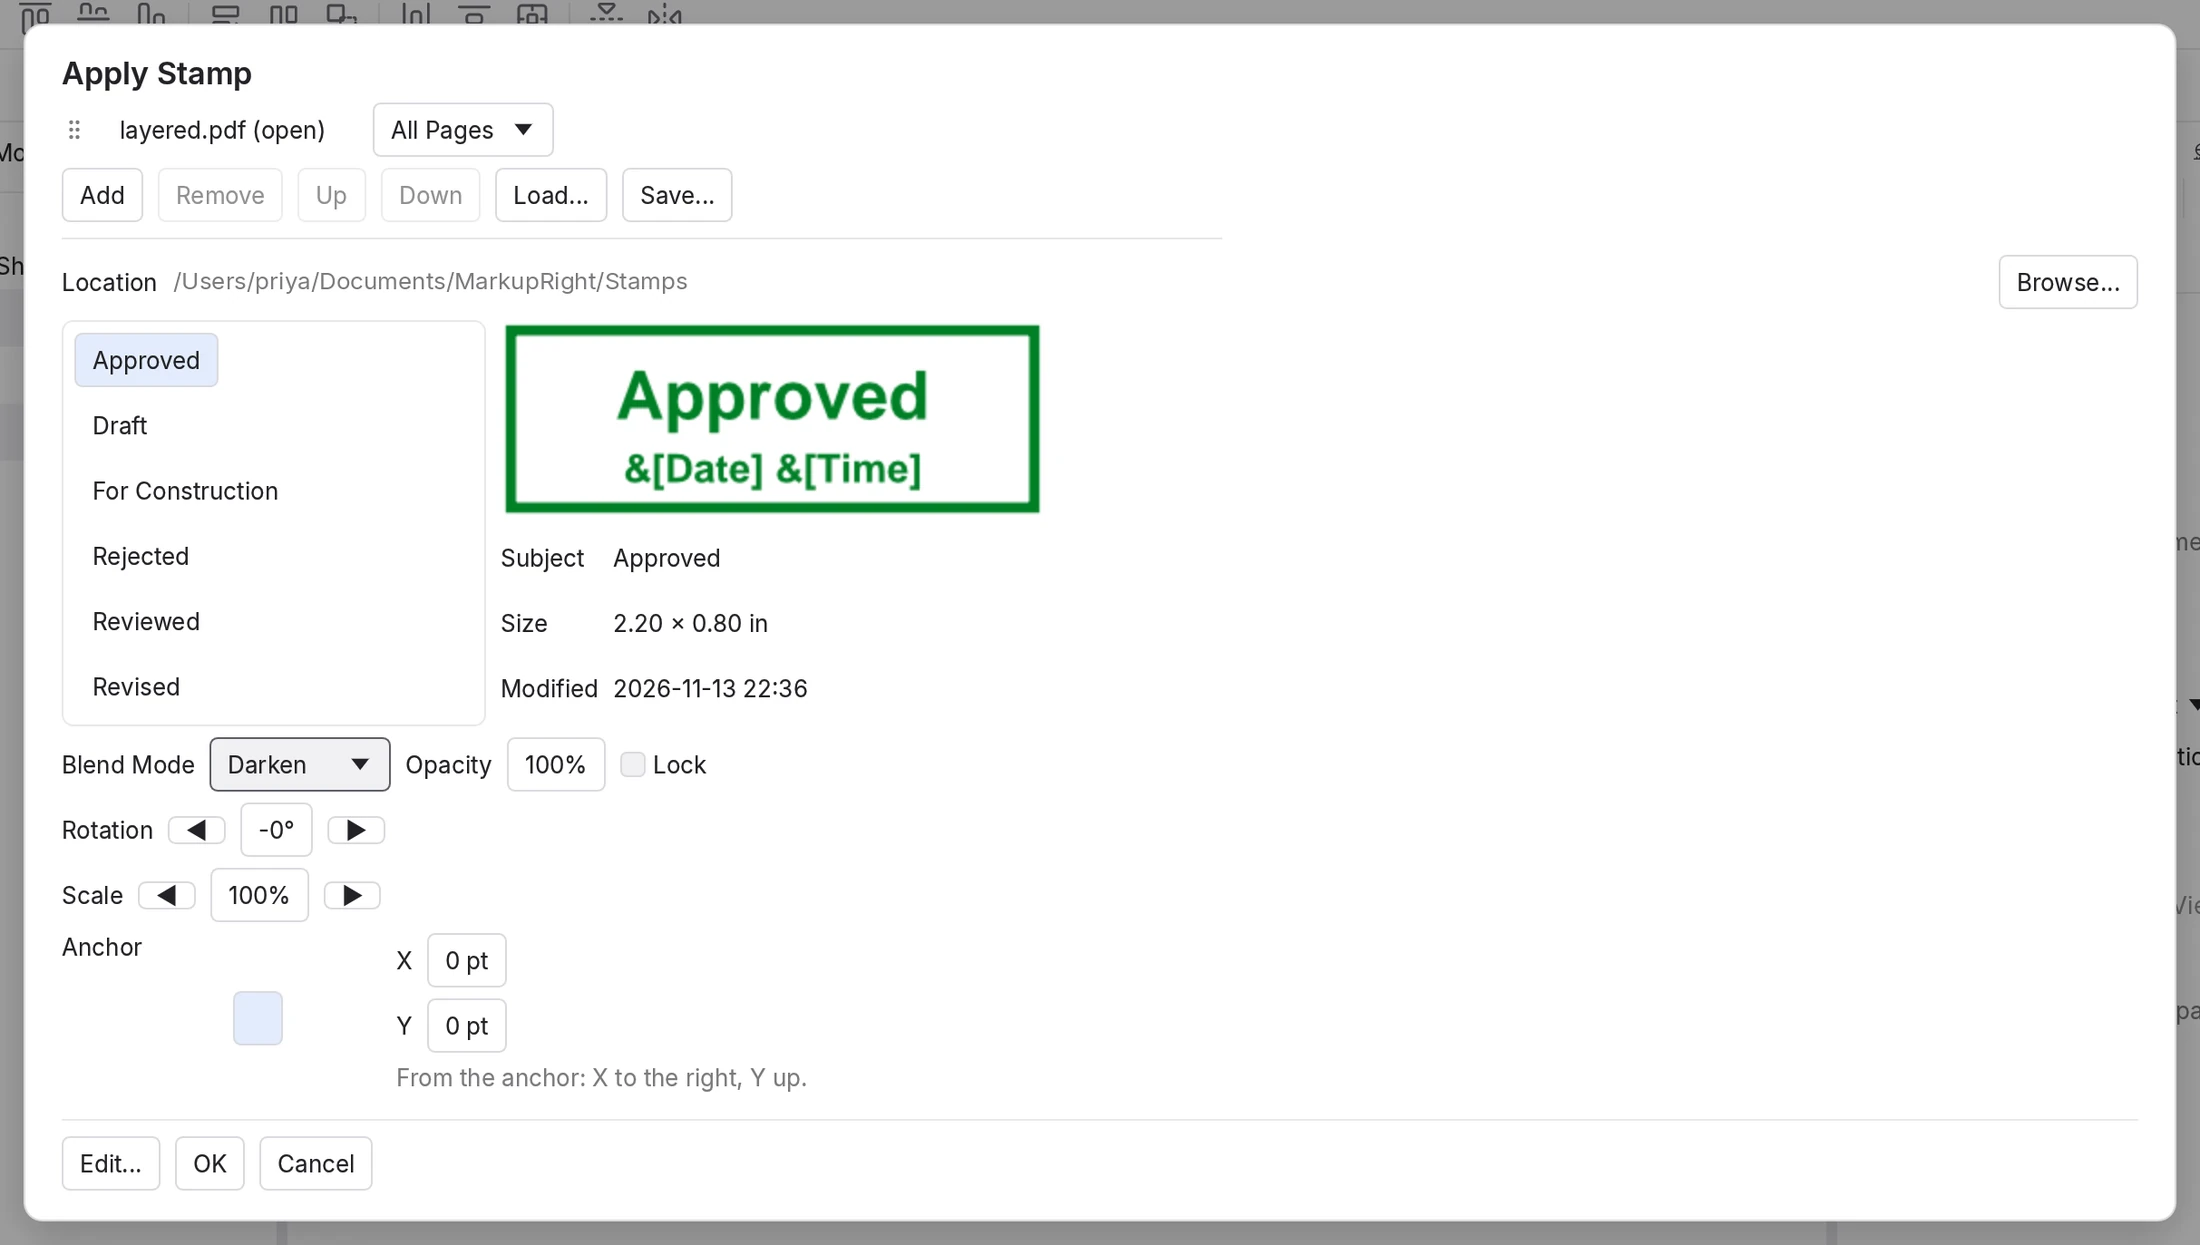
Batch ▸ Apply Stamp… places one stamp, such as Approved or For Construction, on the chosen pages of every file. The stamps come from your stamp folder; to make your own, see Tool Chest and stamps.
 1
2
3
4
5
6
- File list. Each file with its page selector.
- List buttons. Build the list, or reuse a saved
.bcx. - Stamps. The stamps in the Location folder; Browse... picks another folder.
- Preview. The chosen stamp with its Subject, Size and Modified date. Fields such as &[Date] fill in when the stamp is placed.
- Look. Blend Mode, Opacity, Lock, Rotation (in 15° steps) and Scale (in 10% steps).
- Position. The Anchor grid picks the spot on the page (the center at first); X and Y move the stamp from there, in points: X to the right, Y up.
To batch-stamp a folder
- Choose Batch ▸ Apply Stamp….
- Choose Add ▸ Folder... and pick the folder. To stamp only the first page of each file, set each file's selector to Current Page.
- Pick the stamp and choose a spot in the Anchor grid, such as top right. If it needs to clear a border, move it with X and Y.
- Choose OK.
Each file is stamped. Closed files are saved in place, and the summary lists any that were skipped.
Edit... opens the chosen stamp in the stamp editor, but closes this dialog and loses the batch, after a warning.
Pairs of files: compare, overlay and slip sheet
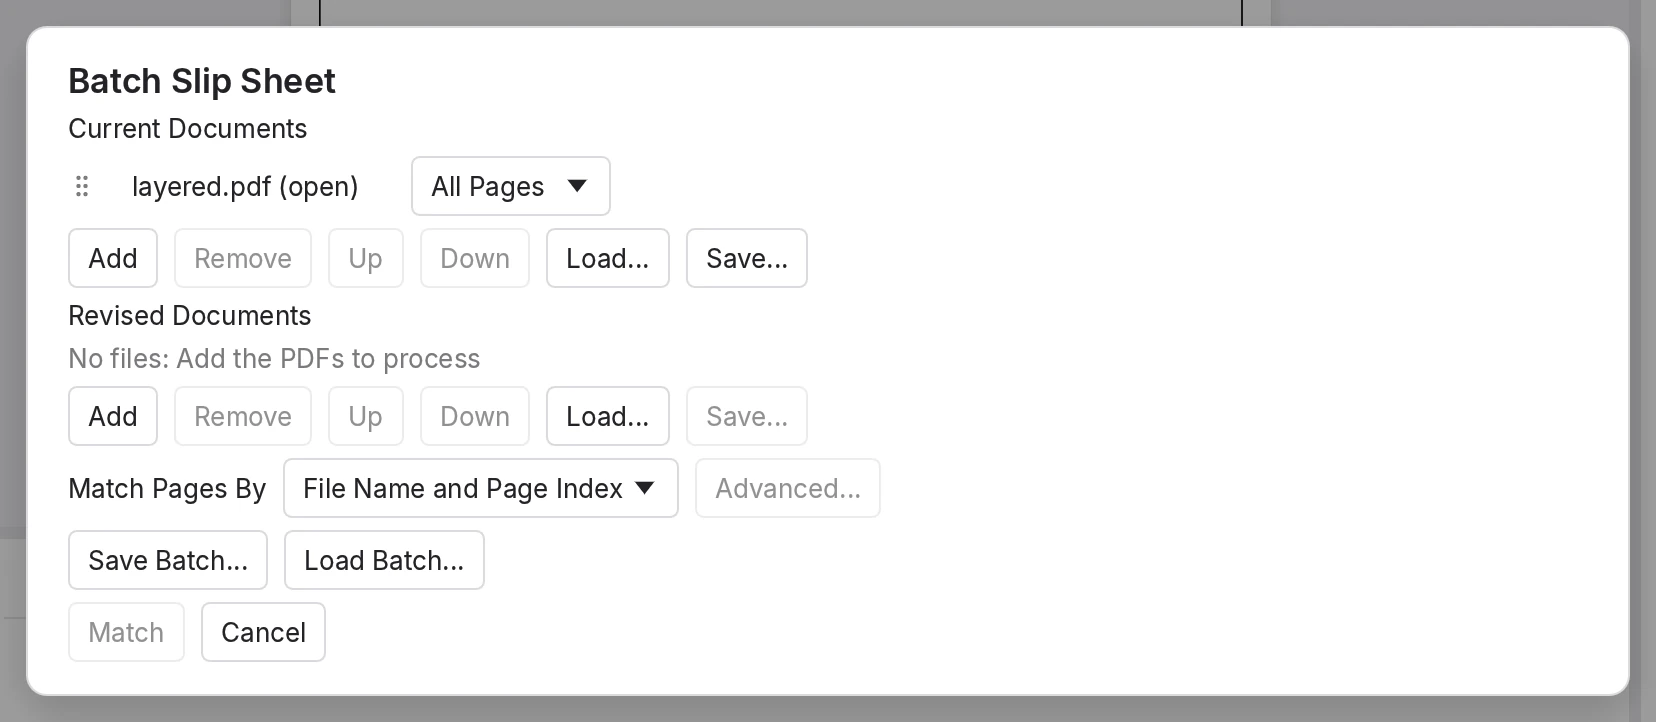
Compare Documents…, Overlay Pages… and Slip Sheet… pair each page of your current files with the page that replaces it in the revised files. Each is a short wizard:
 1
2
3
4
5
- Current Documents. The files you have now.
- Revised Documents. The new issue. Images and text files are converted to PDF.
- Match Pages By. How pages are paired (below).
- Save Batch... and Load Batch... Keep both lists and the matching in one
.bcx. - Match. Pairs the pages and goes on to check them.
| Match Pages By | Pairs a current page with the revised page that has… |
|---|---|
| File Name and Page Index | The same file name and the same position: page 1 of M-101.pdf with page 1 of the new M-101.pdf. |
| File Name and Page Label | The same page label, such as M-101, whatever the files are called. Best when the new issue arrives as one combined PDF. |
| Manual Correlation | Nothing: you pair the pages yourself. |
The next page lists the Matched Pages. A red Conflict means a page matches more than one: choose one under Use:, or Leave Out. Remove drops a pair; drag a revised file onto another row to re-pair it. On Unmatched Pages, click a current page, then a revised one, to pair them. OK stays grayed until every conflict is settled.
- Compare writes each revised file once, as a new file in the Output Folder, with the differences outlined as red clouds or rectangles. See Compare and overlay.
- Overlay writes one new file per pair, named after the current file and page with
_overlayadded. - Neither changes the source files. The last page shows the counts and can Create detailed report as a PDF or CSV file.
Slip-sheet a new issue
Slip sheeting puts each revised page into your current files, in front of or in place of the page it supersedes, and carries your markups across. Your current files change; the revised files don't. The options are on the pairs page:
- Insert Revised Pages before Current Pages (the default) keeps both pages. Stamp Current Pages 'Superseded' marks the old one, and links and bookmarks move to the new page while the Document preference Redirect Links and Bookmarks when Inserting Pages with Slip Sheet is on (the default).
- Replace Current Pages with Revised Pages swaps the page's content, so its bookmarks, links and markups stay where they are.
- Copy Markups from Current Pages to Revised Pages (on), with Unflatten Markups prior to Copy and Flatten Markups after Copy.
To slip-sheet a new issue
- Choose Batch ▸ Slip Sheet…. Under Current Documents, add your working files; under Revised Documents, add the new issue.
- Set Match Pages By to File Name and Page Label, then choose Match.
- Check the pairs and settle any conflicts. Choose Replace Current Pages with Revised Pages, keep Copy Markups from Current Pages to Revised Pages ticked, and choose OK.
- If the new issue has sheets that match nothing, choose Extract Pages to save them as new drawings, or Skip.
The summary counts Slip Sheeted Pages and Markups Copied. Unmatched Pages (Current) counts the sheets the new issue dropped.
- Save the documents that were open; closed files are already saved.
Pages Not Recovered counts pages whose flattened markups couldn't be unflattened for copying.
Batch Link
Batch Link adds invisible hyperlinks wherever a search term appears in the page text, across many files at once. The classic use: make every sheet callout such as “M-101” open that sheet.
- Choose Batch ▸ Link ▸ New…. On Paths, add the documents and folders (Add Open Files, Add..., Add Folder...) and choose Next.
- Choose Page Label (each sheet label links to its page) or Filename (each file name links to its file), then Generate. Settings trims the terms: with First from start and a space as the Filter Character, “M-101 HVAC Plan.pdf” gives the term M-101.
- Check the grid: tick the terms to link and edit their Destination, which can be
B.pdf,page 3 in B.pdf,place "Lobby" in B.pdforweb https://…. Import... and Export... exchange the list as CSV. - Choose Run.
“Batch Link Complete” shows the counts; Details lists each file.
Link Options include Whole Words Only and Use relative paths (both on), Overlap behavior for links already there, and Include Appearance Properties to make the links visible. Pages without text are skipped and counted, so run OCR on scans first. Each document takes 10,000 links at first; Create Them makes the rest. Save Config keeps the setup for Link ▸ Open…; Save to Set keeps it in the open Set.
Sign & Seal
Batch ▸ Sign & Seal… dates, seals and digitally signs a batch of files in one run, for example to issue a set for construction. You need a digital ID first: see Security and signatures.
- Add the files and choose Next. “Each file is dated, sealed and signed, then saved in place.”
- Under Digital Signatures, choose the Type (Digital Signature or Document Certification) and the Digital ID, type its password and choose Log In. Add a Reason if you like.
- Choose the Placement: Manual Placement (drag the box on the preview; it goes in the same place on every chosen page) or Signature Field (the files' empty signature fields).
- Optional: tick Date to add the date in a date field or a box, and Seal to place a stamp.
- Choose Run.
The summary lists each file as Done, Skipped or Failed.
Sign & Seal skips open documents (“close it first”), because it writes each file as it signs it.
Run batches from the command line
Every Batch job can run without the window, from a terminal, a scheduled task or a build script:
markupright batch <feature> --bcx <list> [options]Make the list in any batch dialog with Save...; relative paths in a .bcx are read from its folder. On Windows, type markupright-cli instead of markupright: it is installed beside markupright.exe, shows the output in the terminal and waits for the job to finish. If your terminal can't find the program, give its full path; see Command line and AI agents.
# Rotate the listed pages 90°
markupright batch rotate --bcx issue.bcx --degrees 90

# Stamp each file's top right corner with a stamp from your stamp folder
markupright batch stamp --bcx issue.bcx --stamp ~/Documents/MarkupRight/Stamps/Approved.pdf --anchor top_right

# Secure each file with a saved security preset; set MR_PW first,
# because passwords never go on the command line
markupright batch security --bcx issue.bcx --preset Issue --master-password-env MR_PW

# Slip-sheet a paired list, replacing pages and copying markups
markupright batch slip-sheet --bcx slip.bcx --replace --copy-markups

# Compare a paired list into a folder
markupright batch compare --bcx slip.bcx --out compare-results
The features are rotate, split, headers, remove-headers, security, remove-security, sign-seal, ocr, reduce, flatten, repair, link, slip-sheet, compare, overlay, stamp, page-setup, summary and print. A missing or wrong option prints the usage. Passwords come only from environment variables (the -env options), so they never land in your shell history.
Each file gets one line of output: done, skipped with the reason, or failed with the reason. The exit code tells a script how it went:
| Exit code | Meaning |
|---|---|
0 | The run finished and no file failed. Skipped files are listed but don't count as failures. |
1 | At least one file failed. |
2 | The command was wrong; the usage is printed. |
3 | MarkupRight is in viewer mode, so batch work is turned off. |
For power users Expert
- The
.bcxformat is plain XML with one line per file.pagestakesall,current,view,even,odd,landscape,portraitor a range. A paired list, for compare, overlay and slip sheet, addspairing(index,labelormanual) to the root andlist="revised"to each revised file.
<markupright-batch version="1" pairing="label">
  <file path="issue1/M-101.pdf" pages="all"/>
  <file path="issue2/M-101.pdf" pages="all" list="revised"/>
</markupright-batch>- Remembered settings live in your preferences file:
batch.default_page_selector,batch.link.recentandbatch.open_output_after. Slip Sheet's link redirect isdocument.redirect_links_on_slip_sheet. - Automation tools.
batch_runruns any Batch job over closed files, and the otherbatch_*tools cover stamps, page setup, Sign & Seal, pairing, compare, overlay, slip sheets and Batch Link. See Command line and AI agents. - Sets. Add ▸ Open Set... feeds a whole drawing set to any batch, and a stacked sheet's revisions open in the compare and overlay wizards already paired. See Sets and drawing logs.
- After Reduce File Size, pages with flattened markups can't be unflattened.