Collab
Collab connects MarkupRight to your organization's Collab server. Keep a project's drawings in one shared place with check-out and revision history, or review them together in a live Session where everyone's markups appear as they're drawn.
- You'll learn
- How to connect and sign in, share Project files, check them out and in, and run a live Session.
- Where it lives
- The Collab panel: Window ▸ Panels ▸ Collab Alt+C
- You need
- A Team licence, the desktop app and your Collab server's address.
What Collab is
Collab has two parts, both in the Collab panel:
| Projects | Sessions | |
|---|---|---|
| For | Keeping a project's PDFs in one shared place. | Reviewing drawings together, live. |
| Who changes a file | One person at a time: whoever has it checked out. | Everyone at once, but only markups. |
| What you keep | Every revision of every file. | Every markup, written into the documents when the host finishes. |
Collab comes with a MarkupRight Team licence and runs in the desktop app. Otherwise the panel says “Collab comes with a MarkupRight Team licence” or “Collab needs the MarkupRight desktop app”. Your organization runs its own Collab server; ask your administrator for its address.
The Collab panel
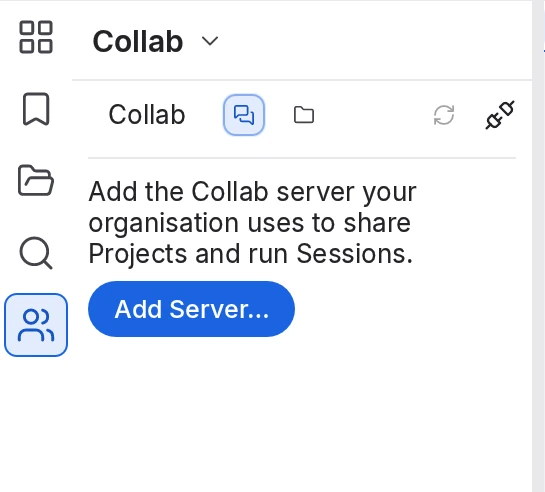
Open the panel with Window ▸ Panels ▸ Collab or Alt+C. Until you add a server, it offers one button:
 1
2
3
- Toolbar. The account menu (“Collab” until you sign in, then your name), then Sessions and Projects.
- Refresh and connection. Refresh reloads the lists; the plug shows Connected or Not connected.
- Add Server… The first step: connect the panel to your server.
Once you're signed in, the panel lists your Sessions or your Projects, each split into Joined and Not Joined. Not Joined holds your invitations.
Collab's commands have no menu entries. Use the panel, or press Ctrl+K for Find Tools + Commands and type the command's name, such as New Collab Session… or Check In….
Connect and sign in
To connect to your Collab server
- In the Collab panel, choose Add Server….
- In Add a Collab Server, type the address your administrator gave you and choose Add Server. It must be an
https://address. - In Sign In to Collab, type your Email and Password and choose Sign In.
Your name appears on the account menu, and the panel lists your Sessions.
New to the server? Choose Create an account… instead, fill in Email, Your name and Password, and choose Create Account. If the server checks addresses, it emails you a code: type it in Confirm Your Email, choose Confirm, then sign in.
You stay signed in when you quit and restart. The account menu lists your Collab Servers, so you can switch between them, and has Sign Out. Collab signs in with an email address and password; single sign-on isn't available in this version.
Projects
A Project is a shared set of folders and PDFs on the server. Every file keeps all its revisions, and only one person can change it at a time: whoever has it checked out. Choose Projects to list yours; opening an invitation from Not Joined joins that Project.
| Permission | What it allows |
|---|---|
| Read | Open files read-only and look through their revisions. |
| Read and Write | Also upload files, create folders, check files out and in, and restore an earlier revision. |
| Full Control | Also invite people, make share links, and delete files and folders. |
To create a Project and add files
- Choose Projects, then New Project…. Type a Project name and choose OK.
- Open the Project. To organize it, choose New Folder….
- Choose Upload Files… and pick PDFs.
Each file appears at its first revision: “M-101.pdf · rev 1”.
Right-click a folder for New Folder…, Upload Files… and Delete Folder. ‹ Projects takes you back to the list.
Invite people
Invite… (Full Control) opens Invite to Project. Type email addresses, separated by commas or lines, choose a Permission (Read and Write at first) and choose Invite. The notice says how many people were invited; anyone without an account gets the invitation when they create one. A permission applies to the whole Project: folder permissions and groups can't be set from MarkupRight.
Check out, edit and check in
Each file shows its revision, such as “M-101.pdf · rev 3”, and an icon for its state:
| Tooltip | Meaning | |
|---|---|---|
| Checked out by you, Checked out by a name | Someone is changing the file; others can open it read-only. | |
| Checked out by a name (lapsed) | The holder's MarkupRight hasn't renewed the check-out lately, for example because it's offline. The file stays checked out to them. | |
| On this computer | The latest revision is already downloaded. | |
| Not downloaded yet | It downloads when you open it. |
To change a Project file
- Right-click the file and choose Check Out.
The file opens for editing, and others see it as checked out by you.
- Make your changes and save them Ctrl+S. Check In sends the saved file, so save first.
- Right-click the file and choose Check In…. Add a Comment; tick Keep it checked out to carry on working. Choose Check In.
“Checked in as revision 4”. The file is free for others, unless you kept it checked out.
Undo Check Out discards your changes and frees the file. Open (read-only) shows the latest revision without checking it out: the notice reads “M-101.pdf is read-only: Check Out to edit it”, and Save becomes Save As. Double-clicking a file opens it read-only too, or opens your working copy if you have it checked out.
Revision history
Revision History… lists every revision with its author, date and comment. Open shows an earlier revision; Restore makes it the newest again as a new revision (“Restored as revision 5”), so no history is lost. Restoring needs Read and Write, and can't happen while someone else has the file checked out.
Share links
To send a file to someone outside the Project, right-click it and choose Share Link… (Full Control): “Anyone with the link can download the file (read-only).” Set Expires after (days, empty for never), which starts at 7, and an optional Password, then choose Make Link. The link is shown once, so choose Copy before you close the dialog.
MarkupRight has no command to withdraw a share link, so give each link an expiry and, for sensitive drawings, a password.
Delete files and folders
Delete (Full Control) removes a file that nobody has checked out, and Delete Folder removes a folder. The server keeps deleted items for the Project's retention period, but MarkupRight has no command to bring one back, so delete with care.
Sessions
A Session is a live review. The host shares PDFs and invites people, and everyone who joins sees everyone's markups as they're drawn. For example, Marcus T. hosts a coordination review of M-101, and Priya S. and Arjun K. mark it up from their own offices.
To start a Session
- Open the PDFs you want to review.
- In the Collab panel, choose Sessions, then New Session….
- Type a Session name, tick the documents to share under Documents (open in MarkupRight):, and type the attendees' email addresses under Invite.
- Under Attendees may:, choose what others can do. Add and change markups, Save the documents and Print are on; Add documents is off.
- Choose Start Session.
The shared copies open, and the panel shows the Session's name and ID, such as “M-101 Review - 123-456-789”.
The host can invite more people with Invite… under Attendees. Anyone can share the ID: open the menu on the Session's name and choose Copy Session ID.
Join a Session
An invitation appears under Not Joined in the Sessions list: choose Join. Or choose Join Session…, type the nine-digit Session ID, such as 123-456-789, and choose Join. The Session's documents open as shared copies. You can be in one Session at a time; Leave is on the Session's menu.
During a Session
- Attendees shows who's Online and Offline, marked “(you)” and “· host”, and the document and page each person is on.
- Documents lists the shared PDFs. Add the document in front shares another, if the host allows it.
- Record shows who added, changed or deleted which markup, who joined, and the chat. Filter narrows it to Chat, Markup, Document, Attendee or Alert. Type in the chat box and press Enter to talk to everyone.
- Notifications holds markup alerts sent to you, and Pending the changes not yet sent.
Session Record Report, on the Session's menu, saves the Record as a PDF at any time.
Who can change what
- Only markups are shared. Page and content edits are refused in a shared document; to change the rest, check the file out of its Project.
- Your markups are yours. You can change or delete only your own markups, and the host can change anyone's. Otherwise you see, for example, “that markup is Priya S.'s: in a Collab Session only its author or the host can change it”. Undo takes back only your own changes.
- The host sets the rules. Session Settings… turns markup, saving, printing and adding documents on or off for attendees at any time.
- Some files can't be shared. A PDF certified to allow no changes can't be marked up in a Session.
- No save prompts. Shared documents don't ask to be saved when you close them.
Finish a Session
When the review is done, the host chooses Finish Session… on the Session's menu. The dialog explains what happens: “Finishing writes every markup into the documents: a Project file gets a new revision, a local file a download. The Session then closes for everyone; its Record stays.” Also make a report of the Record (PDF and CSV) is ticked at first. Choose Finish Session.
While it works, the panel says “Finishing: markups are being written into the documents”, then “This Session is finished. Its results:”. If something goes wrong, it says “Finish failed; the host can try again”.
Working offline
- In a Session, a lost connection shows “Collab is offline: changes wait in Pending and go when it is back”. Keep working: your changes wait in the Pending tab, even if you quit, and are sent once when the connection returns.
- Refused changes also wait in Pending, with Keep as New Markup and Discard.
- In a Project, a check-in made while the server can't be reached waits (“The server can't be reached: the check-in waits and goes when it is back”). Projects then lists Pending check-ins with Send Now, and MarkupRight also tries again every five minutes.
- Your check-outs stay yours while you're away. While you're signed in, MarkupRight renews them every five minutes; after 15 minutes without a renewal, others see “(lapsed)” after your name.
The message ends “Use Save As on your copy, then Undo Check Out.” Do it in that order, so that your changes are safe in a file of your own.
For power users Expert
- Every command in Find Tools + Commands: Manage Collab Servers…, Sign In to Collab…, Sign Out of Collab, New Collab Session…, Join Collab Session…, Invite to Session…, Add Document to Session, Session Settings…, Session Record Report, Finish Session…, Leave Session, New Collab Project…, Upload to Collab Project…, Check Out, Check In…, Undo Check Out, Revision History…, Share Link… and Collab Notifications. A grayed command says why, such as “Sign in to Collab first” or “Only the Session's host can do that”.
- Where Collab keeps files. Downloaded revisions, working copies and changes waiting to be sent live in the
Collabfolder of MarkupRight's data folder:%LOCALAPPDATA%\MarkupRight\Collabon Windows,~/Library/Application Support/MarkupRight/Collabon macOS,~/.local/share/MarkupRight/Collabon Linux. - Timings. The lists refresh every minute. Check-outs are renewed, and waiting check-ins retried, every five minutes; a check-out's lease lasts 15 minutes.
- Signatures survive Finish. Markups are written as an incremental save, so signatures already in a document stay valid.
- Automation. With a Team licence, 25
collab_*tools cover servers and accounts, Projects, check-out and check-in, revisions, Sessions and notifications. See Command line and AI agents. - Tidy your lists. Right-click a Session or Project and choose Remove From List.